Showing posts with label July-Dec. Mini. Show all posts

Tuesday, October 17, 2023

Yellow Oak Thanksgiving - Stampin' Up! Autumn Leaves

   Last weekend we drove up through the Shenandoah Valley and we saw the start of some beautiful fall colors.  The colors haven't hit their peak in our area just yet so we enjoyed the preview and look forward to seeing it closer to home!

  In the meantime I'm using the colors at The Color Hues to re-create some autumn oak leaves.  They are having us use Yellow and Kraft which I translated to Crushed Curry, Lemon Lolly and Crumb Cake.


  I started with a Crumb Cake base and then a layer of Very Vanilla embossed with the Distressed Tile embossing folder.  I fear I'm a one trick pony when it comes to embossing folders lately.  This one is my absolute favorite right now and shows no signs of slipping in the rankings!  If you follow me on Instagram (@didyoustamptoday) you might have seen my recent reel about being obsessed with this folder!

  Next I sprayed a bit of water onto Fluid 100 watercolor paper to make it damp then inked up the oak leaf stamp from Autumn Harvest.  I stamped 3 in Crushed Curry and 3 in Lemon Lolly.  The wet paper softens the image and blurs the edges just a bit.  I then die cut them along with the veins.

  The veins are adhered to the leaves and then the leaves are adhered to the card front with Tear and Tape to make sure they stick well in case they are still a bit damp.  Once they were arranged in a wreath shape I got to work on the sentiment.  

  I wanted a sentiment to go across the wreath but not cover up too much of it.  The sentiments in the Autumn Leaves set didn't have one that worked so I pulled this one from the Pick of the Patch set.  It was the perfect size.  I stamped it in Crumb Cake on Very Vanilla and added a bit of retired ribbon underneath and then popped it on dimensionals over the wreath.

  A few adhesive-back speckled dots are the final touch to finish this fun fall card.

  All of the current items used to make this card can be purchased in my ONLINE STORE.

  Thanks for looking!  Did you stamp today?

Stamps: Autumn Leaves, Pick of the Patch

Ink: Crushed Curry, Lemon Lolly, Crumb Cake

Paper: Crumb Cake, Very Vanilla, Fluid 100 watercolor paper

Accessories: Autumn Leaves dies, Distressed Tile embossing folder, dimensionals, adhesive-backed speckled dots, fine art ribbon (retired)


Thursday, December 8, 2022

Merry Christmas Basics - Stampin' Up! Spruced Up

   This card has all the basics you need to get your Christmas started!  You've got the tree, ornament(s) and a gift.  All finished!  If only it were that easy to be ready for Christmas in real life right?  We made this card at my last class and it showed off 3 of the elements from the Spruced Up Bundle in a clean layout with some texture thrown in for good measure!


  We started this one with a Soft Sea Foam base, then a layer of Basic White behind an embossed piece of Evening Evergreen using the Whimsical Woodland embossing folder.  

  I think one of the essential things you need when working with this set are the adhesive sheets found on page 127 of the annual catalog.  With these sheets you basically turn a piece of cardstock into a sticker so it makes using the thin outline parts of these dies a snap to work with.  The gift and ornament outlines have the the adhesive sheets applied to them and they stick perfectly to the 2 different DSPs.  The silver polka dot design is the Sale-a-Bration reward Silver & Gold Specialty paper from this past summer.  The little hearts/knitted design is found in the Happy Forest Friends DSP.

  The tree is stamped in Soft Sea Foam and die cut then popped with dimensionals.  We decorated it with a Daffodil Delight star and some rhinestones colored with the Evening Evergreen Stampin' Blends marker.  Some iridescent trim decorates the ornament as does the little sentiment from the Christmas To Remember set.

  This is probably my last Christmas card of 2022 as I've shared all the ones that I have made and I still have a handful left in my stash for last minute needs so I don't think I'll be making any more. That is unless I get some awesome idea I just have to make!

  Thanks for looking!  Did you stamp today?

Stamps: Spruced Up, Christmas to Remember

Ink: Soft Sea Foam, Evening Evergreen

Paper: Soft Sea Foam, Evening Evergreen, Basic White, Blushing Bride, Happy Forest Friends DSP, Silver & Gold Specialty paper (retired-SAB), Daffodil Delight

Accessories: Whimsical Woodland embossing folder, dimensionals, Spruced Up Outlines dies, rhinestones, Iridescent trim

Wednesday, December 7, 2022

Ornament Aglow - Stampin' Up! Lights Aglow DSP

   Do you have a lot of narrow DSP strips that you're holding onto but don't know how to use them?  Want a cool way to use them up for a Christmas card?  Check this one out!


  I started with a Very Vanilla thick card base.  Then I embossed a piece of Soft Succulent with the Merry Melody embossing folder.  To highlight the embossed pattern I brushed a retired gold ink pad across the whole panel to give it a nice gilded look.

  Now on to those strips!  Start with a piece of Very Vanilla that's slightly larger than the circle die you want to use.  I used the largest circle in the Stylish Shapes die set.  Next get your strips of DSP ready.  Add dimensionals to the strips and layer them evenly down the piece of Very Vanilla leaving equal spacing between them. Now cut the circle from the panel of DSP pieces.  If any of your DSP is not securely adhered because where you had the dimensional placed got cut off just add another one to get it adhered. trim them down if you need to.

  I used the little ornament hanger die from the Spruced Up Outlines die to cut a piece of Metallic Gold paper for the top of the ornament.  A gold ribbon knot finishes the ornament.  The whole ornament is popped on the card front with dimensionals.

  The sentiment from  Inspired Thoughts is stamped in Evening Evergreen and cut out with a smaller Stylish Shapes circle and added with yet more dimensionals!

  No excuses now not to use up all those skinny pieces of DSP!

  Thanks for looking!  Did you stamp today?

Stamps: Inspired Thoughts

Ink: Evening Evergreen, Gold

Paper: Very Vanilla thick, Very Vanilla, Soft Succulent, Lights Aglow DSP, Metallic Gold

Accessories: Merry Melody embossing folder, Stylish Shapes dies, dimensionals, Spruced Up Outlines dies, gold ribbon

Tuesday, December 6, 2022

Flurry for New Years - Stampin' Up! Joyful Flurry

   It's nice to have a few Happy new Years cards in your stash as December gets underway so you're ready to go.  I designed this one for my last class and I made a few extras for myself.


 And it's easy enough to swap out a Christmas sentiment instead of the New Years one in case you find yourself short a card or 2 for that stack of Christmas cards.

  This one starts with a Basic White thick card base.  Next is a layer of Starry Sky (such a pretty color!) stamped with snowflakes from the Joyful Flurry set in the same color of ink.  Using the Stylish Shapes dies a circle is cut out of one side of the panel.  On the back of the Starry Sky layer I adhered a piece of the Snowflake Specialty vellum paper.  You could just cut the vellum in a circle but the extra detail of the bit of stitching around the opening is a nice touch and also keeps you from having to be careful with your adhesive so it doesn't show through the vellum as you put the adhesive on the Starry Sky layer.

  Next, a silver snowflake is stamped and embossed on a piece of Fresh Freesia and cut out.  It's popped on dimensionals along with the sentiment stamped in Starry Sky.

  Finally all the "extras" are added on.  2 small snowflakes are cut out of the white glimmer paper and are added to the card front.  A few Fresh Freesia sequins and Adhesive Backed Iridescent stars add some shine and shimmer. And finally a Metallic Woven ribbon bow is added to the edge of the sentiment.

  Thanks for looking!  Did you stamp today?

Stamps: Joyful Flurry

Ink: Starry Sky, Versamark

Paper: Basic White thick, Basic White, Fresh Freesia, Snowflake Specialty Vellum, white glimmer paper

Accessories: Stylish Shapes dies, Frosted Flurry Dies, dimensionals, Adhesive baked stars, sequins, Metallic Woven ribbon

Friday, December 2, 2022

Mini Gift Bag Pop-Up Card - Stampin' Up! Christmas Season

   I taught my stampers how to make this adorable fun fold pop-up card the other day at class.  The mini gift bag is the perfect size to hold a gift card so it is great design for this time of year.  Think of all the teacher gifts you need to have ready to go in just a few weeks!  I've created a step by step video showing how to make the mini gift bag and how to get it to pop up inside your card.  

front of card
 
Inside of card

  Check out the video to see how to make your own mini gift bag pop-up card!  The measurements and step by step instructions are also below. 


 For the mini gift bag you'll need:

1 piece of Designer Series Paper cut 4" x 9.5"

Tear and Tape

paper snips

Simply Scored or scoring tool

2 - 5" length of coordinating ribbon

a finished coordinating card 

Instructions:

  1. Score down the long sides at 1/2” & 3”
  2. Turn cardstock 90° to score the short side
  3. Score at 1/2”, 1”, 4.5”, 5”, 5.5” and 9”
  4.  Snip out the scored tabs (see sample) where the narrow score marks intersect to make assembling the bag easier
  5.  Pre-fold score lines to make the gussets for the sides of the bag
  6. Leave the top 1” flaps up and then punch the holes for the ribbon handles through both layers at once.  The holes should be about 1 inch from the gusset sides of the bag
  7. Thread ribbon through the holes and tape down with Tear & Tape on the inside of the bag.  Peel off the backing paper and fold down the top flaps to cover the ribbon ends.
  8.  Add Tear & Tape to the small flaps at the bottom of the bag on the outside pattern***DO NOT PEEL OFF BACKING PAPER YET!!****

  9. Add Tear & Tape to the small flap on the side of the bag on the outside pattern

  10. Fold bag lining up the gusseted ends. Peel off the backing paper and adhere the flaps to complete the gusset

  11. Once your card is made, center the mini gift bag along the center fold and peel off ONE backing of the Tear Tape, press down to secure.  Peel off the second backing of Tear Tape and close card to adhere the last flap. 


  I hope you have fun making this card on your own!  

  Thanks for looking!  Did you stamp today?

Stamps: Christmas Season, Sweet Candy Canes

Paper: Garden Green, Basic White, Peaceful Prints DSP (retired, SAB) **in the video I use Sweetest Christmas DSP**

Ink: Garden Green, Real Red

Accessories: Candy Canes dies, dimensionals, ribbon, Seasonal Adhesive backed sequins, tear & tape, Simply Scored/scoring tool

Thursday, December 1, 2022

Jolly Christmas Lights - Stampin' Up! Jingle Jingle Jingle

   Who has their tree up already?  Do you go for white or colored lights?  We brought our tree in today and we'll get the lights on it tonight or tomorrow and then decorate.  We always do white lights on our tree but put some colored ones outside in the yard so I get the best of both worlds.  I think the way to go these days is get the fancy strands that have the remote where you can change from white to colors depending on what you feel like that moment!

  My card today has a ton of lights and I was so paranoid that I was going to mess up and do the colors in the wrong order.  Not that I think anyone would notice but me but I wanted to get them just right!


  I only made 5 of these because they were a bit labor intensive with the lights and then the fussy cutting of the letters.  And also it works out to 5 if you stamp the word Jolly in each of the 5 colors I used on the card so I didn't have any leftover pieces so there's that!

  I started with a Pool party base, then a layer of Garden Green topped with some Basic White.  I stamped the light strands in Basic Gray and then filled them in with my colors; Pool Party, Sweet Sorbet, Coastal Cabana, Flirty Flamingo and Garden Green.

  The outline of the Jolly is stamped in Basic Gray and like I said I did it 5 times then filled in each with a different color then fussy cut and mixed and matched them on the 5 cards.  I popped them with trimmed down bits of dimensionals on a Basic White strip backed with some Sweet Sorbet.

  The "'tis the season to be" is stamped in Versamark on Garden Green and then embossed in white.  It is also popped on dimensionals.

 I added 2 die cut stars in Silver Glimmer paper and put a Sweet Sorbet baker's twine bow in the center of one.  

  Thanks for looking!  Did you stamp today?

Stamps: Jingle Jingle Jingle

Ink: Versamark, Pool Party, Sweet Sorbet, Coastal Cabana, Flirty Flamingo, Garden Green

Paper: Basic White, Sweet Sorbet, Garden Green, Sliver Glimmer paper

Accessories: baker's twine, dimensionals, Spruced Up Outlines dies (stars), White embossing powder

Wednesday, November 30, 2022

Pink Poinsettias - Stampin' Up! Ringed With Nature

  Today's card is another one I designed to make at the Saturday craft day I attend 2 weeks ago.  I made 8 of these really love how they turned out.


   There was quite a bit of fussy cutting for this design but it went quickly while chitchatting with the other crafters!  I started with a base of Basic White base then a layer of retired Peaceful Prints DSP in a plaid Crumb Cake pattern.

  Next I embossed a panel of Basic White with the Tree Rings Hybrid Embossing folder.  I did the same with some Crumb Cake and Soft Suede cardstock as well to make the tree ring for part of the focal image. I also added the little die that makes the split lines in the center.

  The branches are die cut in Evening Evergreen.  I inked one poinsettia in Blushing Bride with Flirty Flamingo sponged in the center with a sponge dauber.  The other one is inked in Sweet Sorbet with Cherry Cobbler sponged in the center.  I used my gold Wink of Stella pen to add stamens. Once they were fussy cut I popped them up on dimensionals over the branches and wood cut.
  
  I tucked a piece of Evening Evergreen Windowpane Checked ribbon behind the flowers and added a linen thread bow under the lower flower.  The sentiment is stamped in Cherry Cobbler and fussy cut and popped on dimensionals.  Two small rhinestones accent the sentiment as the final touch.

I love how crisp and clean this one came out.  The fussy cutting was worth it!

  Thanks for looking!  Did you stamp today?

Stamps: Ringed With Nature

Ink: Cherry Cobbler, Flirty Flamingo, Sweet Sorbet, Blushing Bride

Paper: Basic White thick, Basic White, Evening Evergreen, Soft Suede, Crumb Cake, Peaceful Prints DSP (retired SAB)

Accessories: Hybrid Tree Rings embossing folder/dies, dimensionals, Wink of Stella, Evening Evergreen Windowpane Checked ribbon, rhinestones, linen thread

Monday, November 28, 2022

Very Merry Tree Lot - Stampin' Up! Trees for Sale

   We are getting down to the last bunch of Christmas cards that I've made.  This is one I designed to make multiples of to bring to a crafting day last week.  One of my stampers organizes a crafting group in her church to bring people together to work on their craft while sharing some fellowship.  It was a wonderful day to focus on projects I wanted to work on all the while chatting with a super nice group of ladies.  

  I designed and cut all the supplies for several projects (making multiples of each design) and then stamped and put them together at the event.  It was like designing a stamp club just for me!  The Trees for Sale and Tree Lot dies (from this past Sale-a-Bration) was so fun to use.  I created a cute little scene in classic Christmas colors.


  I started with a Crumb Cake base and then used some DSP from Sale-a-Bration from last year called Peaceful Prints.  Next I stamped the trees across a layer of Basic White.  The first layer of the trees are stamped-off Garden Green and then the detail layer is full strength Garden Green.  I used Real Red to add the ornaments to the large tree on the right.

  Next I cut out all the piece for the little camper.  The base is Pool Party, the white accents are White Glimmer paper.  I used my Blends markers in Black and Smoky Slate to color the wheel, hubcap, hitch and door handle.  Real Red is used for the itty bitty curtain and Garden Green is the wreath.  And finally Real Red Glimmer paper is used for the bow.  That was a lot of die cutting but it was so worth it because I think it turned out so cute!  And I only made 8 of this design so it was do-able in an assembly line!

  The final touch is the sentiment stamped on Crumb Cake in Garden Green ink and then cut out using the little sign die.  The camper and sign are both popped up on dimensionals.

  I hope you're almost finished with your Christmas cards too!  Keep plugging away and remember to have fun with them!

  Thanks for looking!  Did you stamp today?

Stamps: Trees for Sale, Itty Bitty Christmas (retired)

Ink: Garden Green, Real Red

Blends: Basic Black dark, Smoky Slate dark

Paper: Crumb Cake, Basic White, Pool Party, White Glimmer Paper, Real Red Glimmer Paper, Real Red, Garden Green, Peaceful Prints DSP (SAB retired)

Accessories: Tree Lot dies (SAB retired), dimensionals

Wednesday, November 23, 2022

Frosty Penguin - Stampin' Up! Penguin Place

   I didn't use Penguin Place as much as I wanted to last year when it was in the holiday mini catalog.  And I didn't use it all in class as the punch was unfortunately unavailable for a good part of the sales period.  I was so happy that it carried over to the annual catalog.  It's a cute set for Christmas and winter cards and that cute little face just makes me smile.


  I was playing around with ways to use the Snowflake Specialty Vellum and thought it was a good match for a frosty snow filled card!  I used the Stitched Rectangle dies to cut an opening in a piece of Balmy Blue and then stamped the snowflakes on the frame.  I stamped the little snow hill in Balmy Blue on Basic White and then trimmed it out.  I adhered it to the bottom of the frame and then backed the opening with a piece of the vellum.  It's a fun paper with the iridescent/silvery patterns as well as the white flocked patterns on other sheets.

  The penguin and accessories are stamped and punched or fussy cut and then popped up on the snow.

  I stamped the sentiment in Starry Sky ink on a narrow scrap and then backed it with a piece of silver metallic edged ribbon and popped it on dimensionals.

  Thanks for looking!  Did you stamp today?

Stamps: Penguin Place

Ink: Memento Black, Starry Sky, Balmy Blue, Mango Melody

Paper: Balmy Blue, Basic White, Snowflake Specialty Vellum

Accessories: Stitched Rectangle dies, Penguin punch, dimensionals, silver metallic edged ribbon

Monday, November 21, 2022

Crumb Cake Flurry - Stampin' Up! Joyful Flurry

   The clean and simple challenge over at Perfectly CAS is snowflakes so since I'm still making Christmas cards I decided to play along to add to my stash.


  This is a really simple design using 3 white embossed snowflakes from the Joyful Flurry set that are popped on dimensionals around the stamped sentiment.  I added some adhesive sequins and rounded 2 corners of the card base for some extra detail but this is definitely a clean and simple card with the limited color palette and open space.

Definitely consider a CAS design if you're tight on stamping time for your Christmas cards.  You don't have to have a card with 7 layers for it to be beautiful!  Also, switch in a Happy New Years sentiment and mail it out in January!

  Thanks for looking!  Did you stamp today?

Stamps: Joyful Flurry

Ink: Versamark, Real Red

Paper: Crumb Cake, Basic White

Accessories: white embossing powder, Frosted Flurry dies, adhesive seasonal sequins, dimensionals


Friday, November 18, 2022

Spruce & Purple Christmas - Stampin' Up! Spruced Up

   Today's card uses a color combo I had written down a while back to try 'someday.'  Highland Heather, Fresh Freesia and Shaded Spruce (and I threw in some retired Just Jade because the DSP just worked out!).  I thought eventually I would have a good idea for it.  I hadn't used the ornament stamps in the Shaded Spruce set very much so I wanted to give them a try and these colors seemed like a good match.

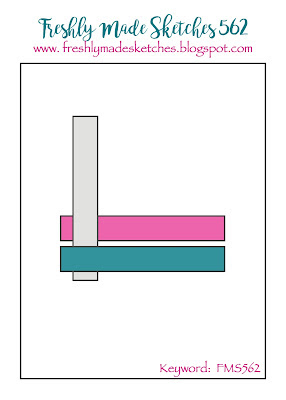
  I used the sketch from Freshly Made Sketches for my layout.  I hope it's fresh enough!


  The base is Shaded Spruce, then another layer of Shaded Spruce embossed with the Whimsical Woodland embossing folder.  I splattered it with bit of white craft ink.  I just put a few drops of reinker in a shallow dish and then dripped a few drops of water from a waterpainter into the dish to thin the mixture a bit.  Then I loaded up the brush tip and tapped the barrel of the waterpainter to flick the drops across the panel.  I set it aside to dry while I did the rest of the card.

  I pulled the DSP strips from the retired Penguin Playmates DSP from last year as well as a strip of Highland Heather cardstock. 

  The large ornament is stamped in Highland Heather and then die cut.  I cut a second shape in Gold Glimmer paper to frame it out.  

 The 'Merry' from Christmas to Remember is stamped in Versamark then embossed with gold on Just Jade cardstock.  I cut it out as well as a second Gold Glimmer paper one with the matching die.

  Both ornaments are added to the card front with dimensionals.  White crinkled seam binding ribbon fork bows (see the tutorials tab on the sidebar to learn how to make a fork bow) are added to the tops and some Elegant Faceted gems are sprinkled across the card front as well.

  Keep working on those Christmas cards!  Plenty of time left to get them made!

  Thanks for looking!  Did you stamp today?

Stamps: Spruced Up, Christmas To Remember

Ink: Highland Heather, Versamark, white craft

Paper: Shaded Spruce, Basic White, Gold Glimmer, Just Jade (retired), Highland Heather, Penguin Playmates DSP (retired)

Accessories: Spruced Up Outlines dies, Whimsical Woodland embossing folder, gold embossing powder, dimensionals, crinkled seam binding ribbon, Elegant Faceted gems


Thursday, November 17, 2022

Vintage Candy Canes - Stampin' Up! Sweet Candy Canes

   I'm squeaking in just under the wire for the TGIF Challenges today!  I combined their fun sketch with the colors over at Hand Stamped Sentiments.  I loved the vintage feel to this color combo and I played it up with a layers and distressing.


  The base is Very Vanilla thick and then a slightly smaller layer of Soft Succulent.  I distressed the top and bottom edges, stamped the big Snow Crystal snowflake in Evening Evergreen and then added some more shading with a blending brush and Soft Succulent ink.

  The candy canes are stamped in Cherry Cobbler and die cut. I sponged a tiny bit of Crumb Cake ink around the edges to soften them a bit. Next, I layered them behind the sentiment that's accented with a piece of gold ribbon and popped on dimensionals.

  I cut a snowflake from Gold Shimmer paper and added that to the edge of the sentiment with a mini dimensional.  I finished off the details with a linen thread bow on the candy canes and then some retired red shimmer dots.

  I really like how this one came together with the fun sparkle and vintage feel.

  Thanks for looking!  Did you stamp today?

Stamps: Sweet Candy Canes, Snow Crystal

Ink: Cherry Cobbler, Soft Succulent, Evening Evergreen

Paper: Very Vanilla thick, Very Vanilla, Soft Succulent, Gold Glimmer paper

Accessories: Candy Canes dies, Frosted Flurry dies, Gold Shimmer ribbon, dimensionals, linen thread, red shimmer adhesive dots


Monday, November 14, 2022

Give Thanks with Nature - Stampin' Up! Ringed With Nature

   We made this fall/Thanksgiving inspired card at my last Quick & Easy card class.  There is definitely still time to make and send some Thanksgiving cards especially when they are really easy like this one!  The Sale-a-bration reward Rings of Love DSP makes this card come together really fast but you could swap it out for any other fall themed paper you have.  


  This one starts with a Crumb Cake card base, then the DSP, then a strip of Crushed Curry cardstock.  The wood cut and little branches were embossed/die cut with the hybrid Tree Rings embossing folder/dies.  They are tucked behind the stamped label.

  The stems of the mushrooms are stamped off once and the sentiment is stamped in full strength ink.  Any long time stampers remember what set this one came from?  It's been long retired and is called And Many More.  I have kept it for years and years because I love the variety of sentiments in it as well as the different fonts.  But any other thanks-giving sentiment would be perfect as well.

  Thanks for looking!  Did you stamp today?

Stamps: Ringed With Nature, And Many More (retired)

Ink: Soft Suede, Poppy Parade

Paper: Crumb Cake, Basic White, Crushed Curry, Soft Suede, Evening Evergreen, Rings of Love DSP (SAB)

Accessories: Tree Rings Hybrid embossing folder/dies, Seasonal Labels dies, dimensionals

Thursday, November 10, 2022

Watercolor Flurry - Stampin' Up! Joyful Flurry

   I made this Christmas card several months ago when it was still hot and humid in my neck of the woods and it just wasn't Christmas card sharing season yet.  And then it got buried at the bottom of my "to share" folder.  Even though it hit 70 today and a tropical storm is on its way I guess it's time to share it before I run out of "days before Christmas".


  This was one of the first cards I made using the Joyful Flurry bundle and while I'm not 100% all in on this color combo taken from the catalog I can say that I love the the dies and and the beautiful snowflake images.

  The colors are used on samples on page 23 of the July-Dec. catalog and were a different color combo to try for Christmas. Pool Party, Shaded Spruce, Blushing Bride and Petal Pink.

  I started with a Pool Party base and then used the dies to cut the snowflakes into a piece of Shimmery White cardstock.  Then I used the water painter to "watercolor" ink over the snowflakes to make them pop.

  The sentiment is embossed in white on a Shaded Spruce Stylish Shapes circle. It's then popped up with dimensionals over a piece of Iridescent Trim.  

  I added a stamped and die cut Pool Party snowflake to the top edge and a small Blushing Bride snowflake to the bottom edge as well as a few Adhesive Backed stars.

  Looking forward to seasonally appropriate weather so sharing Christmas cards doesn't feel so out of place!!

  Thanks for looking!  Did you stamp today?

Stamps: Joyful Flurry

Ink: Versamark, Blushing Bride, Pool Party, Petal Pink

Paper: Pool Party, Shimmery White, Shaded Spruce, Blushing Bride

Accessories: Frosted Flurry Dies, Stylish Shapes dies, dimensionals, adhesive backed stars, Iridescent trim

Friday, November 4, 2022

Soft Spruce Christmas - Stampin' Up! Spruced Up

   I'm continuing to roll through Christmas cards and I used the latest challenge over at Color Throwdown for today's card.  They want us to use mustard, pink and green.  I love the softer color palette and it's always a challenge to use pink! And I figured So Saffron was a Dijon mustard color and would count!


  I started with a Basic White thick base and then topped it with a piece of Blushing Bride.  I roughed up the edges and then embossed some white snowflakes in one corner.

  The trees are stamped in Soft Succulent; one on Basic White cardstock the other on Soft Succulent cardstock.  I cut them out and popped them up on a Basic White Stylish Shapes circle.  One tree is decorated with Blushing Bride stars and both have So Saffron stars as toppers.

  The whole circle is popped on dimensionals over a length of Evening Evergreen ribbon.  The simple sentiment is stamped in Evening Evergreen and added to the edge of the circle.

  A few subtle Polished Dots are added for a tiny bit of shine to finish off this design.

  Thanks for looking!  Did you stamp today?

Stamps: Spruced Up

Ink: Soft Succulent, Evening Evergreen, Blushing Bride, Versamark

Paper: Basic White thick, Blushing Bride, Soft Succulent, So Saffron, Basic White

Accessories: Spruced Up Outlines dies, Stylish Shapes dies, white embossing powder, dimensionals, Evening Evergreen ribbon, Polished Dots


Thursday, November 3, 2022

Classic Christmas Cheer - Stampin' Up! Christmas Season

   The Christmas Season stamp set carried over from last year's July-Dec. mini catalog into the 2022-2023 Annual Catalog and it is what I would consider a classic Christmas set.  With berries, greenery and pinecones it is definitely a set that make gorgeous Christmas and winter cards in that traditional style.  I loved this set last year and I was so glad that it carried over.  

  I think I made this card for several long since closed challenges a few weeks back and I couldn't even tell you what the challenges were!  I love the rustic feel of this card with the use of the wood paper and the rich Christmas colors.


  The card front is a piece of Festive Foils Specialty paper and it has a very subtle snowflake/star pattern that is a great detail but doesn't distract from the focal elements.  The piece of wood grain paper is from the retired In Good Taste DSP.  I backed that with a layer of Evening Evergreen which goes so well with Cherry Cobbler.

  I stamped all the different pieces and arranged them to be tucked just behind the Christmas Cheer sentiment from the Sweet Candy Canes set that was die cut with a Stylish Shapes circle.  A piece of retired scalloped lace trim is added for more detail.  A few enamel dots that were left from a really old Paper Pumpkin kit are added to the sentiment.

  I love that this card is a mix of new (the Specialty Paper), old but current (the Christmas Season stamp set) and retired the In Good Taste DSP and lace trim.  Now if only I had a stamp room big enough to keep all of the retired things every year!

  Thanks for looking!  Did you stamp today?

Stamps: Christmas Season, Sweet Candy Canes

Ink: Evening Evergreen, Soft Succulent, Cherry Cobbler, Soft Suede, Crumb Cake

Paper: Festive Foils Specialty Paper, Evening Evergreen, Very Vanilla, In Good Taste DSP (retired)

Accessories: Stylish Shapes dies, Seasonal Labels dies, dimensionals, enamel dots (retired), lace trim (retired)

Tuesday, November 1, 2022

Christmas Flurry - Stampin' Up! Joyful Flurry

    The Joyful Flurry bundle is a great all purpose winter stamp set which I used here for a Christmas card. But don't limit it to Christmas, think Happy New Years cards, winter birthdays, use it along with a fun snowman set; really you can get a few extra months use with it by not keeping it only as a Christmas set!

  I used somewhat muted color combo but one I think works well for Christmas.  Blushing Bride, Merry Merlot, Mossy Meadow and Sahara Sand.  The real stars of the show are the snowflake cut outs and that's really what I wanted to show off on this design.


  This card starts with a Mossy Meadow base and then a layer of Shimmery White cardstock is where all the action happens.  The Merry Merlot and Blushing Bride snowflake are stamped first and then the snowflake dies are arranged around them.

  I used my die brush and brushed the backside of the shimmery white panel to help pop out the snowflake shapes.  You can also use a toothpick, a Take Your Pick tool or even a closed pen tip.  The dimension is just so cool.

  A few small Sahara Sand stamped snowflakes fill in some open space as well as a few die cut snowflakes with rhinestone centers (colored with the dark Cherry Cobble blends marker).

  The sentiment from Brightest Glow is stamped in Mossy Meadow and then cut out and popped up with a bit of Blushing Bride ribbon.

  How many more Christmas cards do you need yet?  I'm afraid to count up how many I need lol!  I'll just keep on with them until I run out of time I guess!

  Thanks for looking!  Did you stamp today?

Stamps: Joyful Flurry, Brightest Glow

Ink: Mossy Meadow, Merry merlot, Blushing Bride, Sahara Sand

Blends: Cherry Cobbler dark (coloring the rhinestones)

Paper: Mossy Meadow, Shimmery White

Accessories: Frosted Flurry dies, dimensionals, rhinestones, Blushing Bride frayed grosgrain ribbon (retired)

Monday, October 31, 2022

Believe in Cherry Cobbler - Stampin' Up! Jingle Jingle Jingle

   Cherry Cobbler is always a classic color to use for Christmas and when you bring in some gold it gets even better.  My stampers made this design at my last class using two stamp sets to bring it all together.


  This one starts with a Cherry Cobbler card base.  Then another layer of Cherry Cobbler stamped with the large Snow Crystal stamp using Cherry Cobbler ink.

  The sentiments and Santa hat are stamped in Versamark on Basic White and then embossed in gold.  The 'believe' and hat are fussy cut and then popped on dimensionals.

  Several different sized pieces of specialty paper are flagged and then adhered behind the narrow sentiment strip before adhering the whole element under the popped 'believe'.  The flags are a great way to use some of the fun papers in the July-Dec. mini catalog; you don't always need to use big pieces to be effective.  Also a great way to use up smaller scraps!

  Thanks for looking! Did you stamp today?

Stamps: Jingle Jingle Jingle, Snow Crystal

Ink: Cherry Cobbler, Versamark

Paper: Cherry Cobbler, Basic White, Festive Foils Specialty, Lights A Glow DSP, Distressed Gold Specialty

Accessories: gold embossing powder, dimensionals

Friday, October 28, 2022

Spruce Tree Christmas - Stampin' Up! Spruced Up

   My stampers made this card at my last class and I think it was a hit.  We are focusing on Christmas cards and we all agreed that using the adhesive sheets for the outlines made it really easy to put together.  Anything that helps get a lot of cards made for Christmas is always welcome in my stamp room!


  The colors are pulled right from the striped paper in the Sweetest Christmas DSP.  Such a classic Christmas color combo isn't it?

  We started with a Garden Green base, then the Sweetest Christmas DSP.  Next we embossed the sentiment in white onto a piece of Sweet Sorbet.

  The large tree is stamped in Garden Green on Basic White and the small tree is stamped in Pool Party ink onto Pool Party cardstock.  Once the pieces were die cut the outlines and stamped images are layered onto the Sweet Sorbet panel.  The Pool party tree is popped in front on dimensionals.

  3 gifts are stamped in Real Red with 2 being stamped off for a lighter version and then die cut and added to the base of the trees.

  A gold glimmer paper star tops the Garden Green tree and some adhesive backed Seasonal Sequins decorate the tree.  All 4 colors in the sequins pack coordinate with this color combo so my stampers had the choice of whichever color they liked the best.

  Thanks for looking!  Did you stamp today?

Stamps: Spruced Up, Ringed With Nature

Ink: Garden Green, Pool Party, Real Red, Versamark

Paper: Garden Green, Basic White, Pool Party, Sweet Sorbet, Gold Glimmer paper, Sweetest Christmas DSP

Accessories: Spruced Up Outlines dies, white embossing powder, dimensionals, adhesive sheets, adhesive backed Seasonal Sequins

Wednesday, October 26, 2022

Ringed Christmas Wreath - Stampin' Up! Ringed With Nature

   I skipped getting the wreath set in the holiday mini this year not because I didn't love it but because there are only so many hours in the week to create with and my mini preorder in June was already overflowing with stamp sets.  There's always a way to make a wreath card even if you don't have a wreath stamp set so I figured I could live without it.  I used the Ringed With Nature set to get my wreath fix any way!


  All of the little branches and sprigs in the Ringed With Nature set really work well for creating a wreath.  And even though I kind of covered up the wreath with my sentiment banner and ribbon it still makes for a nice cheerful Christmas card.

  I started with a Pear Pizzazz base, then a layer of Basic White embossed with the Tree Rings hybrid embossing folder.  

  To make the wreath panel I punched a small circle out of scrap paper and adhered it to a piece of Basic White with re-positional adhesive.  Then I stamped various images all around the circle leaving the center masked.  I used Pear Pizzazz, Old Olive, Soft Sea Foam, Sweet Sorbet and Daffodil Delight inks.

  I edged the sides of the wreath panel with narrow strips of Sweet Sorbet In Color DSP and then popped the panel on the card front with dimensionals.

  The sentiment is embossed in white and a piece of mini ruffled ribbon is tucked behind it.  I added a few Old Olive candy dots because I am determined to use them up.  But I swear they are having babies in my embellishment drawer because it seems as if there are always more of them not less!

  I'm really digging these colors and might have to try using them all again on another card design soon!

  Thanks for looking!  Did you stamp today?

Stamps: Ringed With Nature

Ink: Versamark, Pear Pizzazz, Old Olive, Soft Sea Foam, Sweet Sorbet, Daffodil Delight

Paper: Pear Pizzazz, Basic White, Sweet Sorbet In Color DSP

Accessories: Tree Rings hybrid embossing folder, dimensionals, white embossing powder, mini ruffled ribbon, candy dots (retired)