Friday, January 27, 2023

Rainbow Hearts - Stampin' Up! Country Bouquet

 I have tons of paper to cut for an upcoming class as well as prepping a big personal project that I'll share whenever I get it finished but I wanted to share this quick Valentine's Day card that I made the other day.  I think this one is perfect for a guy without a lot of fussiness and a nice bright color palette.


  This is really easy to put together!  Basic White thick card base, layer of Starry Sky, then a layer of Basic White embossed with the Brick & Mortar embossing folder.

  Then using 5 ink colors I stamped the 2 hearts from the Country Bouquet stamp set and added them to the card front with dimensionals in a circle.  The smaller hearts were added with a dab of glue and then the sentiment is stamped in Memento Black and added with more dimensionals.

  So easy!  You could swap out the ink colors for 5 pastels or all shades of pinks, favorite team colors; lots of possibilities.  

  Thanks for looking!  Did you stamp today?

Stamps: Country Bouquet

Ink: Sweet Sorbet, Mango Melody, Mint Macaron, Balmy Blue, Starry Sky, Memento Black

Paper: Basic White thick, Basic White, Starry Sky

Accessories: Brick & Mortar embossing folder, Country Bouquet punch, dimensionals

Thursday, January 26, 2023

Wow Geese - Stampin' Up! Silly Goose

   After several attempts to create a card for the current Global Design Project sketch I finally came up with a design that stuck to the layout.  A few others that I tried just ended up morphing into something not terribly close. 


  I ended up with a Well done! Congrats! Wow! kind of card by combining the fist bump geese from the Silly Goose set with the "wow" sentiment from Conversation Bubbles set.  Pulled the bright colors straight from the strip of Dandy Designs DSP.
  
  The geese are stamped in Memento Black, colored in with Blends markers and then fussy cut.  I popped them on dimensionals onto a Stitched Rectangle.  I had drew the little fist bump lines as the ones made with the stamp were trimmed off during fussy cutting for a cleaner edge.
  
  The sentiment is embossed in white on Fresh Freesia card stock then cut with the coordinating die.  I cut a Coastal Cabana banner and trimmed it down a bit to better fit the word bubbles.

  I found some very old Pool Party baker's twine (remember when it used to come on the cardboard?? thats how old it is!!) and added a large bow underneath the sentiment.

  I stamped 2 small stars in Coastal Cabana and then added a few Opaque Adhesive-backed gems to finish the details on this card.

  I'm glad I was patient and kept trying this sketch even though the first few tries weren't so hot!  

  Thanks for looking!  Did you stamp today?

Stamps: Silly Goose, Conversation Bubbles

Ink: Coastal Cabana, Memento Black, Versamark

Blends: Daffodil Delight dark, Gray Granite light

Paper: Granny Apple Green, Basic White, Fresh Freesia, Coastal Cabana, Dandy Designs DSP

Accessories: Stitched Rectangle dies, Conversation Bubbles dies, Stylish Shapes dies, dimensionals, baker's twine, white embossing powder, Opaque Adhesive-Backed Gems


Tuesday, January 24, 2023

Zesty Birthday - Stampin' Up! Sweet Citrus

  I made a bright birthday card today to play along with the TGIF Challenge.  I haven't used the Sweet Citrus bundle much and wanted to get a few more samples made to show my local stampers next week at class.  I love this color combo which I had jotted down in my notebook a few months back.  It seems like a great set of colors to shake up the dreary winter days!


  I first embossed a piece of Coastal Cabana with the Sweet Citrus hybrid embossing folder and added it to my card front.  Next comes a banner made from a piece of Regency Park DSP.  The label is made with the Sentimental Park dies and I stamped the sentiment in Night of Navy.

  The lemons (in this instance) are 2 step stamps and the peels are stamped in Daffodil Delight full strength ink.  The centers are stamped next in stamped off once Daffodil Delight ink.  I lined the images up on the hybrid embossing folder with the die so that I could cut and emboss the lemons at the same time.

  Next, I stamped the leaves in Parakeet Party and then added everything to the card front with dimensionals.

  Thanks for looking!  Did you stamp today?

Stamps: Sweet Citrus

Ink: Daffodil Delight, Night of Navy, Parakeet Party

Paper: Coastal Cabana, Basic White, Regency Park DSP

Accessories: Sweet Citrus Hybrid Embossing folder/dies, dimensionals, Sentimental Park dies


Monday, January 23, 2023

Love a la Mode - Stampin' Up! Alphabet A La Mode Dies

   I've finished all my boring Monday chores so now it's time to 'work' in the stamp room!  My card today actually has no stamping on it!  Hard to believe but yes, you can make a card without ink or stamps!  I don't do it very often but my card today is an example of letting punches, dies and paper do the work!

  I used the Color Hues challenge to create this love themed card.  I love the red and pink combo and it's the perfect time of year for those sweet colors in preparation for Valentine's day.


  I started with a Sweet Sorbet base topped with a piece of Basic White panel embossed with the retired Subtle embossing folder. Using the Heart Punch pack I punched 2 hearts from Country Floral Lane DSP and one from Country Gingham DSP and then backed them with either a Sweet Sorbet or Blushing Bride scalloped heart.  

  Once i had the hearts adhered to my card front I went to work with the Alphabet a la Mode dies which I hadn't used yet even though I received them way back in the beginning of December.  I really like the style of these dies as they are tall but skinny so you can still fit a good amount on a regular A2 card so you can spell quite a few things.  

  So I did learn a few things using these dies for the first time which will make it easier for me (and maybe you!) in the future.  First, they are very skinny so getting them out of the die if they stick you need to be careful not to rip them.  Definitely use your die brush or a toothpick/paper piercer to help you out.  

  Second, I used Basic White for my letters and I think the next time I will use Basic White thick just to have them be a little bit sturdier.  

  Third, since I wanted the letters to stand out from the hearts I backed the die cut letters with a second letter die cut with the the dimensional adhesive sheets.  In the past it hasn't been a problem to line up letters or other shapes onto the adhesive sheet die cuts.  Let me tell you, with these super skinny letters I had quite the time and had to do a bit of trimming around the edges as I wasn't quite as exact as I'd like to be.  So next time I'll suck it up and attach my card stock to the dimensional adhesive sheet first and then just cut with the dies so the letters come out with the dimensional piece already attached.  I think wasting a bit of the dimensional sheet will be worth the aggravation of trying to line up the letters.

  After I lined my letters up and adhered them I cut a few hearts out of red glimmer paper using the Conversation Bubbles dies and added those to the card front.

  I think this card will end up being for one of my boys for Valentine's day so I didn't want to add any ribbon or extra fluff because that might be seen by a teen boy as sappy or some such thing lol! So a bit clean and simple is where it ended up.

  Thanks for looking!  Did you stamp today?

Stamps: none

Ink: none

Paper: Sweet Sorbet, Basic White, Country Floral Lane DSP, Country Gingham DSP, Blushing Bride, Red Glimmer paper

Accessories: Alphabet a la Mode dies, Conversation Bubbles dies, Heart Punch pack, dimensional adhesive sheets, Subtle embossing folder (retired)


Sunday, January 22, 2023

Petal Sympathy - Stampin' Up! Petal Park

   I realized the other day that my stash of sympathy cards was getting pretty skimpy so I had that in the back of my mind when I saw the colors over at The Color Throwdown.  At first I thought they would be great colors for a guy card and they are, don't get me wrong, but to make it a true challenge I decided to go with a floral sympathy card instead.  What do you think?


  I think they background ended up being a bit busier than I had planned so I might have to re-create this one in the future and spread the background to have more white space.

  I started with a Night of Navy base then using a piece of Basic White I stamped the leaves in Basic Gray then filled them in with the 2 step stamp in Smoky Slate.  Then I stamped the open flower images in Basic Gray and filled them in with stamped off once Night of Navy ink.  Using the Petal Park Builder punch I punched out my flowers and adhered them to the panel.  I trimmed off the ones that were hanging off the edges and then added it to the card base.

  Using the coordinating Sentimental Park dies I cut one label in Night of Navy and topped it with another cut out of Basic White and stamped with the sentiment.

  I looped two layers of the Night of Navy Bordered ribbon to the side of the label and then added one of the punched flowers.

  Thanks for looking!  Did you stamp today?

Stamps: Petal Park, Inspired Thoughts

Ink: Basic Gray, Night of Navy, Smoky Slate

Paper: Night of Navy, Basic White

Accessories: Sentimental Park dies, Night of Navy Bordered ribbon, dimensionals, Petal Park Builder punch


Saturday, January 21, 2023

Guacamole Birthday - Stampin' Up! Taco Fiesta

  I used the fantastic clean and simple sketch over at CAS Colours & Sketches to make this fun birthday card!  The Taco Fiesta set continues to delight me!


   I loved the sketch with 3 images down at the bottom of the card front and I thought that the smaller images in the Taco Fiesta set would be perfect.  As it is a clean and simple challenge I went with a limited color palette and didn't add any ribbon or baker's twine....which was hard but I resisted lol!

  The base is Basic White thick cardstock, then I added a strip of the 2022-2024 In Color DSP in a Parakeet Party polka dot pattern.  

  The images are all stamped in Memento black and then colored in with Stampin' Blends markers then cut out with a Stylish Shapes die circle.  I popped the images on dimensionals onto the DSP.  

  For the tortilla chips I stamped them on a small piece of scrap paper then colored and fussy cut them.  I added them to edge of the guacamole bowl with the top on popped on trimmed dimensional.

  Finally the sentiment was added while holding my breath that I wouldn't goof up right at the end.  The ink is a little darker on one end of the sentiment but that can't be changed now!

  Thanks for looking!  Did you stamp today?

Stamps: Taco Fiesta

Ink: Memento Black

Blends: Basic Black light & dark, SU400, Old Olive light, Parakeet Party light & dark, So Saffron dark, Daffodil Delight light

Paper: Basic White thick, Basic White, 2022-2024 In Color DSP

Accessories: Stylish Shapes dies, dimensionals


Friday, January 20, 2023

Purple Park - Stampin' Up! Sentimental Park

   I'm squeaking in just under the wire for the Paper Players challenge today with these fun colors.  I love purple but definitely think it can be hard to create with sometimes.  And this color challenge has 2 different shades of purple!  I like the end result though and it's a good use of the Sentimental Park bundle.  I just love those floral labels!


  The Tea Boutique DSP is the first stop for creating a nice background for the stamping elements.  I used 2 patterns from this pack for my card front.  I wrapped 2 lengths of crinkle seam binding ribbon around the panels before adhering them to the card base.

  I stamped the flower outline in Orchid Oasis and then filled it in with Highland Heather.  The stem is stamped in Parakeet Party and then filled in with the same color but stamped off once.  I die cut the stem, flowers and 2 of the label shapes from Sentimental Park dies.  I layered the plain label over the detailed floral one and then popped the flower pieces on dimensionals.

  The sentiment is from Flowering Tulips and is embossed in white onto Orchid Oasis cardstock and then die cut with a Stylish Shapes circle die.  I popped that up on dimensionals as well and then added a little cluster of flowers stamped in the same colors as the larger flower.  This little flower cluster is found in the coordinating set Petal Park.  I got the whole Regency Park Suite and it is well worth it!  See it all on pages 30-33 in the mini catalog.

  The final details for this card are the mini adhesive pearls in the center of the flowers and then a double fork bow in crinkled seam binding ribbon to the side of the label.

  Thanks to the Paper Players DT for these fun colors to use on these dreary winter days!

  Thanks for looking!  Did you stamp today?

Stamps: Sentimental Park, Petal Park, Flowering Tulips

Ink: Orchid Oasis, Highland Heather, Parakeet Party

Paper: Tea Boutique DSP, Basic White, Orchid Oasis

Accessories: Sentimental Park dies, Stylish Shapes dies, crinkled seam binding ribbon, adhesive pearls, white embossing powder, dimensionals


Thursday, January 19, 2023

Winged Birthday Wishes - Stampin' Up! Adorable Owls

   My card today was made to play along with the Seize the Birthday challenge to use "Winged Things" on a birthday card.  I couldn't resist making another card with the Adorable Owls set.  You can get this set free with a $50 purchase (before tax/shipping) during Sale-a-Bration.  Check out my online store to see this set as well as other rewards you can earn!  

  I paired the owl with the new Conversation Bubble dies for a fun card for all ages.


  The Tahitian Tide card base is a great background for other bold colors.  I used a piece of the retired All Together DSP (which is in the clearance rack currently for $4.60!!  That's a bargain for sure!) for a nice bold contrast to the bright colors.  I topped that with a Stitched Rectangle in Basic White on which to add the rest of my elements.

  I stamped the owl in Soft Suede and colored him/her in with Stampin' Blends markers then fussy cut it.  I popped it on the edge of the Basic White panel then added die cut stars in Daffodil Delight, Tahitian Tide and Sweet Sorbet.  The little stars die is in the Conversation Bubbles die set and is perfect for a little something extra.

  The sentiment from Best Day stamp set is stamped in Memento Black and the word bubble frame in Basic Black cut with the new Conversation Bubble dies is popped on dimensionals around it. The last touch is a tiny baker's twine bow on one of the lower stars.

  Thanks for looking!  Did you stamp today?

Stamps: Adorable Owls (SAB), Best Day

Ink: Soft Suede, Memento Black

Blends: SU500, Ivory, Daffodil Delight dark, Tahitian Tide dark

Paper: Tahitian Tide, Basic White, Basic Black, All Together DSP (retired), Daffodil Delight, Sweet Sorbet

Accessories: Stitched Rectangle dies, Conversation Bubbles dies, dimensionals, baker's twine


Wednesday, January 18, 2023

Heart Flowers Valentine - Stampin' Up! Country Bouquet

   I need to get rolling on some Valentine's day cards.  I don't usually need a lot but one can't be in the card business and not have at least a small stack of cards for one of the most popular card-sending holidays!  I made this card last week but didn't get it photographed and edited in time to enter it into the challenge but if you want more inspiration with this layout check out Freshly Made Sketches.


  The Country Floral Lane Suite is just the sweetest for some love themed cards or really any cards that need a soft, sweet look.  The stamp/punch bundle is super and will even punch out images from the coordinating DSP, Country Floral Lane.  I didn't use that DSP here but the other coordinating pack Country Gingham DSP.

  I started with a Balmy Blue card base then a layer of Country Gingham DSP backed with a piece of Basic White.

  The flower/hearts are stamped in Sweet Sorbet and the leaves are Mint Macaron then punched out.  I layered the small heart in front of the larger one and then added the leaves to the bottom to look like a flower bud opening.  

 I cut 3 Basic White squares with the Stylish Shapes dies then layered my flowers on adhering with dimensionals.  I turned each flower a different way to add a bit of interest.

 The sentiment is stamped in Mint Macaron on a narrow strip of Basic White and an even narrower piece of Sweet Sorbet lines the bottom of the sentiment.

  A few Sweet Sorbet sequins from the retired Seasonal Sequins pack from the last mini catalog accent the sentiment strip.

  Thanks for looking!  Did you stamp today?

Stamps: Country Bouquet

Ink: Sweet Sorbet, Mint Macaron

Paper: Balmy Blue, Basic White, Country Gingham DSP, Sweet Sorbet

Accessories: Stylish Shapes dies, Country Bouquet punch, dimensionals, Seasonal Sequins (retired)

Tuesday, January 17, 2023

Birthday Hoot - Stampin' Up! Adorable Owls

   It's Testosterone Tuesday and I've got an adorable owl in some masculine colors for a birthday celebration.  My guy birthday card selection gets a bit thin at times and right now I need to stock up as I have a lot of family birthdays coming up.  I used 2 Sale-a-Bration (SAB) rewards as main elements on this card so it makes it even better!


  This card starts with a Crumb Cake card base and I stamped one of the sentiments from the Sale-a-Bration set Adorable Owls on the top portion in a random pattern in Crumb Cake ink.  Next I added a panel of the Day at the Farm DSP which is also a SAB reward.

  For some reason I have a ton of Stylish Shapes circles already cut so I'm really trying to use them up so I stamped the party owl in Soft Suede and then colored him in with Blends markers (colors listed below).  Once he was colored in I popped him with dimensionals on the card front.

  I stamped the sentiment in Versamark on Old Olive card stock then embossed it in white.  I adhered the sentiment strip with dimensionals over a bit of Old Olive ribbon tied with some linen thread (aka man ribbon).

  Thanks for looking!  Did you stamp today?

Stamps: Adorable Owls (SAB)

Ink: Soft Suede, Versamark, Crumb Cake

Blends: Crumb Cake light & dark, Cherry Cobbler dark, Old Olive light, Daffodil Delight dark

Paper: Crumb Cake, Basic White, Day at the Farm DSP (SAB), Old Olive

Accessories: Stylish Shapes dies, dimensionals, linen thread, Old Olive Twill ribbon

Monday, January 16, 2023

Handsome Turtle Hello - Stampin' Up! Playing in the Rain - Global Design Project 377

   The fabulous team over at Global Design Project has seen fit to invite me to be a guest designer for their newest color challenge which starts today.  It's such an honor to be asked to join them!  I get a ton of inspiration from the challenges, design team samples and each gallery! Hopefully I did these colors justice.


  I have to be honest that while I love the combo of colors, So Saffron is hard for me to use and I think the only time I pull it out is for challenges!  I even did an Instagram Reel a while ago about me and So Saffron!  I think I pulled it together for my card though! 


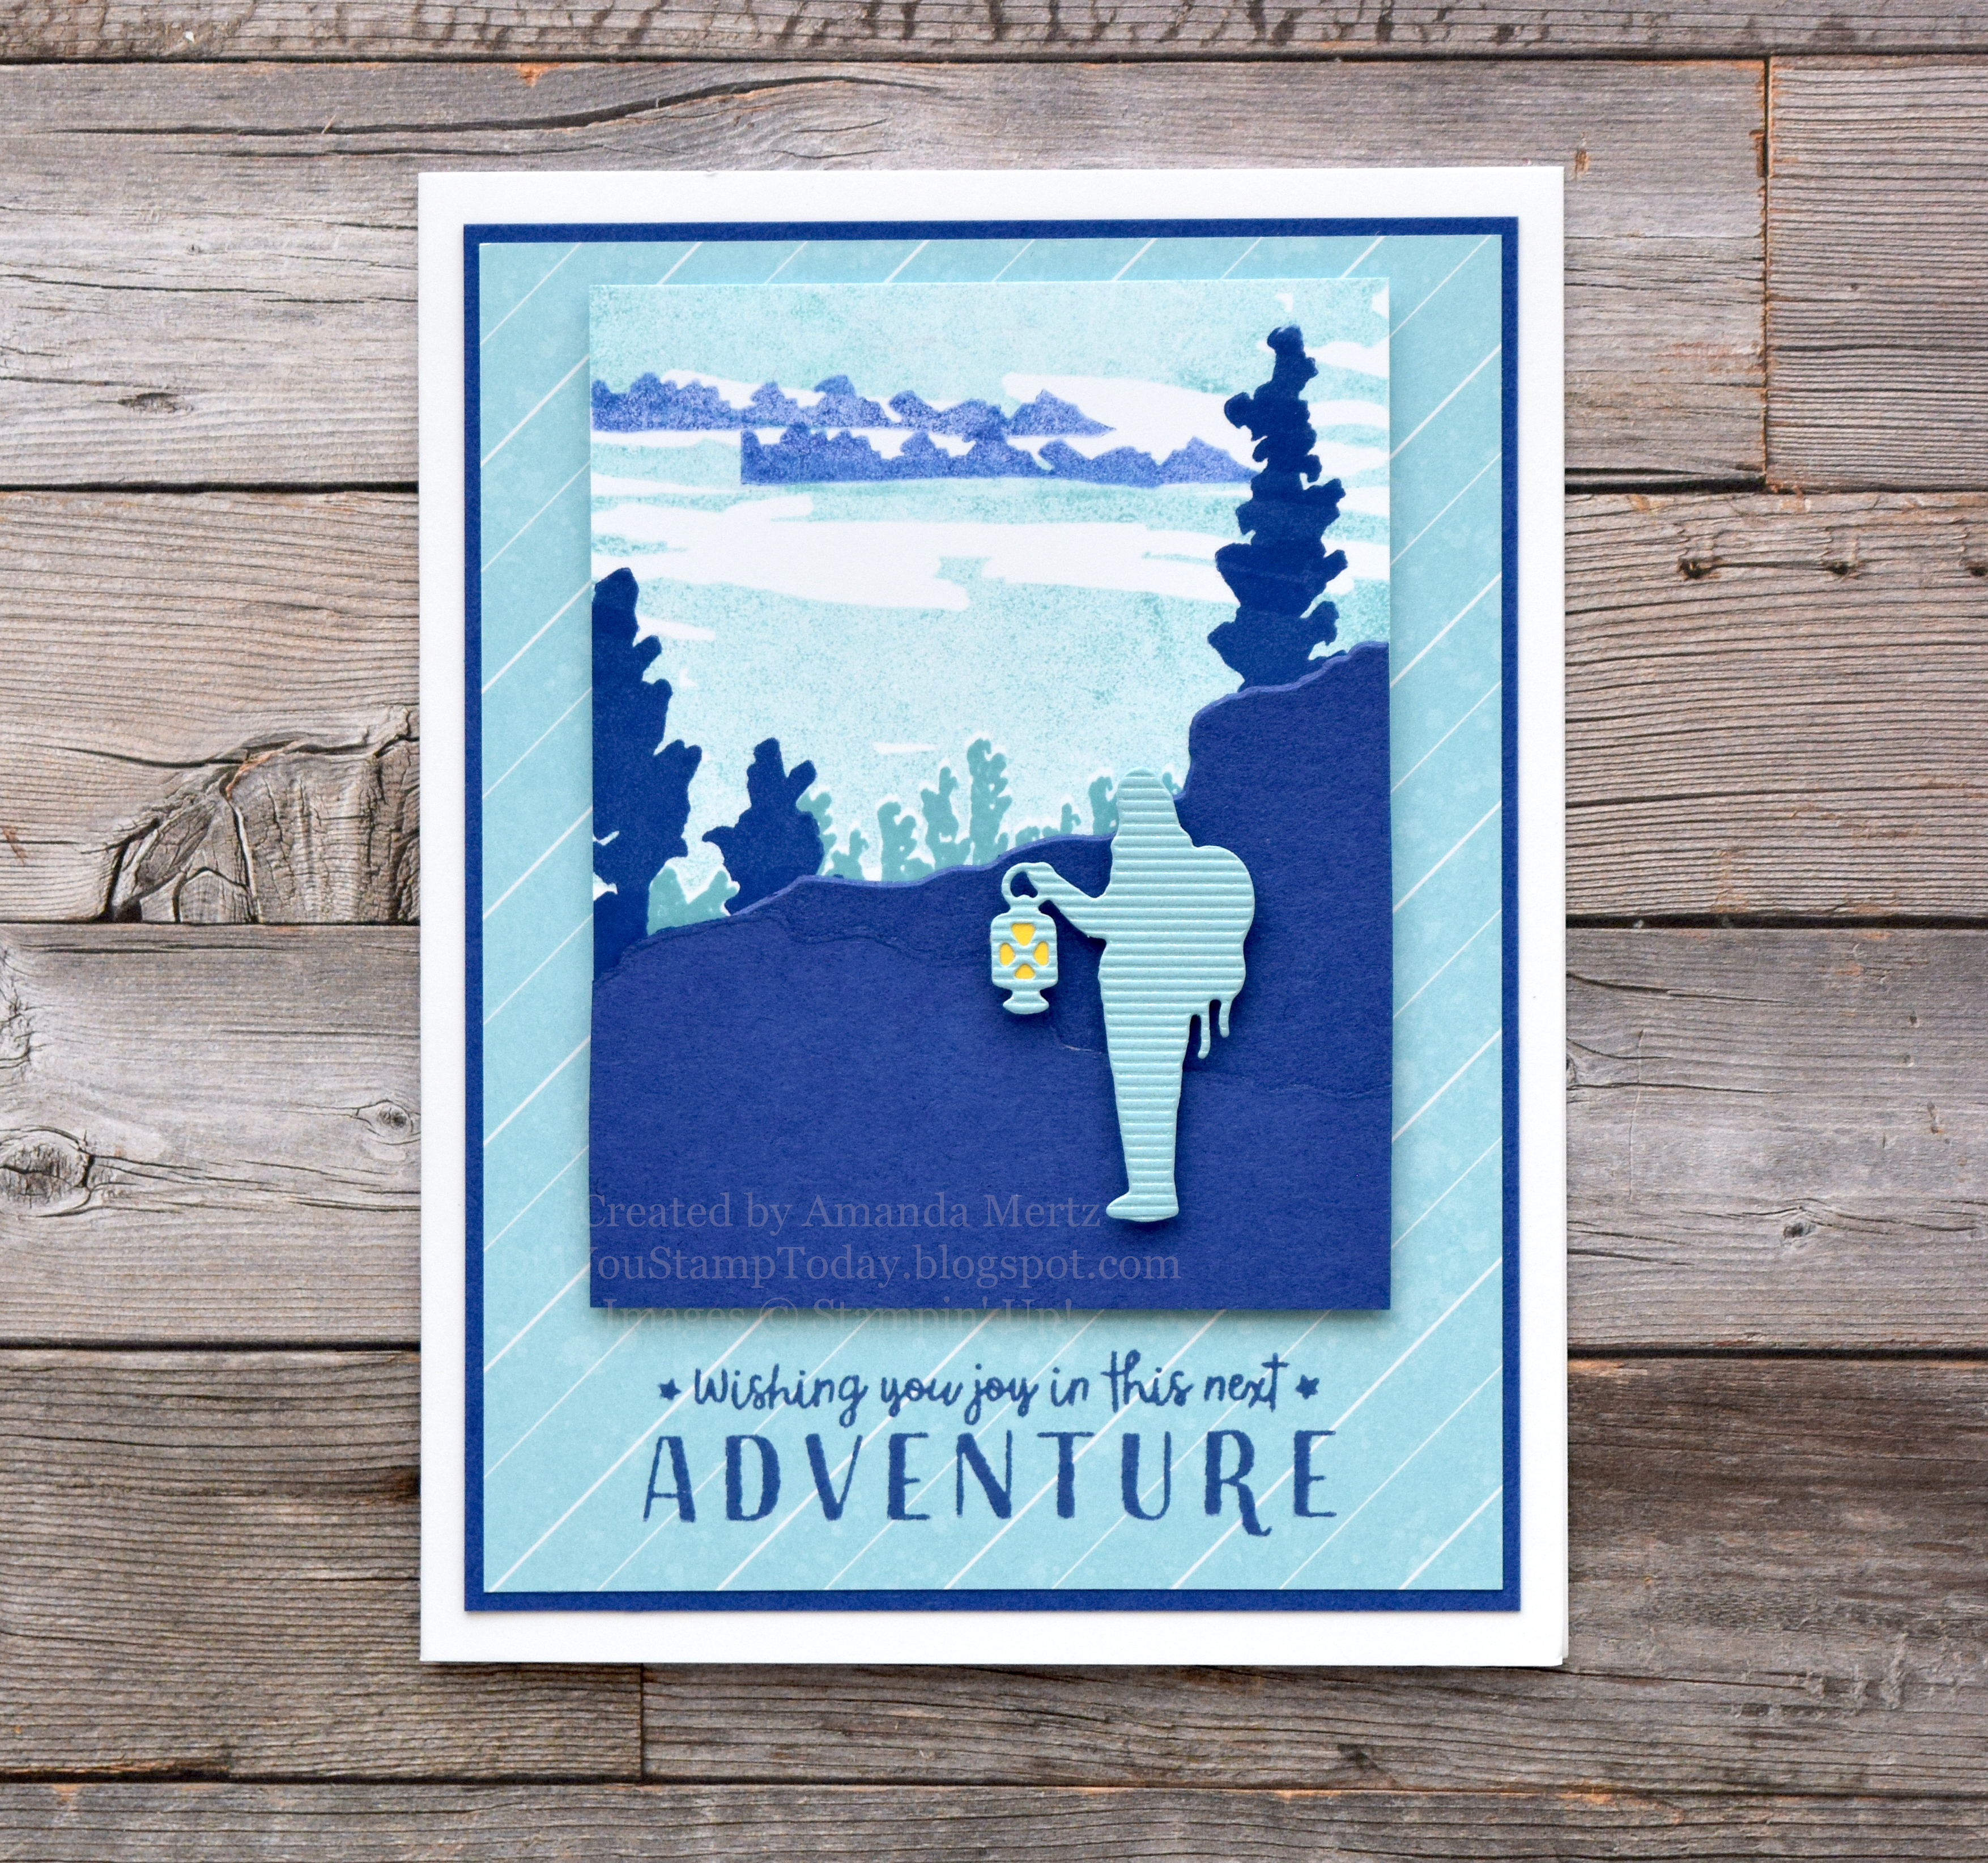
   Look at this handsome fellow!  I had a lot of fun with a bunch of new products to make this card.  

  I started with a Basic White thick base then added a layer of Balmy Blue topped with the Sale-a-Bration reward Dandy Designs DSP in a nice polka dot pattern.  Then I pulled in a wide band of So Saffon *pat myself on the back*.

  I had a bunch of Stylish Shapes die cut circles leftover from another project and the circle went with the DSP so I stamped the flowers from Playing in the Rain stamp set along the bottom edge in Basic Gray then colored them in a bit with Blends markers.  I used a blending brush to add some Balmy Blue ink to the top portion of the circle.

  The turtle is stamped in Basic Gray and colored in with Granny Apple Green Blends and then cut out with the Playing in the Rain dies.  I also cut 2 small flags in So Saffron to layer to make him a little bowtie.  The flags are supposed to go on the kite in the die set but this works too!  I popped the turtle on dimensionals onto the circle and then added the circle to the card front.

  I cut a few clouds from the white Textured Shimmer paper and added them to the circle with dimensionals.

  The final touches are the sentiment from the Sale-a-Bration set, Thanks a Bunch and a baker's twine bow.  The baker's twine was white and I colored it with my Balmy Blue Blends marker for a perfect match.

  Thanks so much to the Global Design Team for inviting me to join them this week!  It was a fun challenge that allowed me to use some of my newest supplies!  I hope you'll play along with these challenge colors and give me a lot more ideas for So Saffron because I need them!  

  Thanks for looking!  Did you stamp today?

Stamps: Playing in the Rain, Thanks a Bunch (SAB)

Ink: Basic Gray, Balmy Blue

Blends: Granny Apple Green light & dark, So Saffron dark, Balmy Blue dark

Paper: Basic White thick, Balmy Blue, Dandy Designs DSP (SAB), So Saffron, Textured Shimmer paper

Accessories: Stylish Shapes dies, Playing in the Rain dies, dimensionals, baker's twine

Friday, January 13, 2023

Sentimental Celebration - Stampin' Up! Sentimental Park

   The Regency Park Suite in the Jan.-April mini catalog is just chock full of beautiful products.  The stamps and DSP are gorgeous but the Sentimental Park dies just have to be pointed out on their own.  This is a perfect die set to help you highlight a sentiment.  The tags/labels are so pretty with dainty intricate flowers edging a nice open space for images or sentiments.  

  I decided to focus on the die cuts to play along with 2 challenges today.  The first is a "CASE the Designer" from Global Design Project and I focused on the embossed background and using an intricate die cut as the main card element just like the sample card by Connie Collins.

  My colors come from the Hand Stamped Sentiment Challenge which has Pool Party, Petal Pink and Mango Melody for their colors.


  Isn't this just so sweet?  I love the round little flowers sprinkled all over!  I started with a piece of Pool Party embossed with the Cane Weave embossing folder and added a length of Pool Party Grosgrain rib to the card front.

  Next, I cut the large label in Basic White and stamped the sentiment in Pool Party.  Then I cut some flowers in Petal pink and added some white outlines, then cut some Petal Pink outlines and added them all around the label.  Some are popped on dimensionals and others are adhered flat.

  To bring in just a touch of the last challenge color I added Adhesive Backed Milky Dots in Mango Melody to the flowers on the label. Finally a fork bow is added to the edge of the label.

  Thanks for looking!  Did you stamp today?

Stamps: Sentimental Park

Ink: Pool Party

Paper: Pool Party, Petal Pink, Basic White

Accessories: Sentimental Park dies, Cane Weave embossing folder, Pool party grosgrain ribbon, Adhesive Backed Milky Dots, dimensionals


Thursday, January 12, 2023

Taco Tags - Stampin' Up! Taco Fiesta

   When I did my demonstrator pre-order for the Jan.-April mini catalog way back in early December the Taco Fiesta set was at the very top of my wish list!  It's such fun set with so many adorable images that I had a hard time deciding which ones I wanted to use for today's card!  Erica Cerwin knocked it out of the park designing this set to celebrate her $1 million sales achievement!  

  The Paper Players challenge gave me a little bit of a start as they are challenging us to use a tag or tags on our card.  I had a bunch already pre-cut left from another project so I got to work!


  The card front is a piece of Regency Park DSP in a sweet Mango Melody polka dot pattern.  I added a strip of Basic Black just to give some depth behind the tags.

  I stamped all of my images in Memento Black and then colored them in with Stampin' Blends markers (colors listed below).  Since the images are on the smaller side it really doesn't take very long to color them all in so don't be intimidated by the open spaces in the images.  I used my Color Lifter marker to make the stripes and dots on the cacti.Once they were colored I fussy cut them, again they are smaller so it doesn't take long at all.

  Next, I arranged the images on the tags and adhered them with dimensionals.  I added 2 strands of black baker's twine to each tag and trimmed the ends.  The tags are then adhered to the card front with more dimensionals.

  Finally I embossed the sentiment in white onto a piece of Basic Black card stock and added it to the middle taco tag.

  These bright colors and sweet images just made me smile....and I didn't even use the adorable faces that come in the set.  I'm sure you'll be seeing a lot more of this set in the coming months.  Don't blame me if it makes you crave some Mexican food for dinner!

   Thanks for looking!  Did you stamp today?

Stamps: Taco Fiesta

Ink: Memento Black, Versamark

Blends: Parakeet Party light & dark, Daffodil Delight light & dark, Real Red dark, Granny Apple Green light & dark, So Saffron dark, Poppy Parade light & dark, Old Olive dark

Paper: Regency Park DSP, Basic Black, Basic White

Accessories: Tailor Made Tags dies, white embossing powder, dimensionals, black baker's twine


Wednesday, January 11, 2023

Valentine's Hearts - Stampin' Up! Country Bouquet

   I'm playing along with The Color Hues challenge for my card today.  They've got light pink & gold for the colors so I'm going for sweet and girlie today after Testosterone Tuesday blues of yesterday!  Pink and gold said Valentine's to me so that's where I took it using the new Country Bouquet bundle.


   I started with a Blushing Bride card base then a piece of Basic White that I had in my spare card parts that had already been embossed with the new Cane Weave embossing folder.  

  Next I embossed the big leaf heart in gold onto a Stylish Shape die cut circle then stamped the flower portion in Blushing Bride ink.  I popped it all on the card front with dimensionals and then added the other elements around it.

  The two smaller hearts are made with the Country Bouquet punch after embossing in gold the Blushing Bride one.  Both small hearts are popped on dimensionals.  The sentiment is stamped in Blushing Bride and then baker's twine bow and gold sequins are added as finishing touches.

  Thanks for looking!  Did you stamp today?

Stamps: Country Bouquet

Ink: Blushing Bride, Versamark

Paper: Blushing Bride, Basic White, Gold & Rose Gold Metallic Specialty paper

Accessories: Cane Weave embossing folder, Stylish Shapes dies, Country Bouquet punch, dimensionals, sequins, baker's twine


Tuesday, January 10, 2023

Greatest Adventure - Stampin' Up! Picturesque

 I'm trying to get back into the groove of stamping and figured I might as well jump in and do another Testosterone Tuesday card.  Recently (before Christmas!) I've tried to make an effort to share a guy card on Tuesdays so as to not let my stash of masculine card dwindle too low.  I figure if I find it hard to do guy cards sometimes I bet other stampers do too and might enjoy getting a bit of inspiration from my efforts.

  Today I'm using 2 stamp sets from the Jan.-April mini catalog that are a bit out of my comfort zone as they are "scene" sets in which you build up scenes using the different images and die cuts.  Not my usual go to sets but I'm up for trying new things.  I also pulled my masculine colors from the Just Us Girls challenge... hey it's equal opportunity here at Did You Stamp Today, girls and boys both welcome!  The light blue and dark blue combo seemed like a good fit for the guy theme.


  This card starts with a Basic White thick card base, then a layer of Starry Sky, then a piece of Country Floral Lane DSP in a nice striped Balmy Blue pattern.  I stamped the sentiment from Greatest Journey right onto the DSP in Starry Sky ink.

  To build my scene I started with a piece of Whisper White and used the stamp with the 3 "trees" and stamped it in Starry Sky along the bottom edge of my cardstock.  Then I used the "sky" stamp and stamped off once with Balmy Blue ink then stamped my Basic White for a lighter sky.  I turned the stamp 180° and did the same thing again to extend the sky higher.  

  I filled in the trees/bushes in the foreground with full strength Balmy Blue ink and added 2 rows of mountains in the far distance with stamped off once Starry Sky ink.

  Using the Greatest Journey dies I cut 2 mountain/rock panels and layered them to look like a summit overlooking the valley and distant mountains.  I trimmed off the overhang so they lined up with the scene panel and then popped it all on the card front.

  I used the Textured Shimmer Paper in Balmy Blue to die cut the hiker and added a bit of Daffodil Delight cardstock (hopefully that doesn't disqualify me from the challenge!) to the back of the lantern so it looks like it was glowing and then popped the figure on mini dimensionals.

  I'm sure you'll be seeing these 2 stamp sets in future Testosterone Tuesday posts as there are a lot of great possibilities for guys cards combining these sets.  And I didn't even break out the coordinating Enjoy the Journey DSP yet!

  Thanks for looking!  Did you stamp today?

Stamps: Greatest Journey, Picturesque

Ink: Balmy Blue, Starry Sky

Paper: Basic White thick, Basic White, Textured Shimmer Paper, Starry Sky, Daffodil Delight, Country Floral Lane DSP

Accessories: Greatest Journey dies, dimensionals


Monday, January 9, 2023

Party Goose - Stampin' Up! Silly Goose

   It's been a hot minute since I've shared anything hasn't it? Now that the holidays are over and I've gotten my house and some other obligations in order it's time to get back to stamping!  The first order of business is to celebrate the New Year as well as the start of Sale-a-Bration (SAB) and a new mini catalog!  I wrapped all 3 into one celebration card!


 Nothing really fancy here but I was enjoying these colors in the new Dandy Designs DSP that is a Sale-a-Bration reward.  I think after all the Christmas colors I was ready for something fresh and bright and this huge pack of DSP fits the bill perfectly.  You can earn it with a $100 more order during SAB (until Feb. 28 or while supplies last).  This pack has 48 sheets of 12x12 paper so no need to hoard it! You could even order with a friend and split the reward. 

 The goose is in the new stamp set Silly Goose found on page 27 of the Jan.-April mini catalog.  Look at how cute he/she is!  That party hat and balloon were just right for celebrating the new year.  I stamped the image in memento black and then colored it in with Blends markers.

  The sentiment from Brightest Glow (still available as a carryover item from the July-Dec. mini catalog)is also stamped in Memento Black and cut out with a Stylish Shapes circle die.  It's popped with dimensionals and accented with a Fresh Freesia ribbon knot.

  Thanks for looking!  Did you stamp today?

Stamps: Silly Goose, Brightest Glow

Ink: Memento Black

Blends: Petal Pink dark, Fresh Freesia light & dark, Mango Melody dark (retired), Gray Granite light

Paper: Fresh Freesia, Basic Whit, Dandy Designs DSP (SAB), Petal Pink

Accessories: Stylish Shapes dies, Stitched So Sweetly dies (retired), dimensionals, Fresh Freesia Open Weave ribbon