Friday, November 25, 2016

Birthday Moose - Stampin' Up! Jolly Friends - Fab Friday 101

 So how much turkey did you eat yesterday?  I hope you have some Thanksgiving leftovers so you don't have to cook today!    That way you can spend more time stamping!

  Let's start the weekend off with a fun Fab Friday challenge.  Maybe it will get you moving a bit and work off some of those goodies you ate yesterday.  It's a sketch challenge this time around.  I used our challenge for double duty again!  Design Team card and a birthday card all rolled into one!


  It was my dad's 70th birthday yesterday!  Yup, some years his birthday falls on Thanksgiving and I don't think you could ask for a better birthday feast than the spread our family puts out.  We had a lot of extended family gathered to celebrate the day and we ate really well all day!


  The sweet little moose doesn't have to only be used for Christmas or winter cards.  Here I left off a hat and instead gave him some balloons wrapped up in his antlers instead.

  I thought these colors worked well for a guy card.  Smoky Slate, Dapper Denim and Old Olive along with the browns for the moose.

  The greeting is from the Party with Cake set,  the balloons are from the Balloon Celebrations set and the '70' on the balloons is made with the Labeler Alphabet set.  It's fun to mix and match stamp sets to make a card for any occasion.

  On the inside of the card I stamped "make a wish" from Party with Cake and then I added "party animal!!" with the Labeler Alphabet.

  I hope this sketch will spark your creativity and you'll join us at Fab Friday by adding your creation to our gallery so we can all ooohhh and aaahhh over it!  For more great inspiration check out the rest of the Fab Friday Design Team.

  Thanks for looking!  Did you stamp today?

Stamps: Jolly Friends, Party with Cake, Balloon Celebrations, Labeler Alphabet

Ink: Black, Dapper Denim, Old Olive

Paper: Smoky Slate, Old Olive, Naturals white (retired), Adventure Bound DSP (retired)

Accessories: Layering Circles framelits, balloon punch, black bakers twine, dimensionals, Dapper Denim ruched ribbon, alcohol markers

Thursday, November 24, 2016

O Christmas Tree - Stampin' Up! Totally Trees

    Happy Thanksgiving!  I hope you have a whole lot of fun family time and good food on your agenda today!

 This was a happy accident kind of card and I am quite pleased how cute it turned out.  I designed this other Totally Cute Christmas Tree card way back in September and cut supplies to make 12 of them to pad my Christmas card stash.  When I had finished all 12 cards I ended up with one extra tree panel some how.  In my defense math was never my best subject!  So I grabbed a few supplies and turned the tree panel into a cute, clean and simple design.


  A simple Garden Green base, some gold enamel stars and bit of retired seam binding ribbon is all it took.

  I had a fork bow (tutorial here) in my ribbon scraps that was super easy to add to the corners and then pop the whole panel on dimensionals.  

  Thanks for looking!  Did you stamp today?

Stamps: Totally Trees, Star of Light

Ink: Garden Green, Cherry Cobbler, gold

Paper: Garden Green, Whisper White

Accessories: gold enamel stars, seam binding ribbon (retired), dimensionals


Tuesday, November 22, 2016

This Christmas Pinecones - Stampin' Up! Christmas Pines

Today's card is another that we did at my October stamp club.  It's a quick layout and can look different depending on which DSP you choose.  There are so many great patterns in the This Christmas DSP collection that you could have tons of different looks.


  I really like the classic winter and Christmas images that the Christmas Pines set contains.  With pine branches, pine cones, mistletoe, different sized sentiments and smaller accent stamps there are so many mix and match possibilities.  Add in the coordinating Pretty Pines thinlets (comes in a bundle to save 10%!) the sky's the limit!

  The card base is Garden Green stamped with the little snowflake background also in Garden Green ink.  Then a layer of Cherry Cobbler, a slightly smaller piece of Very Vanilla and then the strips of This Christmas DSP.

  The sentiment is stamped in Cherry Cobbler with little branches in Garden Green.  The circle is popped up.  The pinecones are stamped in Early Espresso onto Crumb Cake and then cut out.  They are popped up and I added a little knot of gold natural trim.

  I really like the classic Christmas feel of this card and plan to make some more for my own card stash.

  Don't forget that  Stampin' Up! is having the Online Extravaganza sale right now.  Be sure to check out the list for some great deals!  Maybe you have some stampers on your gift list and you can get them crossed off!  Place an order online through my store.  Just click SHOP NOW!

  Thanks for looking!  Did you stamp today?

Stamps: Christmas Pines

Ink: Garden Green, Cherry Cobbler, Early Espresso

Paper: Garden Green, Cherry Cobbler, Crumb Cake, Very Vanilla, This Christmas DSP

Accessories: circle punch, Pretty Pines Thinlets, dimensionals, gold natural trim

Monday, November 21, 2016

Christmas Stars Double Z Fold - Stampin' Up! Star of Light

  I am way behind in sharing the projects we made at my stamp club last month!  So many picture to edit so little time lately!  Today's card was inspired by a fancy fold card my downline Julie taught us at a team get together.  It's the Double Z Fold card.  There are a lot of tutorials out there so I'm not going to reinvent the wheel but it is way easier than it look I promise!  Just search in Google or Pinterest.

  It's an easy card to make but not to photograph.  I did my best to show the different panels and I hope you can see how fun it is!


  The Star of Light is a great set to use for this fun card.  It has a lot of different stamps to use to mix and match for the different panels.  I used Island Indigo, Pool Party and copper accents for a fun combo.


  The stars border punch made the itty bitty stars that are scattered across the card.


  The large copper star is popped up on the front for more dimension.


  And here is the the view from above with the card opened.  Pretty neat huh?  And all it is is a bit of scoring!

  Thanks for looking!  Did you stamp today?

Stamps: Star of Light

Ink: Island Indigo, Pool Party

Paper: Island Indigo, Pool Party, Very Vanilla, This Christmas DSP, Copper Foil

Accessories: Starlight Thinlets, Simply Scored, dimensionals, star border punch

Friday, November 18, 2016

This Christmas Gift Stack - Stampin' Up! Tin of Tags

 Every year I always think I have enough Christmas cards but then I find myself a few short.  And as always it's a day that I'm short on time.  It's good to have a few card layouts that you can whip up without a lot of fuss but know they will still look great.  This is a layout I've used before and it's fantastic for using up some smaller scraps from a DSP pack.


  Just cut 3 different sizes of rectangles and/or squares and stack them up, tie them with a ribbon and add a tag.  Done and Done!  

  I added some embossing in the background with the Cable Knit embossing folder.  The Tags & Labels Framelits set paired with the Tin of Tags stamp set makes for a quick and cute tag.  I added a little bling with the silver enamel shape in the corner.  If you're more of a gold kinda person just switch the enamel shape to a gold one and use the gold Natural Trim instead of the silver.

  Speaking of being short on Christmas cards I better go count up how many I have and see how many more I need and then add like 20 onto that number just to be safe!  

  Thanks for looking!  Did you stamp today?

Stamps: Tin of Tags

Ink: Garden Green

Paper: Cherry Cobbler, Very Vanilla, This Christmas DSP

Accessories: Cable Knit embossing folder, silver natural trim, Tags & Labels framelits, metallic enamel shapes

Wednesday, November 16, 2016

Rose Garden Thinking of You - Stampin' Up! Rose Garden Thinlets

I was fully intending to share this card yesterday but I had 2 wisdom teeth taken out first thing in the morning and while I didn't have any pain the icing schedule didn't leave much time to do anything but watch Netflix!  That and the fact that my fingers were frozen from holding the ice packs to my face!  I ended up putting my mittens on every time I needed to ice!  I didn't have any swelling so I guess my diligence paid off!

I made this card on Sunday and Monday.  Yes it took 2 days for this one!  I started it on Sunday and then had to finish on Monday.  Some days I just don't have enough time to stamp as much as I'd like and have to grab a few minutes here and there!  I used the current CAS(e) This Sketch challenge as a starting point.


  I wanted to send a card to a friend and out of my giant box of cards there wasn't one with the right feel and sentiment so I set to work.  I've always like the Sahara Sand, Calypso Coral and Whisper White combo and I thought it would work well for a thinking of you card.

  The base is heavyweight Whisper White, another smaller layer of Whisper White is next.  Then a layer of Sahara Sand.  I cut out the large roses from the Rose Garden thinlets.  I trimmed the leaves and then adhered them to the top and bottom of the panel.  The fine-tip glue pen works really well for this die cut.  After the adhesive was dry I trimmed off the overhanging edges of the roses.

  I used the sentiment from Sheltering Tree stamp set and embossed it in white. For the ribbon treatment I punched 2 small holes on either side of the sentiment and then threaded the Calypso Coral ribbon through and adhered it to the back of the panel.  I used a bit more ribbon to tie a fork bow (tutorial here) and attached it with a glue dot.  

  Hopefully this card will make my friend smile.

  Thanks for looking!  Did you stamp today?

Stamps: Sheltering Tree

Ink: Versamark

Paper: Whisper White, Sahara Sand

Accessories: Rose Garden Thinlets, white embossing powder, Calypso Coral ribbon (retired- SAB)


Monday, November 14, 2016

Shimmery Trees - Stampin' Up! Totally Trees

  It was a cool 32 degrees this morning when I woke up and there was a decent layer of frost so I don't think it would be out of line to share a Christmas card this morning.  I actually wore my mittens on my walk this morning.  The boys and I looked quite the scene walking to school....me with my mittens and neck gaiter on and them wearing shorts.  I was able to talk them into a sweatshirt at least by mentioning I didn't think the teachers would let them go out to recess if they didn't have some of their body covered!  One of these days I'm expecting a call from Child Protective Services and the school counselor to check up on us!  I figure at some point you've got to let the kids figure it out for themselves and it's probably better for them to do it when they are 8 and 10 than when they are 18 and 20!


 So like my balloon card last week the sparkle on this card was hard to photograph!   Each of the tress is covered with Iridescent Ice.  Iridescent Ice is retired but any shimmery embossing powder would work.  But if you're like me you have a jar in your stash just begging to be used!  

  I'm not much of a pastel-y pink kind of girl but I like the soft non-traditional colors for this Christmas card.  I can't remember if this was for a challenge or not but it's fun to go a little different than the red/green Christmas combo sometimes.

The card base is Sweet Sugar Plum and then a strip of Perfect Plum and the trees are stamped on Whisper White.  The trees are inked in Sweet Sugarplum, Perfect Plum and Pink Pirouette.

  The sentiment is stamped in Perfect Plum ink and I added some of the Fancy Frost sequins across the card for even more sparkle.

  A change in sentiment would make this a great Happy New Years card.

  Thanks for looking!  Did you stamp today?

Stamps: Totally Trees, Christmas Pines

Ink: Sweet Sugarplum, Perfect Plum, Pink Pirouette, Versamark

Paper: Sweet Sugarplum, Perfect Plum, Whisper White

Accessories: Fancy Frost Sequins, Iridescent Ice (retired)


Friday, November 11, 2016

Elf Sized Treats - Stampin' Up! Jolly Friends - Fab Friday 100

 When time is running short it's always nice to be able to combine projects to serve more than one purpose!  That's what I did this time around for the latest Fab Friday challenge....which is number 100 by the way!!  That's quite a milestone in my book!  I needed a fun project for my team to make at our stamping get together last night and when I sat down to design it earlier in the week I already had our challenge colors out on my desk to spark some creativity.  Need + Need = 2 items checked off the to do list!

  Check out these fun Fab Friday challenge colors for the big 1-0-0!


  Cool right?  At first I was going to go with a fall card but then those little hats started calling to me along with a need to include some chocolates.  What's a stamper to do but to make a little treat tote with wrapped treats and a coordinating 3 x 3 card!


    So cute right?  The little tote is made with the envelope punch board.  After the scoring I ran it through the Big Shot with the Cable Knit embossing folder for some winter texture.  The tote holds 4 wrapped Hershey Nuggets (I couldn't get all 4 to stack up so you'll have to imagine the 4th!).  I wrapped them with 1 x 3.25" strips that are also embossed.

  The hats are popped up for dimensional and the brims (or are they cuffs?) and the pompoms are colored with clear Wink of Stella for a bit of sparkle.

  I used the "to you and yours" sentiment from the Christmas Pines stamp set as it was just the right size for my Elf Sized Treats.

  I hope you'll join the Fab Friday team in celebrating our 100th challenge by playing along!

  Thanks for looking!  Did you stamp today?

Stamps: Jolly Friends, Christmas Pines

Ink: Delightful Dijon, Mint Macaron, Rich Razzleberry, black

Paper: Delightful Dijon, Mint Macaron, Rich Razzleberry, Whisper White

Accessories: Envelope Punch Board, Cable Knit embossing folder, corner rounder,  Jolly Hat punch, dimensionals, Wink of Stella, Mint Macaron Sheer Linen

Thursday, November 10, 2016

Sparkly Balloon Birthday - Stampin' Up! Balloon Celebration

 A few weeks ago we travelled to Pennsylvania to surprise my mother in law for her birthday.  Of course I had to make a fun birthday card using her favorite color and lots of sparkle!


  It was super hard to get a good photo.  This was the best that my meager photography skills could manage hence the weird fuzziness and some glare.  You get the idea right?

  I did a watercolored background using Perfect Plum ink on watercolor paper.  After it was dry I stamped both sizes of balloons overlapping.

  Next, using my Clear Wink of Stella I colored in all the balloons adding an extra layer each time a portion of a balloon overlapped with another.

  The final bit of sparkle comes in the way of some bits of extras from my Tin of Tags kit.  The kit comes with a generous amount of iridescent sequins and silver star confetti pieces so after completing my tags I had some fun stuff to add to other projects.  The perfect embellishments for these birthday balloons!

  Using the retired color spritzer tool and my Perfect Plum marker I spritzed a bit of splatter randomly around the card front.  I tied a black bakers twine bow to the side to wrap up this card.

  Thanks for looking!  Did you stamp today?

Stamps: Balloon Celebrations

Ink: Perfect Plum, Black Stazon

Paper: Perfect Plum, watercolor paper

Accessories: Wink of Stella, black baker's twine, sequins & star confetti (Tin of Tags kit), spritzer tool (retired)

Friday, November 4, 2016

Fresh Fall Leaves - Stampin' Up! Vintage Leaves

  I keep thinking that fall is finally here and then we have a day or 2 with the temps in the 70s or even hitting 80....like yesterday!  The leaves are changing but the weather is still up and down.  But I'm trying to get all my fall stamping in before it changes to cold for good.

  The project I'm sharing today is the design that my stampers made at my October Stamp club last week.  We mixed some fun clear block stamping with the elegant Copper embossing powder.


 I normally grab Pear Pizzazz for spring cards but I thought it was a nice pairing to put it with Cajun Craze and Tip Top Taupe.  Kind of gives it a bit of a fresh look for fall.

  The Pear Pizzazz was used to stamp the little square with an "A" block.  Next the small splatter stamp from Gorgeous Grunge was used with Tip Top Taupe.

  The leaves were embossed with Copper Embossing powder and cut out with the Leaflets framelits.  they are adhered with dimensionals over a narrow strip of Tip Top Taupe cardstock and tied with a linen thread bow.

  I gave my stampers lots of choices in their sentiments with the Sunshine Sayings stamp set which we stamped in Tip Top Taupe ink.

  Thanks for looking!  Did you stamp today?

Stamps: Vintage Leaves, Sunshine Sayings, Gorgeous Grunge

Ink: Pear Pizzazz, Tip Top Taupe, Versamark

Paper: Pear Pizzazz, Tip Top Taupe, Cajun Craze, Whisper White

Accessories: Leaflets framelits, Copper embossing powder, linen thread, A block, dimensionals

Tuesday, November 1, 2016

Inspired Fall Leaves - Stampin' Up! Vintage Leaves

  So is your household in a candy coma like mine is?  Well my boys were slow moving this morning at least.  According to Alex the 8 year old, it was the "most successful Halloween yet".  A half a pillowcase full of candy is definitely successful by anyone's standards!  The costumes were decided upon the night before and thankfully were really easy to put together.


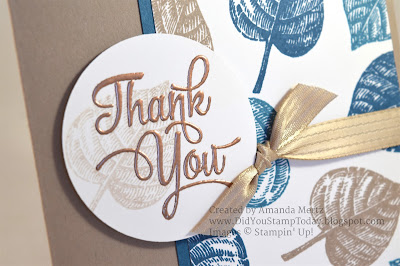
 Now onto the card for today!  I needed a thank you card for my brother in law and sister in law who hosted a birthday brunch for my mother in law last weekend.  They put on a huge spread for the family to celebrate her birthday and we ate and ate and ate so I couldn't let the occasion go by without a proper thank you card.  

  I got my inspiration from this duvet cover I saw in the Company Store catalog.  I made a bit of homemade DSP for the main element and then all the rest of the card parts came together.


  The card base is Tip Top Taupe and the leaves from Vintage Leaves are stamped in Tip Top Taupe, Dapper Denim, and Island Indigo.

  I wrapped a bit of retired Crumb Cake stitched satin ribbon that is a very close match to the Tip Top Taupe.

  I stamped off Tip Top Taupe once and then stamped the leaf again and embossed the thank you in Copper over the top of it.  After embossing I punched out a circle and popped it up to the side of the 
ribbon.


  The leaves are finally changing around me and it seems that it happened just over the weekend. Hopefully we'll get some sunshine this week to really enjoy the bright colors!  And maybe stamp a few more fall inspired cards!

  Thanks for looking!  Did you stamp today?

Stamps: Vintage Leaves, One Big Meaning

Ink: Tip Top Taupe, Dapper Denim, Island Indigo

Paper: Tip Top Taupe, Whisper White, Dapper Denim

Accessories: circle punch, copper embossing powder, Crumb Cake stitched satin ribbon (retired), dimensionals, corner rounder