Sunday, October 31, 2021

Merry Little Trees - Stampin' Up! Christmas Trees Dies

   The Paper Players Challenge is back with a new challenge today! Ann has given us a fun Tic-Tac-Toe board for our inspiration.  Pick a row or column down, across or diagonal and use those 3 elements to create your card.

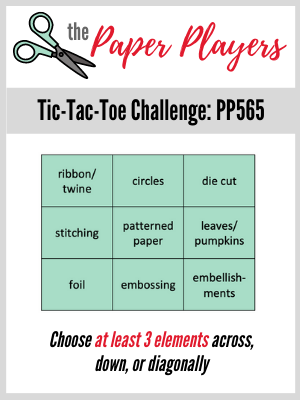
  I chose the middle row down; Circles, Patterned Paper & Embossing to make my card.  I need to get going on Christmas cards so that was my focus for this card.  


  Apologies for the poor photo!  I was losing my natural light to photograph so I promise this card looks better in person!

  I used circles for the trees, the embossed patterned and the little gems at the tops of the trees.  Embossing is the embossed polka dots as well as the silver embossed sentiment.  And of course the patterned paper for the trees which I layered behind the circles with the trees cut out of them.  The Christmas Tree dies and Whimsy & Wonder DSP are definitely the stars of this card.

  Check out the rest of the Design Team and then share your creation in the gallery so we can oooh and aaah over it!

Jaydee
 LeAnne
Claire
Joanne
Laurie
Anne Marie
Ann
Nancy
Debbie 

  Thanks for looking!  Did you stamp today?

Stamps: Christmas to Remember

Ink: Versamark

Paper: Basic White thick, Basic White, Whimsy & Wonder DSP

Accessories: circle punches, Christmas Trees Dies, Checks & Dots embossing folders, Metallic Edges ribbon (retired), silver embossing powder, dimensionals, Elegant Faceted gems


Saturday, October 30, 2021

Cozy Knit Sweater & Fork Bow How To VIDEO - Stampin' Up! Knit Together Bundle

   There are a lot of fun perks about being a Stampin' Up! demonstrator but one of my favorites is teaching cool little tricks and tips to other stampers who get just as excited as I do.  I had a class this week for my local stampers (if you're in the Richmond, VA area and would like to get on my email list just leave a comment or send me an email!) and we made this adorable Christmas card using the Knit Together bundle.  Not only did they get hands on time with this fun stamp and die set but I was able to (re)teach them how to make a fork bow.  A 'what' you ask?  Yup, it's a bow made with a fork.  I promise it's super easy and super cute.  Check it out on the card we made!

  And now here's a quick video showing How to Make a Fork Bow.  If this is a new tip for you I bet a fork will find it's way into your stamping supplies!


  The card is a fun one to put together and the Knit Sweater dies offer endless mix and match opportunities for patterns and colors.  The card we made in class starts with a Smoky Slate base.  Then we stamped a layer of Cherry Cobbler (a must have color for fall and Christmas card making!) with Cherry Cobbler ink and the Knit Together background stamp.  I mounted the stamp on the Stamp-a-ratus for even inking and stamping.  

 After the stamping we used the Knit Sweater dies to cut the pattern in the Cherry Cobbler layer. We added a layer of Basic White behind the die cut layer so the patterns would pop.  To add even more fun details we cut a piece of Evening Evergreen with the tree die and a piece of Smoky Slate with the deer die and then added the shapes back into the negative space on the Cherry Cobbler piece.  If you don't like messing with glue you can use some of our adhesive sheets and the cardstock to make little stickers for ease of application.  It's a great product to use for fine detailed die cuts that are hard to apply adhesive to.

  When the deer and trees were finished being added back in the sentiment from Sweet Little Stockings was stamped in Evening Evergreen on Basic White then cut out and backed with a Smoky Slate circle.  It's then popped on dimensionals and then we added our sweet little Evening Evergreen fork bow as the final touch.

 I hope you have fun making your own fork bows now that you know how easy it is!

  Thanks for looking!  Did you stamp today?

Stamps: Knit Together, Sweet Little Stockings

Ink: Cherry Cobbler, Evening Evergreen

Paper: Smoky Slate, Cherry Cobbler, Basic White, Evening Evergreen

Accessories: Knit Sweater dies, circle punches, Evening Evergreen open weave ribbon, dimensionals, fork(!)


Friday, October 29, 2021

Autumn Petals - Stampin' Up! Hand-Penned Petals

 It is a dreary day here in Virginia!  It's been raining on and off since last night and it is gray and soggy. A perfect time to stay in and stamp. A not so perfect time to try to photograph projects or record videos!  My stamp room lighting deficiencies are shown in full on dark days like this!  

  What kind of lights do you use for your stamping space and for photography and video recording?  Usually I just use natural light from my big window for photographs and that works really well but on days like this it's hard to get enough light. Check back over the next few days for some how to videos if I can get them to not look like I'm in a cave! My desk lamp and the camera ring light will be working over time for sure!

  For today I have a clean and simple (CAS) card that I'm sharing over at CAS Colours & Sketches for their current layout.  It's also the second of two entries to try out for their design team call.  To see my first project click HERE.

  I've had this color combo in my pile of inspiration for a while now and this challenge seemed like the perfect time to use it for this non-geometric shaped flower cluster.  The Hand-Penned Petals set is gorgeous no matter what colors you use but I'm really digging this fall inspired combo. 

  I started with a Basic White thick card base that I embossed with the Stitched With Whimsy dies just for a bit of subtle detail.  I added a some light shading with my blending brush and Misty Moonlight ink to create a space for the flowers.

  Next I stamped the big flower cluster in Night of Navy then filled in the flowers with Cajun Craze and Bumblebee ink.  The leaves are filled in with Misty Moonlight.  I die cut the shape then popped it on the card base with dimensionals but first tucked a piece of retired corduroy ribbon underneath.

  The sentiment from Many Messages is stamped in Night of Navy and cut with the Tasteful Labels dies.  It's then backed with a Cajun Craze circle and also popped on dimensionals.  The final touch are a few Bumblebee enamel dots.

  Thanks for looking!  Did you stamp today?

Stamps: Hand-Penned Petals, Many Messages

Ink: Night of Navy, Cajun Craze, Bumblebee, Misty Moonlight

Paper: Basic White thick, Cajun Craze

Accessories: Stitched with Whimsy dies, Penned Flowers dies, Tasteful Label dies, dimensionals, corduroy ribbon (retired), enamel dots (retired), circle punch, blending brush


Wednesday, October 27, 2021

Gorgeous Purples - Stampin' Up! Gorgeous Leaves

   Happy Wednesday stamping friends!  The last few days have been all about stamping! I've been designing for, prepping for and having my monthly class.  I love seeing my local stampers each month and getting to share new projects with them.  If you're local to the Richmond, VA area and would like to join in on the monthly stamping fun just reach out and get on my email list so you can get all the details.  

  I'll be sharing those class projects soon but in the meantime I have a card that I can finally show as I made it for my mother-in-laws birthday last week and now that I know she's received it there won't be a spoiler!

  I had a lot of fun putting this beauty together!  There's a lot of texture and detail in there and I combined products from a few different suites to get just the right look.  To start I used a Crumb Cake base, then a layer of Basic White, then a piece of Harvest Meadow DSP in a nice neutral pattern.

  For the small square element I used a bit more Crumb Cake then topped it with a vellum square doily.  Next up is a Basic White circle embossed with one of the Greenery embossing folders.  Now comes all the layering of stamped leaves, gold die cut leaves, and a branch all using the Gorgeous Leaves bundle.  A sprig of wheat cut using the Harvest dies gives some height to the arrangement and ties in with the DSP.

  Next comes some fun sparkly embellishments in the way of gold sequins, purple sequins and a few Fresh Freesia adhesive gems.  A length of Gorgeous Grape sheer ribbon helps anchor the sentiment.

  The sentiment is from the All Squared Away set and embossing in gold.  After I trimmed the ends I layered it on a slightly larger piece of the Gold Metallic Specialty paper which I absolutely love (page 135 of the Annual catalog, the sample is so small and tucked into the fold so it's really easy to miss!).  I love all the purple and gold against the Crumb Cake; it's nature-y but with a fun 'pop'!

  Thanks for looking!  Did you stamp today?

Stamps: Gorgeous Leaves, All Squared Away

Ink: Gorgeous Grape, Highland Heather, Fresh Freesia, Versamark

Paper: Crumb Cake, Basic White, Soft Suede, Gold Specialty Paper, Fresh Freesia, Gorgeous Grape

Accessories: Stitched Shapes dies (retired), Greenery embossing folder, dimensionals, Harvest dies, Intricate Leaves dies, sequins, adhesive gems, sheer ribbon, gold embossing powder, square vellum doily


Sunday, October 24, 2021

Moonlight Coneflowers - Stampin Up! Nature's Harvest - Paper Players 564

   I always say the best way to start the week off is to do some stamping!  Lucky for you The Paper Players Challenge is back with a great new challenge to help you get started!  LeAnne has us working on a great sketch this time!  So many possibilities with those rectangle panels!  Can't wait to see what you all create.


 This is the card design that I sent out to my team for their October monthly hello card.  If you're ever interested in learning more about being a demonstrator feel free to reach out to me.  I'd love to answer any questions.

  I went full on Misty Moonlight with just a touch of cork for my card.  I love this color and couldn't resist using 3 different DSP sheets for my card!  The Harvest Meadow DSP has two of the patterns and the third (the stripes) comes from the Sale-A-Bration freebie Penguin Playmates DSP.  I layered the DSP over a piece of Cork Specialty paper and a Basic White layer.

  The stitched circle is embossed with the Tasteful Textile folder and makes for a nice texture for the coneflowers from the Nature's Harvest set.  I stamped them in Misty Moonlight and then used my blender pen to lightly blend some of the ink for a very light color.  I didn't add any extra ink but just pulled it from the stamped image to fill in some of the white spaces. You want to be careful you don't over work the cardstock with the blender pen as the cardstock will start to pill and get muddy looking but it's a great technique for a very subtle color.  Once the flowers were cut out I adhered them to the circle and then the whole thing to the card front.

  The sentiment from the Many Happenings set is stamped in what else; Misty Moonlight! I used the long label from the Harvest dies to cut it out.  I have had this white twill ribbon forever and it's long since retired but I thought it was just right for adding to the underside of the sentiment.  The whole strip is popped on dimensionals.  The final touch is two retired white sequins and a retired enamel dot in Misty Moonlight.  No matter how much I use these retired dots and sequins I always seem to have just as many left!  I think they have babies in the drawer!

  The Paper Players Design Team always knocks these challenges out of the park so head on over and give them some love before playing along!

Jaydee
 LeAnne
Claire
Joanne
Laurie
Anne Marie
Ann
Nancy
Debbie 

   Thanks for looking!  Did you stamp today?

Stamps: Nature's Harvest, Many Happenings

Ink: Misty Moonlight

Paper: Misty Moonlight, Basic White, Cork Specialty, Harvest Meadow DSP, Penguin Playmates DSP (SAB)

Accessories: Stitched Circle die (retired), Harvest dies, dimensionals, blender pen, sequins (retired), enamel dot (retired)


Friday, October 22, 2021

Fresh Falling Leaves - Stampin' Up! Intricate Leaves Dies

   I was able to quickly finish up all of my stamping 'work' on Wednesday morning so I found myself with some time on my hands before I had to leave the house for an appointment.  I decided to get busy with 2 challenges that had just posted.  I'll be sharing this one on both CAS Colours & Sketches for their color challenge as well as Freshly Made Sketches for their layout.  The CAS Colours & Sketches team has put out a design team call for next year so I thought I would throw my hat in the ring and try out by submitting this card for consideration.  

  I found these colors fun to work with as they are older Stampin' Up! colors and have been around for a while.  I guess they would be some of the veterans in my color collection and deserve some love!

  Following the Freshly Made Sketches layout I started with a Basic White thick card base then embossed a piece of Rich Razzleberry with one of the Greenery embossing folders.

  Next is a layer of Night of Navy then a layer of Basic White embossed with the retired Subtle folder.  Using the 3 challenge colors I cut different leaves with the Intricate Leaves dies as well as one of each from foam sheets.  Once I had my leaves assembled and looking nice and popped up I adhered them to the Basic White panel.  

  I embossed the 'hello' from the Beauty of Friendship set and trimmed it and popped it up with dimensionals.  I added a length of Night of Navy twine to help anchor the smaller sentiment as well as adding a few Rich Razzleberry sequins around it.  The whole leaf panel is then popped on dimensionals on the card front.

  Thanks for looking!  Did you stamp today?

Stamps: Beauty of Friendship

Ink: Versamark

Paper: Basic White thick, Basic White, Night of Navy, Rich Razzleberry, Old Olive

Accessories: Intricate Leaves dies, dimensional sheets, white embossing powder, Subtle embossing folder (retired), Greenery embossing folder, baker's twine, sequins


Tuesday, October 19, 2021

24 Hour Only Stamp Sale - Wednesday October 20


  All cling stamps in the 2021-2022 Annual Catalog (except for host stamps) will be 15% off!!!  Check those wish lists and order on Wednesday.  All sale stamps will be listed in the online store under 'Stamp Sale' for easy browsing.

  Use my monthly Host Code: C4NMB3J9 to be entered into the door prize drawing for a pack of the Gingerbread & Peppermint DSP.  Each $25 spent (before tax/shipping) gets you one entry.


Autumn Wreath - Stampin' Up! Sparkle of the Season

   I've been busy designing projects for my next class and I realized I haven't finished sharing all the projects we did last month!  I have one left and as it's seasonal I should probably get it shared before it's too late!


  I love the look of this somewhat neutral and soft fall card.  I wanted to show off some Sale-a-Bration products as well as the Sparkle of the Season bundle. Unfortunately by the time class rolled around the Be Dazzling paper was already sold out but a few of my customers were able to snag it before it was gone.  It was definitely it hit and fingers crossed that Stampin' Up! offers it again in the future.  I hope you got your favorites!

  This card also has a piece of the Peaceful Prints DSP which was also a Sale-a-Bration choice.  I love this birch wood pattern since it isn't overtly Christmas and can be used on all kinds of cards.

  The wreath is mostly die cutting with 2 layers of the wreath stacked and then the stamped leaves and pine cones along with the sentiment.  The pumpkins are cut from Pale Papaya cardstock and lightly inked along the edges with the same color ink using a blending brush. A bit of Soft Succulent open weave ribbon is tucked under the cluster for some added softness.

Thanks for looking!  Did you stamp today?

Stamps: Sparkle of the Season

Ink: Soft Succulent, Crumb Cake, Pale Papaya

Paper: Crumb Cake, Basic White, Pale Papaya, Be Dazzling paper (SAB), Peaceful Prints DSP (SAB)

Accessories: Seasonal Swirl dies, dimensionals, open weave ribbon,

Sunday, October 17, 2021

Big Birthday Wish - Stampin' Up! Party Puffins - Paper Players 563

   It just so happened that my specific card needs coincided with the newest Paper Players Challenge this week!  Jaydee has given us the fun challenge of a Clean and Simple birthday card!  I hope you'll be inspired by this new challenge this week and come play along with us!


  I needed a special birthday card for one of my childhood soccer coaches who was having a milestone birthday.  He was an enthusiastic coach who always believed in us and who showed up season after season in all sorts of weather to continue to teach 20 girls not only the fundamentals of the game but also how to be a team.  Happy birthday Mr. G!

   I do have some layers and bit of texture but I think the open space and limited color palette (our team always wore blue so I had to stick with the theme!) definitely put this card in the clean and simple category.  Nothing crazy here, no fancy techniques just some mixing and matching of stamp sets and a tiny bit of ink blending behind the sentiment.

  Check out the Paper Players Design Team for more inspiration!

Jaydee
 LeAnne
Claire
Joanne
Laurie
Anne Marie
Ann
Nancy
Debbie 

  Thanks for looking!  Did you stamp today?

Stamps: Party Puffins, Biggest Wish, For the Win (retired)

Ink: Versamark, Memento Black, Misty Moonlight, Balmy Blue

Blends: Daffodil Delight dark, Pumpkin Pie dark

Paper: Basic White, Misty Moonlight

Accessories: black embossing powder, dimensionals, Stitched Rectangle dies, Subtle embossing folder (retired), black bakers twine, rhinestones, candy dots (retired), enamel dots (retired)

Friday, October 15, 2021

Fresh Christmas - Stampin' Up! Christmas Season

   I haven't had much time to play around with challenges lately but when I saw the CAS Colours & Sketches Challenge newest inspiration sketch I just had to try my hand at it.  It was a challenge for sure; it took me a while to get just the right balance of elements as well as colors for this clean and simple challenge.


  I'm trying to jump start some holiday card making with this one!  That fun angle really gives a unique look doesn't it?  I started with a Fresh Freesia base and then embossed another panel of the same with the retired Subtle embossing folder for my background.  I used my somewhat neglected Basic Borders dies to cut the angle out of Basic White cardstock.  I like the subtle accents of the stitch marks along the edge.

  The snowflakes are cut with the So Many Snowflakes dies out of the leftover piece from the Wonderful Snowflakes accents (in the July-Dec. catalog page 25) after using up all the snowflakes.  There's just enough room in the center of the panel to cut a few small elements and 2 of the snowflake dies fit perfectly!  The iridescent look is just right for a CAS design.

  The stamping is done with the Christmas Season stamp set and I stamped the holly leaves in Soft Sea Foam and the berries in Fresh Freesia.  Once I cut them out I adhered them with dimensionals.  The 'merry' is from the Christmas to Remember stamp set and is also stamped in Fresh Freesia.  I just hand trimmed it down to size and also popped it on dimensionals.  And while I wanted to add some more greenery and maybe even a bow, cooler heads prevailed and reminded me of the challenge guidelines and so I just added a few In Color rhinestones to finish off this clean and simple Christmas card.

   Thanks for looking!  Did you stamp today?

Stamps: Christmas Season, Christmas to Remember

Ink: Fresh Freesia, Soft Sea Foam

Paper: Fresh Freesia, Basic White, scraps from the Wonderful Snowflake accent sheets

Accessories: So Many Snowflakes dies, Basic Borders dies, Seasonal Labels dies, In Color rhinestones, dimensionals, Subtle embossing folder (retired)


Wednesday, October 13, 2021

Pinecone Hello - Stampin' Up! Christmas Season Bundle - VIDEO

 I'm back with another video today.  This time I'm using the Christmas Season bundle to make a non-Christmas card.  It's nice to see some ways to use a Christmas set in other ways to get a bit more use out of.  Check out the video below to see how to put this one together.


   Thanks for looking!  Did you stamp today?

Stamps: Christmas Season, Biggest Wish

Ink: Soft Suede, Blackberry Bliss, Soft Succulent

Paper: Soft Succulent, Very Vanilla, Cork Specialty paper, Harvest Meadow DSP

Accessories: Seasonal Labels dies, scalloped lace trim, dimensionals, adhesive pearls

Monday, October 11, 2021

'Tis the Season Wreath - Stampin' Up! Christmas Season

   It must be wreath stamping season!  When I checked my 'cards to upload' file almost all of them are wreath cards!  And my card yesterday had a wreath too.  I hope you aren't a wreath hater lol!  I might need to reign it in in the coming week or you'll think I'm a one trick pony!  Hopefully they are all different enough that you'll find some kind of inspiration from each one.

  Today it's a Christmas wreath that we made at my last class.  The Christmas Season stamp set in the July-Dec. mini catalog is a great set that has lovely seasonal foliage and coordinating dies. This card only uses one little die but it's nice to have some examples of just using the stamps on their own.


  This one starts with a Soft Sea Foam base which I used one of the Adorning Designs masks to lightly blend some Soft Sea Foam ink on the background.

  The wreath panel starts with a piece of Basic White.  I used my retired 1.25" circle punch (but you can use any size punch or circle die to get the same effect) to cut a mask out of scrap paper.  I used some re-positional adhesive to stick it to the center of the Basic White. 

  Now comes the stamping all around the mask with the different stamps and colors.  I did 4 of each element in (mostly) equal spacing around the circle (colors listed below). Once my wreath was filled in to my liking I removed the mask and put the rest of the card together.

  Using some narrow strips of Evening Evergreen I used my fingernail to distress one edge on each strip to give a bit of texture and layered it behind the wreath layer.  This is a quick way to add some interest and texture without going all out, it also is a great way to use some narrow strips of card stock and jazz them up a bit.

  The sentiment is stamped in Evening Evergreen and then die cut.  It's popped on dimensionals over a length of Real Red Mini Ruffled ribbon.  A few red jewels are the final touch to this seasonal beauty!

  Thanks for looking!  Did you stamp today?

Stamps: Christmas Season, Christmas to Remember

Ink: Real Red, Evening Evergreen, Garden Green, Soft Sea Foam

Paper: Soft Sea Foam, Basic White, Evening Evergreen

Accessories: Seasonal Labels dies, circle punch, red jewels, mini ruffled ribbon, dimensionals

Sunday, October 10, 2021

Gorgeous Wreath - Stampin' Up! Gorgeous Leaves - Paper Players 562

   It's Sunday again and you know what that means?  It's a new Paper Players challenge!  Ann Marie has given us a color palette to work with this week.  We've got Pumpkin Pie, Pale Papaya, Early Espresso and a 4th color of your choice!


  I have to confess I struggled a bit to get this one started.  I liked the colors but none of my stamps sets seemed to be calling out to be used!  After a few stops and starts I ended up combining some elements from the Gorgeous Leaves stamp set and the Sparkle of the Season bundle.


  I added Crumb Cake as my 4th colors and embossed it with the Brick & Mortar embossing folder.  I brushed a bit of Crumb Cake ink onto the panel for a little detail.

  The two wreaths are cut out of Early Espresso and layered.  The leaves are inked in Pale Papaya with some Pumpkin Pie sponged on with a sponge dauber.  After cutting them out the leaves are layered around the wreath and then the whole wreath is popped on dimensionals.

  The sentiment is stamped on a strip of Crumb Cake and then I added a few retired candy dots for some extra detail.  For another detail I added a knot of twine and retired Early Espresso seam binding ribbon.  It's hard to see but I covered each little leaf on the wreath with a light layer of Wink of Stella for a bit of shine.

  I figure that this will be a good Thanksgiving card with these pretty fall colors.

  I can't wait to see the wonderful ideas you come up with for these colors.  Be sure to share them in the challenge gallery.  Also take a look at the Design Team projects and give them some love!

Jaydee
 LeAnne
Claire
Joanne
Laurie
Anne Marie
Ann
Nancy
Debbie 

  Thanks for looking!  Did you stamp today?

 Stamps: Gorgeous Leaves, Sparkle of the Season

Ink: Pumpkin Pie, Pale Papaya, Early Espresso, Crumb Cake

Paper: Early Espresso, Crumb Cake, Basic White

Accessories: Brick & Mortar embossing folder, Seasonal Swirls dies, Intricate Leaves dies, dimensionals, twine, Wink of Stella, Early Espresso seam binding ribbon (retired), candy dots (retired)

Sunday, October 3, 2021

Spooky Night Sky - Stampin' Up! Seasonal Swirl Dies - Paper Players 561

  The Paper Players challenge is back today with a great new challenge.  I know I say that every week but it's true!  I'm so inspired with each new challenge and getting to see the Design Team projects as well as the lovely gallery.  This week is no exception!  Laurie has given us the theme of 'Spooky' this time.  

  I've got to admit that I don't usually go in for Halloween stamp sets or papers as I have found over these many years of stamping that I just don't send many cards for this one day.  It's all well and good with me if one of my fall sets has a pumpkin or a bat so if I need to make a card I can usually come up with something.  And that something is my card today since about the only thing I had that might be spooky is bats.  


  I decided that it would be pretty spooky to have a full moon with a bold sky and some bats flying over head.  Add in a few trees and we've got the start of a haunted hay ride through the woods of New England right?


  I used basic masking to make the moon and then reversed the mask to blend in the night sky while keeping the moon nice and bright.  The trees are embossed in black and have a nice shine in real life.  The background layer and the bats are Black Glitter paper.  The bat die is in the Seasonal Swirls die set and are popped on dimensionals.

  Check out the Design Team's spooky cards and then play along with us and share your card to our gallery!

Jaydee
 LeAnne
Claire
Joanne
Laurie
Anne Marie
Ann
Nancy
Debbie 

  Thanks for looking!  Did you stamp today?

Stamps: Beauty of Friendship

Ink: So Saffron, Bermuda Bay, Pacific Point, Night of Navy, Blackberry Bliss, Versamark

Paper: Basic Black, Black Glitter paper, Basic White

Accessories: Seasonal Swirl dies, black embossing powder dimensionals

Friday, October 1, 2021

Harvest Alcohol Ink Background - Stampin' Up! Harvest Dies

   Happy October 1st!  Does it feel like fall where you live?  We've had lower temps lately and I'm starting to get in my fall feels.  I even wore pants the other day! My card today is one my stampers made at class earlier this week.  And while not overtly fall it uses the Harvest dies and the background reminds me of a fall evening after sunset as the sky turn darker.


  This card was all about letting my stampers play around with this fun technique that uses the Blends alcohol markers to get a truly unique background panel.  There are lots of videos out there and I'm not even sure if there is a standard name for this technique but Blended Alcohol Ink Background or Alcohol Ink Vellum Background should get you a few to see which way works for you and your supplies.  

  For this panel we used a piece of vellum and colored blocks of Blends marker in about 3/4"-1" wide sections starting with the darkest ink at the top and working our way down.  Colors used here are listed below in the supply list.

  After you've colored in your vellum use a dry paint brush or dry Aqua painter/Water Painter brush and some 91% rubbing alcohol in a little dish to gently blur the colors (only 91% works for this technique).  Start with less rubbing alcohol on the brush and add more as needed blotting the brush between each color.  Work your way down the vellum until all the color are blurred.

  Dry any rubbing alcohol still left with a heat tool.  Then using the brush and dish of rubbing alcohol drip and splatter drops onto the vellum at random.  Heat again to dry and repeat this step if you would like more splatter marks.

  After the alcohol has dried adhere the vellum to a piece of Basic White cardstock to really make your background pop and then create the rest of your project.  For this one we simply cut out a Basic Black flower sprig using the Harvest dies, popped it up on the background with dimensionals and added a black baker's twine bow.  A sentiment and some Artistry Bloom sequins finish this card off.


  Thanks for looking!  Did you stamp today?

Stamps: Many Happenings

Ink: Memento Black

Blends: Night of Navy dark & light, Misty Moonlight dark & light, BlackBerry Bliss dark & light, Fresh Freesia dark

Paper: Blackberry Bliss, vellum, Basic White

Accessories: Harvest dies, black baker's twine, dimensionals, Artistry Blooms sequins, 91% rubbing alcohol