Well lo & behold, there was some figuring & measuring and a trip to Lowe's for supplies....a few consultations...a request for a shelf and some decorative molding and I got a wall mounted ink pad storage unit for Christmas from my dear husband! He was smart (way smarter than I am) and took some pictures during the building process and I had him write up the instructions to share with you all. If you have any questions please don't hesitate to leave a comment or send me an e-mail and he'll get back to you as soon as he can. Hopefully you have someone in your life (maybe even yourself!) that is handy with wood and could be persuaded to get the sawdust flying to make this ink pad storage unit for you. I love mine and it makes it so easy having all of my ink color options within reach of my stamping table. So a HUGE thank you to my husband for building & then writing up the instructions about making my ink pad storage!
***And don't worry....I have WAY more ink pads than are shown in the final photo. I had a lot pulled out for my stamp club as well as another project when the picture was taken!***
This storage is about 21 ¼ inches wide and 24 ¾ inches tall (without the molding pieces) and can hold 60 ink pads.
Parts list
- 2 6-foot pieces of ¾ pine
- 1 4-foot piece of ¾ pine
- 1 2 x 2 foot piece of ¼ board (backer board)
- 1 4 x 2 foot piece of ¼ board (shelves)

1) Cut the ¾ pine for the frame.
a. 2 Sides: 24 ¾ inches
b. 3 Top/Bottom: 17 ¾ inches
c. 3 Middle: 18 1/2 inches (****this measurement was originally 18 1/5 inches....this was incorrect and I have updated it to read the correct measurement of 18 1/2*****)
2) Mark the grooves in the side pieces, which will hold the shelves. I allowed for 1 inch gaps so I marked the top of the side pieces and then started with a 1 ¾ inch mark from the top of the wood. In the end this gave me a smaller top shelf spacing (3/4), because I didn’t allow for the first groove cut width, so you could modify this, but it worked the way I did it. From that first mark 1 ¾ inch from the top of the sides I marked a center line every 1 ¼ inch, making 13 more marks. These marks are where you will cut the grooves for the shelves.

3) Mark the grooves in the middle pieces. Top/bottom doesn’t matter with these. Start by marking at 1 inch and then every 1 ¼, again making 13 more lines.
4) Cut your grooves. I used a table saw with a ¼ inch dado saw blade at a ¼ inch depth. Center the dado blade on your marks. Because the side and middle pieces have different measurements for the grooves I cut them at different times. I did, however, make sure to use each measurement to make all of the cuts I could before changing the fence. For the sides this meant only two cuts but for the middle pieces each measurement will give 12 cuts. 3 boards, two sides and two ends. Just keep flipping the board and make all the cuts.
5) I would paint a few coats now (which I did not), which will make your life easier later. You will have to do some topcoats later, but get a good base down now.
6) Cut strips of your 4 x 2 x ¼ board to start making the shelves. You will need 5 lengths to make the 56 shelves and will have waste at the 4x2 size. Using the table saw, cut them along the 4-foot length at 3.5 widths (this matches the width of the ¾ pine boards)
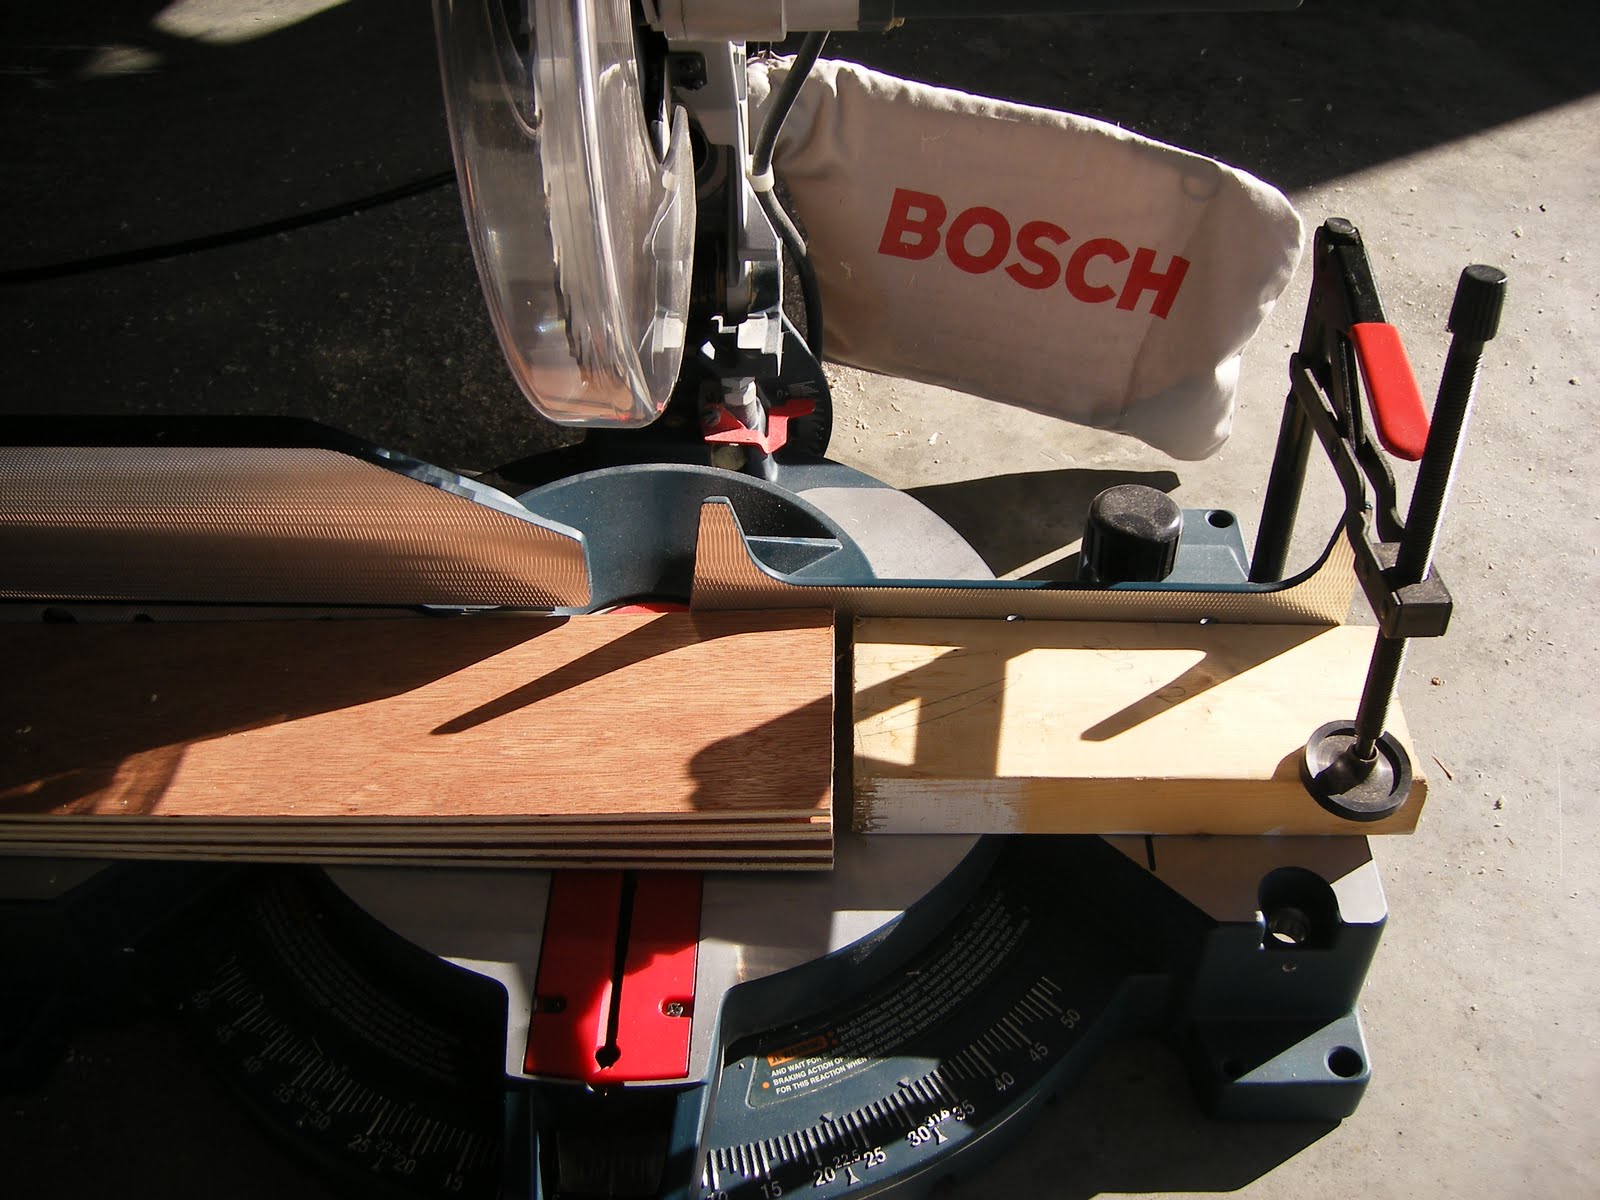
7) I made a simple jig for my miter saw to make this next cut go faster. Just clamp a block giving you 4 ¼ inches to the jig side of the blade. At 4 ¼ inches the shelves should slide into the frame.
8) Paint your 56 shelves. You will be very sick of this step. Remember at least one of the 4 ¼ inch edges will be showing, so you need to paint it as well.
9) Once your frame pieces are dry you can start assembly. The way I built this the top and bottom pieces fit inside and flush to the sides. The outer middle sections are 5 inches (on center) from the outside edge of the frame. The very middle is centered between those, which is 4 5/8 inches, from center to center. The bottom section has a 4-inch gap, so 4 ¾ from center of the bottom board to the center of the bottom piece of the shelf section.

10) I had various pieces of molding from other projects, which I used to dress up the joints a little. I have another jig for molding (again from another job) which makes corners that much easier. Your project will be painted at this point, of course!


11) Mark the 2x2 backer board to fit your finished frame and nail it on. Paint this first, again.
Here is the finished product in the stamp room.
This is AWESOME!! Great job building this. And please thank your husband for taking pictures and writing up the info! :)
ReplyDeletespectacular; thanks for the directions; it's great where if you like it mounted.
ReplyDeleteAwesome stamp pad holder and husband!!!
ReplyDeleteIt's absolutely BEAUTIFUL!!! Thanks for sharing.
ReplyDeleteThis looks great! I may just have to talk to my brother-in-law about this! :-)
ReplyDeleteThis is so cool! Thanks to you hubby for making it for you and thanks to you for sharing it.
ReplyDeleteIt's a beautiful.
Wonderful!! I love it! This is going on my hubby's 'honey-do' list!! LOL.
ReplyDeletePaula T.
What a beautiful piece of woodwork; just gorgeous!
ReplyDeleteThis is amazing...what a wonderful job he did both in the construction and the instructions...you have a keeper there...(again both)...This is absolutely beautiful...
ReplyDeleteOh my goodness! This is fantastic. I have two of the SU! color caddies, but I love this! So pretty looking! I am going to print off these instructions and give it a try. TFS!
ReplyDeleteAlthoughI don't have anyone who can do this for me, I enjoyed the drool factor!
ReplyDeleteSharon L
I <3 this & way better than our SU! one; now let me see if I can get my hubby to do this; hmph!
ReplyDeleteWow this is so great! You have a wonderful husband! If I wasn't so afraid that I would cut off something I may need I would give this a try myself. Boy if I could ever find someone to do something like this for me, I would be on cloud nine.
ReplyDeleteGreat Job Mandy's Husband!
Love it! Great job! Thanks for sharing the design and instructions!
ReplyDeleteWould your husband like a holiday to Sunny Queensland..............no ulterior motive.....well maybe..
ReplyDeleteIt is absolutely fabulous and what a wonderful, thoughtful and useful Christmas Gift to receive. So much better than those I have seen made by big manufacturers. What a business he could do!
Cheers
Gwen
WOW! I found your link from the LNS group - and I'm so glad I did. This is awesome!!
ReplyDeleteThis is absolutely awesome! Please tell your hubby thank you very much for the instructions!
ReplyDeleteIn this part of the instructions, is part C 18 and one 'fifth' inches or is that a typo? I am usually good at measuring, but I might be too tired right now to wrap my head around one fifth inches, lol! Thanks for clarification!
1) Cut the ¾ pine for the frame.
a. 2 Sides: 24 ¾ inches
b. 3 Top/Bottom: 17 ¾ inches
c. 3 Middle: 18 1/5 inches
Barb
Very nice - makes me wish I had a DH that did this type of stuff...mine is not even allowed to hammer in a nail - LOL!
ReplyDeleteCynthia Ferenz
Proud Parent of 2 Soldiers
Nice job. Don't you love it when your DH does stuff like that. Mine helped me make a stamp credenza to store my UM in. Gotta love a handy man!
ReplyDeleteI love this! Thanks so much to your husband for sharing! Although my husband probably won't thank him as I am going to be adding this to his list of things I want!
ReplyDeletehey mandy... awesome ink pad holder .. my question is,... is it for spots or full size ... cuz my hubby is making one and im a lil perplexed ??? as to what im seeing .cant tell if its a spot or not .. ive never seen a spot .. and i only own the reg.. ink pads .. help ...i told him dont cut anymore wood till i ask .. thanks anne marie ..
ReplyDeleteAnne M-- You didn't leave contact info so I hope you're checking back for an answer. The inkpad storage is for full sized ink pads. Stampin' Spots are about an inch square and this storage unit is definitely bigger than that! Enjoy your storage when it is finished!
ReplyDeleteYou are my new hero! Thanks so much for posting this - so helpful and the directions are great. Now I know what my husband can do with all his tools I spent 2 days organizing for him! :-)
ReplyDeleteOkay so what if my husband is TOTALLY not a handy man...............how much would your handy hubby charge to make one?? Is there just not enough money to do it again??
ReplyDeleteThank your husband and your for posting this wonderful ink pad storage unit. My husband and I are to the dado cuts tomorrow. One question thou - any trick to attaching it to the wall? Thanks, Barb. barbeestampin@yahoo.com
ReplyDeleteOH MY GOODNESS!!! I'm super jealous! But I made my hubby take a look at it and I begged him to make it for me. I want one for my paper too =)
ReplyDeletewww.shortycreations.com
This just great. Now get my hubby to do this will be the challenge. Thanks for the directions.
ReplyDeletesuzydube@rogers.com
Thank you so much for posting the instructions for this unit. I made it myself and people cannot believe that I made this. I LOVE IT! Thank you again!
ReplyDeleteI just wanted to thank you for posting the instructions for this storage unit. I just completed it a week ago and people can't believe that I made it myself. I absolutely LOVE IT! Thanks
ReplyDeleteI too shared pictures of the wall mounted stamp pad holders to my DH, but unfortunately mine ended up on the 'someday' pile. But now that I have a tutorial to share with him, perhaps I can turn this into a Valentine's gift!! Wish me luck!
ReplyDeleteThanks so much to both of you for sharing this!
Thanks you for sharing this. I am going to try to make this myself.
ReplyDeleteGill
This is awesome DIY project. But I don't have right tools and not sure if I buy them and not using afterwords. Is it possible for you to make couple of those shelves for me?? If you are willing to make and sell then please let me know the price.
ReplyDeleteThanks,
mycreativecorner@yahoo.com
Just found this. Awesome, Awesome. Tell your husband job well done. How just have to find a husband that can build. LOL
ReplyDeleteThis is fantastic! I showed my husband and he said he will build it for me! Thanks to you and your husband for this.
ReplyDeleteThank you for sharing!
ReplyDeleteI really appreciate your sharing this! I'm thinking it would be great for the punches as well with a few changes in measurement. Thanks again!!
ReplyDeleteOh OH OH Oh Oh Oh I almost cussed, this man would get sex any time he wanted it and I would cook everyday forever!!! ( Not really LOL) But still awesome job awesome husband! I love to see men really support their wives in what they do, mine does not so I know the difference!!!
ReplyDeleteWish I were handy.
ReplyDeleteMake these and sell them on Etsy for those of us who love them and don't have the tools - or the experience with them - to make our own!!
ReplyDeleteSo do you make these and sell them?
ReplyDeleteThank you for a great Tutorial and the detailed instructions. I am going to make this after a couple more DIY wood furniture repair and refinishing projects.
ReplyDelete