Tuesday, February 15, 2011

Post Valentine's Day Wrap Up

  I wasn't organized enough last week to get my Valentine's Day projects made, photographed and blogged about so I'm going to do it now....maybe plant some idea seeds for you next year!  My DH and I really don't do much to celebrate Valentine's day but I wanted to kind of do something fun this year since my 4 1/2 year old was excited about the whole day since they were doing a party and exchanging Valentine's at school (check back tomorrow to see what he made!).  I made cards for my kids and husband....nothing too fancy but just a little something to tell them I love them.  I left the cards out on the table so they would find them at breakfast. 

  Here is the card I made DH.  I saw this card by StampGroover over on Splitcoaststampers and thought it was so totally adorable that I had to make one myself.

  The bag is made from some of the packing paper that comes in our Stampin' Up orders!  I've saved 2 large rolls of it but haven't done much with it.  This only took a small scrap but it's a great use for the paper don't you think?  I just folded the ends and bottom in and punched out just the edge using my small oval punch and then adhered.  The hearts are made with the Heart to Heart punch and various kinds of red paper.  I highlighted the Whisper White panel with the new Framed Tulips embossing folder.  The Glimmer Paper (sooooo addicting!) heart is popped up on a dimensional.

Paper: Real Red, Whisper White, Real Red Textured, Love Patterns DSP, Stampin' Up packing paper


Accessories: Framed Tulips embossing folder, Tombow glue, Heart to Heart punch, small oval punch, dimensionals.

  Here are the 2 cards I made for my boys.  They get a kick out of owls lately so I made them both an owl card and just alternated the colors.  I used the Clean and Simple Challenge (CAS105) from last week as my starting point for colors, Poppy Parade, Peach Parfait and Daffodil Delight.  Let me tell you, these colors are hard to use together....I love them all individually but it's hard working with such bright colors all on one little card.  I also used the Sketch Challenge (SC319) for the basic layout.


Stamps: So Many Sayings

Ink: Peach Parfait & Poppy Parade (markers)

Paper: Whisper White, Peach Parfait, Poppy Parade, Daffodil Delight, In Color Hostess DSP pack


Accessories: Owl punch, Word Window punch, 5/8" satin ribbon

  But wait there's more... for dinner we planned to have a nice family dinner in the dining room complete with candles, good china, good crystal, tablecloths, napkins the works!  Ryan helped me set the table and then we sprinkled a bunch of punched out hearts in the center of the table.  Of course we needed to make some more special decorations so we whipped up a cool (easy!) banner to hang across the large mirror in our dining room.  Seriously, this took less than half an hour and that's with a 4 1/2 year old helping.  Ryan actually did all the Big Shot cranking--he's getting to be quite the pro!  Please excuse the photos...it's super hard to get a decent shot with a mirror there without getting myself in the shot (cause I know you don't want to see me!) and the weird bright spots from the sun weren't helping.  I'm sure you can get the gist of it though!


  This was made using the new Petal Cone die in the Occasions Mini catalog.  I had seen a few of these on Splitcoast and thought how cool!  The heart shape is cut with a little flap on one side (for when you make it into the cone shape) that I just trimmed off.  We used the Love Patterns DSP for the 4 "LOVE" hearts and Real Red textured for the end hearts.  We punched the 2 sparkly end hearts with the Full Heart punch and used the Glimmer Paper (again!) for the letters.  I cut 2 sets of letters, one with thin cardboard and the second with the Glimmer paper (I know- someone call me some help!) and just glued them together.  We mounted the hearts and letters onto Whisper White 2 3/8" scallops.  I used the small handheld punch to make holes to run the ribbon through and then simply knotted them on the front of each heart.  The boys got a big kick out of the "fancy" dinner and were especially mesmerized by the candles...everything is better with candles isn't it?  Well maybe not stamping but a lot of things anyway! 

Paper: Glimmer Paper, Love Patterns DSP, Whisper White, Real Red textured

Accessories: Full Heart punch, Petal Cone die, grosgrain ribbon, 2 3/8" scallop circle punch, handhelp punch

And last but not least; here is the card that DH stamped for me.  Didn't he do a good job?  It's so fun to get a handmade card once in while!  Don't mind the smudge on the one heart....Alex got a hold of it with this goopy hands...Silly 2 year old!  DH said he traced the heart from Filled with Love "just to do something different"!  He even cleaned the stamps and put everything away in the right spot!  I'm a lucky lady indeed!

 Stamps: Filled With Love

Ink: Melon Mambo

Paper: Whisper White

  Check back tomorrow to see the Valentine's projects Ryan made for our family and school friends!

Thanks for looking!  Did you stamp today?

Saturday, February 12, 2011

Circle & Square Aviary Thank You

  I had a few thank you cards to write a few weeks ago and you'd think that I would have some sittign around since I'm always making cards but I was all out of generic thank yous.  I had some autumn themed ones but they just weren't going to cut it.  I wanted to keep it simple and just use things that I had bits and pieces of.  This came together pretty fast and I just love how the little birdcage fits perfectly into the square scallop punch. 


  I had the Crumb Cake base already cut from stamp club.  I punched 4 circles from the Elegant Soiree DSP scraps that were also leftover from stamp club (see there's a reason I don't clean up and put everything in it's place right after stamp club!) and arranged them on the corner.  Then I added a strip of Very Vanilla taffeta that I had cut for another card but ended up not using.  I keep my ribbon scraps in their own little bin so I always check there before cutting any new pieces.  I feel like I've hit the jackpot when I find a scrap that is just the right color and length for the project I'm working on!

  I always have (at least!) a few scrap pieces of Very Vanilla so I stamped the small birdcage in Basic Gray ink, then I added the bird in Baja Breeze.  I punched it all out with my scallop square punch which I seem to neglect sometimes but it is such a nice punch I don't know why.  I sponged the edges of the scallop square with Baja Breeze to soften it up a bit.  I adhered the birdcage to the base using dimensionals.   Then I stamped "Thank You" from Thank You Kindly in Basic Gray.  I thought this scroll-y font matched the feel of this card perfectly.  Last but not least, I added my pearl to the birdcage top.  I try to add things like the pearls and rhinestones at the end since once they are on, they are on and can't be reused easily.  That way if I goof up on another part of the card I and have to start again I haven't wasted a pearl.

  Thanks for looking!  Did you stamp today?

Stamps: Aviary, Thank You Kindly

Ink: Basic Gray, Baja Breeze

Paper: Crumb Cake, Very Vanilla, Elegant Soiree DSP


Accessories: 11/4 circle punch, scallop square punch, adhesive pearl, taffeta ribbon, dimensionals

Friday, February 11, 2011

Sew Suite Birthday & MOJO176 Sketch

  Today is my mom's birthday (the second among many February family birthdays---you might get sick of seeing birthday cards this month!!) so I made this card for her last week using the Mojo Monday Sketch 176.  It seemed like a fun sketch to try out and the ones they post over at Mojo are always great to stretch your creativeness.  My mom is a great quilter and seamstress so of course I had to use the Sew Suite set from the Occasions Mini catalog.   Being at her sewing machine is her number 1 favorite place to be in the cold winter months (working in her garden is her warm weather favorite).  She's always working on some project or another.   I used my trusty Color Coach to get the combo for this card.  My mom really likes blues so that was my starting place.

I paired Baja Breeze, Early Espresso and Pirouette Pink together on the advice of the Color Coach.  The base is Early Espresso, then a layer of Very Vanilla and then the Baja Breeze.  The Baja Breeze was put through the Big Shot with the Perfect Polka Dot embossing folder for some texture.

  I used my paper snips to free hand the curve for the sketch.  I accented the curve with some ruffled seam binding (for the tutorial click here) which I adhered with SNAIL.  Then I added some pearls.  I used about 1 1/2 of the long strands and just snipped off the extra to be used another time.

  I stamped "Happy Birthday" from Bring on the Cake set in Early Espresso.  It seemed like a perfect font to go with the feel of the card---and it fit perfectly in the space!  I wanted to bring some Pink Pirouette down to the bottom of the card so I punched out a small heart using the Heart to Heart punch.  I adhered the heart to the back of a Bitty Button with some Crystal Effects.  Then using my paper piercer I poked some holes to run my linen thread through and tied a knot.  The whole shebang is stuck on with a glue dot.

  For the cute little sewing machine I first stamped it in Early Espresso and then colored parts in using my Pink Pirouette and Baja Breeze markers.  I added a little pearl to the knob in the front (I have no idea what that knob is called and I'd have to dig out my sewing machine manual and I'm too lazy to do that!).  I punched the image out with the Decorative Label punch and then matted it with Early Espresso. 

   The top of the Baja Breeze panel was looking a little bare and unbalanced so I added some Early Espresso brads.  I think I could have added something else but I'm still not sure what would have worked...maybe some Antique Brads??  I didn't have any of those at the time but that would certainly add more weight to the top as they are a much larger size than the regular brads.  Oh well...you always need something you don't own!

  Thanks for looking!  Did you stamp today?


Stamps: Sew Suite, Bring on the Cake

Ink: Early Espresso, Baja Breeze & Pink Pirouette (markers)


Paper: Early Espresso, Baja Breeze, Very Vanilla, Pink Pirouette


Accessories: Very Vanilla seam binding, adhesive pearls, Decorative Label punch, Heart to Heart punch, bitty buttons, linen thread, brads

Wednesday, February 9, 2011

January Christmas Card Challenge

  So I know this is going backwards on the calendar of holidays but remember I told you that I was going to try to make 10 Christmas cards each month so I would have my stockpile by the time December came around again?  I signed up for the Christmas Card Challenge over on Splitcoaststampers to help keep me accountable and while I didn't get my 10 cards done by the end of January (I ran out of seam binding ribbon right at the end and had to wait for an order to arrive) they are finished now!  So here is my first design:
  How cute is this Santa??  I first saw this guy on Becky Roberts blog Inking Idaho back in December and had to remember the idea so I could use it for next year.  I think she even got the idea from someone else.  This is just another example of the versatility of the Ornament punch. 

  The base is Crumb Cake with a layer of Cherry Cobbler (yum!) and then a layer of Always Artichoke that was run through the Big Shot using the Perfect Polka Dots embossing folder.  I wrapped a length of Cherry Cobbler seam binding around and added a knot.  For the sentiment I inked up each word with a different color and then punched it out with the Decorative Label punch.  I added some bling on the sentiment with the rhinestones.

  Here is the punch list for the Santa.  The beard pieces were lightly sponged with Crumb Cake ink.

Hat- small circle punch, small oval punch, wide oval punch
Face- wide oval punch
Nose- smaller circle
Mustache - 2 Step Bird punch (wings)
Beard - Ornament punch


Stamps: So Many Sayings

Ink: Crumb Cake, Artichoke, Cherry Cobbler

Paper: Crumb Cake, Cherry Cobbler, Always Artichoke, Whisper White, Blushing Bride

Accessories: seam binding, rhinestones, Perfect Polka Dot embossing folder, various punches

Monday, February 7, 2011

Caffeine Happy Birthday

  Here is the birthday card that I made for DH's stepfather.  He is one of those people who can drink coffee whenever, even late at night and still be able to fall asleep with no problem.  I can't sleep that night if I have caffeine anytime after lunch.  He goes to Starbucks and gets a few extra shots of espresso than what is listed on the menu.  I thought the Morning Cup set would be perfect as a birthday card with a little something inside so he can get his fix in the morning!


  Since this is a guy card I choose to keep the design pretty clean and use some bolder colors.  The base is Basic Gray, then a layer of Pumpkin Pie and then the Whisper White image panel.  I stamped my images using Basic Gray ink and then highlighted parts of the coffee pot with my Pumpkin Pie marker.  As I am addicted to the new Glimmer paper I wanted to add that onto the heart of the mug.  I turned the Glimmer paper over to the smooth white side and stamped the mug again in Stazon this time.  The backside of the Glimmer paper is pretty slick so you have to be careful and not smudge the image before it dries...Stazon helps with that!  So then you have a nice little heart to cut out and adhere to the coffee mug. Don't try to stamp on the Glimmer paper....doesn't work (ask me how I know!)

  The ribbon is retired Basic Gray taffeta.  I have hopes that someday Stampin' Up will bring it back and I'll do the happy dance.   I stamped the sentiment with Basic Gray and punched it out with my oval punch and then layered it on another oval.  I used a bit of linen thread and a brad to attach the tag to the ribbon. 

  Sweet and simple!
 Thanks for looking!  Happy Stamping!


Stamps: Morning Cup

Ink: Basic Gray, Stazon, Pumpkin Pie (marker)

Paper: Basic Gray, Pumpkin Pie, Whisper White, Glimmer Paper

Accessories:  Taffeta ribbon, linen thread, brad, oval punches

Sunday, February 6, 2011

January Hostess Club Goodies

  We're sitting here watching the SuperBowl but as we're not invested at all in either team I figure I don't have to be glued to the game and can multitask and show off these cute little sour cream containers.  I made these for my 2 hostess club hostesses last month.  I filled them with some fun embellishments that they could use on their Valentine's Day cards.  They are just the right size for some little goodies and they take just seconds to make.  Check out this tutorial here on Splitcoaststampers for the details.  They do such a great job I don't feel the need to re-create the wheel!

  I know they are called sour cream containers but to be honest I've never ever seen sour cream come out of anything that is this shape!  So I'm thinking it might be a regional thing; that or I'm totally clueless which is probably the case!

  I personalized each one with my hostesses first initial.  It was the first time I had used my new Simple Letters Big Shot die and I'm already finding so many other projects to use letters on that I can't believe I hadn't gotten them sooner.  First, I cut the letters out of the thin piece of cardboard that comes inside Stampin' Up Designer Series Paper; it's the perfect weight to use on a project like this.  I cut the letters again using the Love Patterns DSP (available only until Feb. 14) and adhered them to the cardboard.  I punched a small hole through the sour cream (???) container and the corner of the letter and used some retired ribbon to tie them together.

Thanks for looking!  Happy Stamping!   

 Paper: thin cardboard, Love Patterns DSP

Accessories: ribbon, Simple Letters die, sticky strip, crimper, handheld hole punch


Friday, February 4, 2011

Side Stair Step Card Tutorial

  So life gets in the way of blogging and stamping sometimes and I didn't get around to posting again with the Side Stair Step Tutorial yesterday like I was planning to.  Apparently my family wanted to get fed or something silly like that!  And actually my stamp club order arrived yesterday afternoon so I wanted to get that all sorted and bagged so my stamping ladies could pick up their goodies and have the weekend to play.  There were 2 HUGE boxes so it took some time to sort and it was so fun to check out all the fun stuff.

  On to the tutorial....Check out my post from yesterday for all the fun details and the link to Jackie Topa's video tutorial for this card fold.  I'm one who needs step by step written instructions (and photos help too!) so I figured there are others out there who need this too and I wanted to have some place for my stamping ladies to refer when they want to make another one at home.

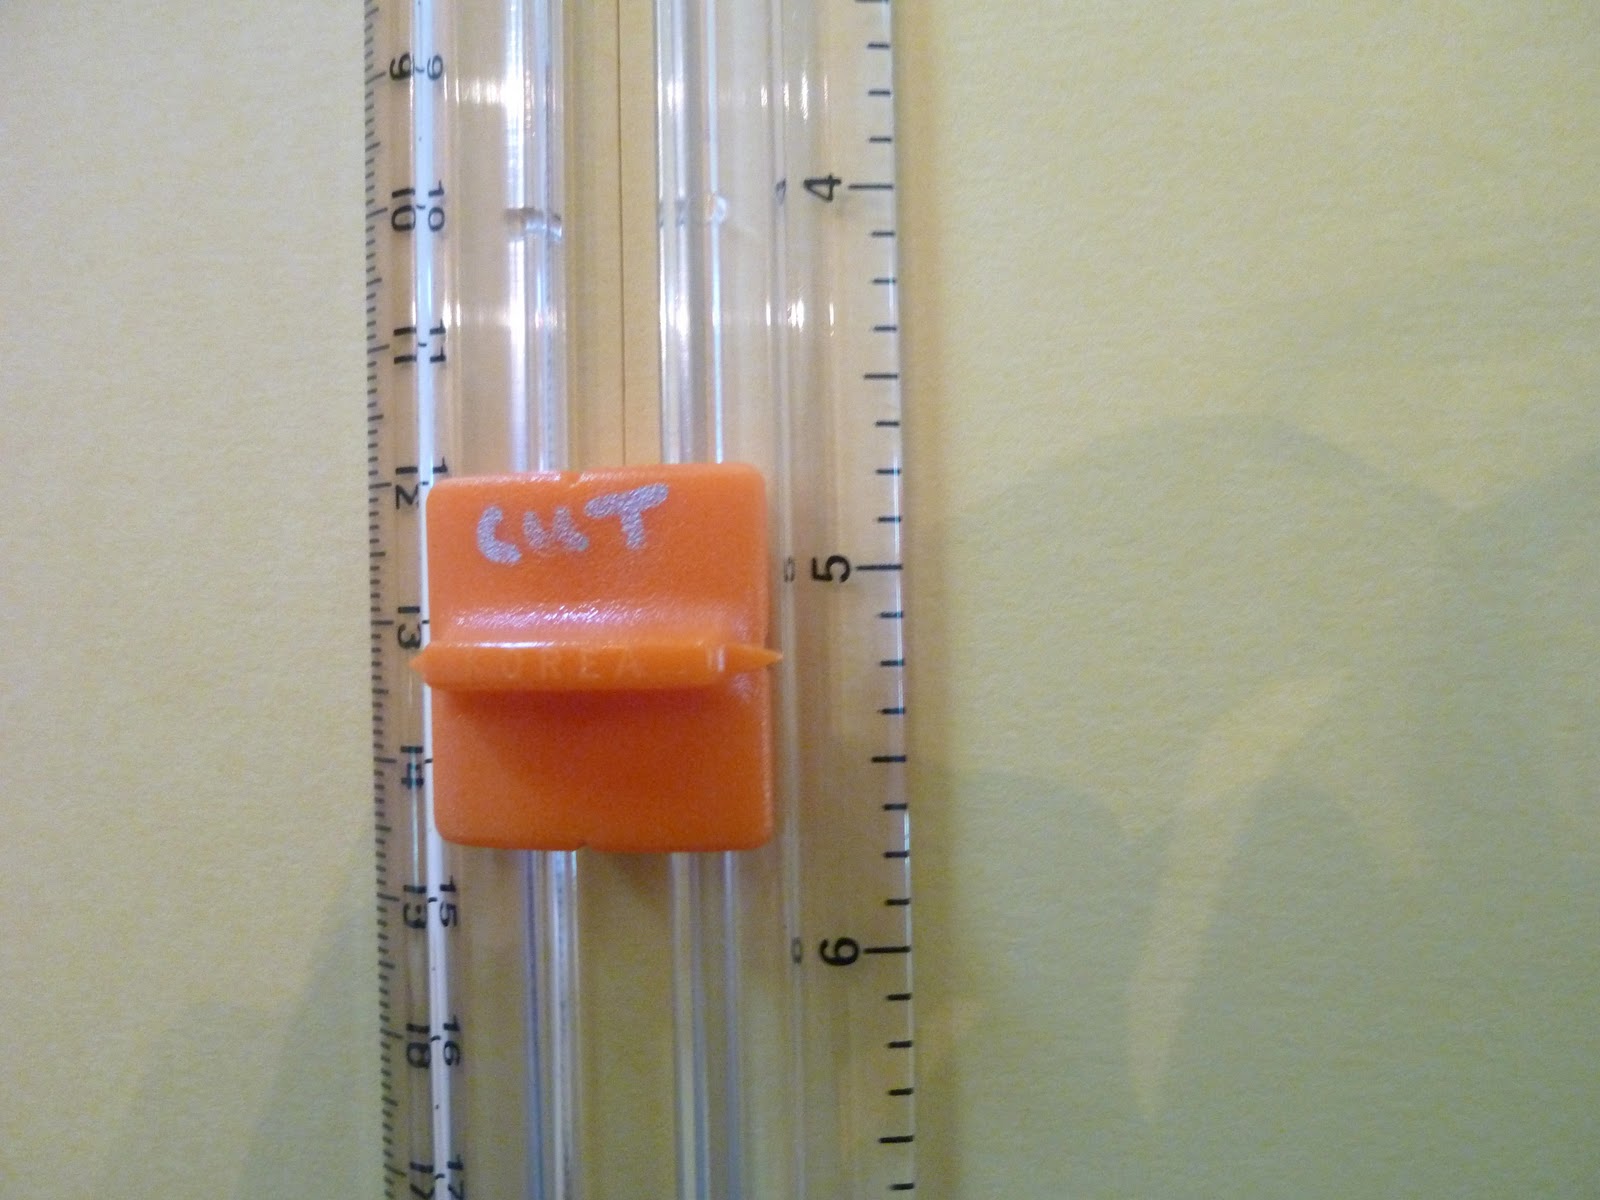
 Start with a 5.5" x 8.5" sheet of cardstock--other tutorials out there call for a larger sheet of paper so this one is nice that you can get 2 bases from one sheet of cardstock.  Get out your cutter/scorer.  I've labeled mine so there isn't any confusion at stamp club about which blade is which.  Orange = Cut, Black = Score....easy peasy! 

1) Line up cardstock at 2 3/4" (center of the short side of the paper).  The little sticky arrow helps you line up the cardstock all the way down.

2) Line up the CUTTING blade at the 1" line on the clear bar


3) CUT from the 1" line down to the 5 1/4" line on the clear bar


4) Turn paper so that the cut line is horizontal and on the left hand side.  Line up at the 1" mark.

See the cut line there in the center??

5) Using the SCORING blade, score from the bottom edge just until you reach the cut line


6) Slide your cardstock over to the left to the 2" mark and score again from the bottom of the cardstock just up until the cut line.  All done...seriously that's all it takes!  1 cut and 2 scores.


 Fold on your score lines and you get this...


Thanks for looking!  Happy Stamping!

Thursday, February 3, 2011

Sew Suite Side Stair Step Card

  We are still not back to our normal routine after being sick last weekend.  Slowly but surely I'll get back into the swing of things and be posting more regularly.  I have a bunch of new projects to show you, I just have to take the photos and find time to sit down and post.  I hope you'll be patient with me! 

   Here is the last project we did at January stamp club.  I think all the ladies were a bit intimidated when they first saw this card and to be honest when I first attempted it myself I wasn't so sure I was going to be able to teach it.  But by the end of the night the ladies were teaching each other!  The Stair Step fold is actually quite easy and this version gives you a nice side area for your focal image and then a smaller space for your sentiment or a quick note.  I first saw this version on Jackie Topa's blog and she has a great video showing how to make this into a cute little dresser with drawers and everything.  Later today I'll be posting a step by step photo tutorial for the Side Stair Step fold if you're like me and need a picture to go along with the measurements and instructions. 


  Wow--where to start on this one huh?  Everything except the cardstock is a new item from the Occasions Mini catalog.  I just couldn't stop adding new products to this card.  The stamp set is Sew Suite and is just adorable.  If you have any sewers in your life this would be a great set to make birthday cards, notecard sets or "handmade by" tags.  I think I'm going to be using this set to make a stack of notecards for my grandma's birthday gift in April.  And how cute is that measuring tape stamp??  So many uses for this one!

  The Designer Series Paper is Sweet Stitches and has a great variety of patterns in bright fun colors.  In this card we did some paper piecing on the dress form with the Sweet Stitches DSP and also have some as a layer behind that panel.

Side View

   And now for the embellishments!!  The first is the cute little button....what a great way to add dimension to a card without the bulk of a real button!  You can make a button in any color you choose using the new Sweet Buttons Embosslits--sky's the limit with one.  The Embosslit has 6 buttons of various shapes and sizes so you're bound to have one to match whatever project you're making.  We threaded a small strand of cardstock through holes we punched with a handheld punch and tied a knot to mimic thread.  Then it was popped on a dimensional.

  The last embellishment is the Melon Mambo Pompom trim.  It's so cute and adds a nice texture that you don't always get with flat ribbon.  We just adhered a length of the pompom trim across the top with some SNAIL adhesive.  You could also use a bit of Tombow multi as well.

  Stay tuned for the Side Step Card tutorial!

  Thanks for looking!  Happy Stamping!

Stamps: Sew Suite

Ink: Chocolate Chip

Paper: Daffodil Delight, Chocolate Chip, Very Vanilla, Sweet Stitches DSP, Melon Mambo


Accessories: Pompom Trim, Sweet Buttons Embosslit, paper trimmer/scorer (for the card folds)