Happy Sunday stampers! I'm sharing a Christmas card that I made a while back and it just kept getting buried in the "to blog about" pile. While this card looks CAS (clean and simple) there are some details that take a few more steps.
I had some fun with the Dazzling Diamonds for this card. First I stamped the ornament in Cherry Cobbler, then planted it face down on one of the multipurpose adhesive sheets and put the backing paper back over it. Next, I used the coordinating Framelits dies to cut out the ornament adhesive sheet and all. Once I had it cut I peeled off the adhesive backing and pressed the whole ornament into my tray of Dazzling Diamonds. Tapped off any excess glitter and Wow! Super sparkly!
Next, I stamped the ornament again in Gumball Green (cleaning off the Cherry Cobbler ink of course) and then cut out just the pattern in the middle of the ornament. The paper snips were very handy for this portion of the card! I adhered the pattern to the ornament and then added rhinestones. I used Cherry Cobbler baker's twine to make the loop.
For the flag/banner I stamped "Christmas Cheer" from Sweet Essentials and edged the cardstock with the Gumball Green. This little detail keeps the flag from disappearing into the background.
I really liked how this card turned out so I made 9 more to add to my Christmas card stash. I hope you're getting some ideas for your Christmas cards. It's never too early to start thinking about them; we're already halfway through September!
Thanks for looking! Did you stamp today?
Stamps: Sweet Essentials, Ornament Keepsakes
Ink: Gumball Green, Cherry Cobbler
Paper: Gumball Green, Cherry Cobbler, Very Vanilla, Multipurpose Adhesive Sheets
Accessories: Holiday Ornaments Framelits, baker's twine, Dazzling Diamonds, Vintage Wallpaper e.f.
Amanda Mertz ~ Independent Stampin' Up!® Demonstrator ~ didyoustamptoday@gmail.com
Sunday, September 16, 2012
Friday, September 14, 2012
Wonderfall is Fab on Friday!
TGIF right? We're starting the weekend off right with another Fab Friday challenge. We had an awesome group of entries for the very first challenge so we're excited to see all the awesome projects for this great color challenge!
This time it's a color challenge! So Saffron, Sahara Sand and Basic Gray! Head over to Fab Friday for all the details on how to join in the fun and see the fabulous design team samples!
I'll admit that at first I was stumped but once I started playing with the colors I really liked them together. Lately here in Central Virginia we've had cooler temperatures and hardly any humidity so feels like fall is in the air....at least for a few days. I fully expect to have several more 90+ days before autumn officially starts! For now I've decided to embrace the cooler weather and I stamped a fall card for this color challenge!
The photo makes this card look short and squat but it's a regular A2 size. Again, I must work on my camera skills! Anyway, I had fun making this little leaf bouquet to incorporate our challenge colors. The card base is Sahara Sand and I embossed a smaller piece of Sahara Sand with the Woodgrain embossing folder for the top portion of the card. Next I used a scrap of Very Vanilla and the zigzag Finishing Touches Edgelit and added it behind a piece of the Basic Gray polka dotted DSP from the Howlstooth & Scarringbone pack. I covered the seam with Basic Gray taffeta ribbon.
Next, using the fun new Wonderfall stamp set and the coordinating Autumn Accents Big Shot die I created my leaf bouquet (both found in the Holiday catalog). Quick tip: Cut your leaves out first and then ink your stamp, flip it over and lay the leaf on top of the stamp. Use a bone folder or brayer to "rub" your ink onto the die cut. Pretty much like how you use big background stamps.
Once I had my bouquet made and popped up with dimensionals I needed to do some embellishing! I added a Very Vanilla button tied with linen thread (a.k.a. Man Ribbon!), added a Vintage Trinket safety pin and a little tag. The 'hello' is in the Pennant Parade set and is the perfect size for the jewelry tag punch.
This card is going to find it's way to my grandparents with some photos of the boys from the first day of school. Just need to print them out...one more thing added to the to-do list!
I hope you can play along with us at Fab Friday! Remember you have almost 2 weeks to do the challenge so you can mull it over for a bit! Have a fantastic weekend!
Thanks for looking! Did you stamp today?
Stamps: Wonderfall, Pennant Parade
Ink: So Saffron, Sahara Sand, Basic Gray
Paper: Sahara Sand, Very Vanilla, Howlstooth & Scarringbone DSP
Accessories: Vintage Trinket, linen thread, button, taffeta ribbon, Finishing Touches Edgelit, Woodgrain e.f.
This time it's a color challenge! So Saffron, Sahara Sand and Basic Gray! Head over to Fab Friday for all the details on how to join in the fun and see the fabulous design team samples!
I'll admit that at first I was stumped but once I started playing with the colors I really liked them together. Lately here in Central Virginia we've had cooler temperatures and hardly any humidity so feels like fall is in the air....at least for a few days. I fully expect to have several more 90+ days before autumn officially starts! For now I've decided to embrace the cooler weather and I stamped a fall card for this color challenge!
The photo makes this card look short and squat but it's a regular A2 size. Again, I must work on my camera skills! Anyway, I had fun making this little leaf bouquet to incorporate our challenge colors. The card base is Sahara Sand and I embossed a smaller piece of Sahara Sand with the Woodgrain embossing folder for the top portion of the card. Next I used a scrap of Very Vanilla and the zigzag Finishing Touches Edgelit and added it behind a piece of the Basic Gray polka dotted DSP from the Howlstooth & Scarringbone pack. I covered the seam with Basic Gray taffeta ribbon.
Next, using the fun new Wonderfall stamp set and the coordinating Autumn Accents Big Shot die I created my leaf bouquet (both found in the Holiday catalog). Quick tip: Cut your leaves out first and then ink your stamp, flip it over and lay the leaf on top of the stamp. Use a bone folder or brayer to "rub" your ink onto the die cut. Pretty much like how you use big background stamps.
Once I had my bouquet made and popped up with dimensionals I needed to do some embellishing! I added a Very Vanilla button tied with linen thread (a.k.a. Man Ribbon!), added a Vintage Trinket safety pin and a little tag. The 'hello' is in the Pennant Parade set and is the perfect size for the jewelry tag punch.
This card is going to find it's way to my grandparents with some photos of the boys from the first day of school. Just need to print them out...one more thing added to the to-do list!
I hope you can play along with us at Fab Friday! Remember you have almost 2 weeks to do the challenge so you can mull it over for a bit! Have a fantastic weekend!
Thanks for looking! Did you stamp today?
Stamps: Wonderfall, Pennant Parade
Ink: So Saffron, Sahara Sand, Basic Gray
Paper: Sahara Sand, Very Vanilla, Howlstooth & Scarringbone DSP
Accessories: Vintage Trinket, linen thread, button, taffeta ribbon, Finishing Touches Edgelit, Woodgrain e.f.
Wednesday, September 12, 2012
Ornament Tent Card
Here's a fun Christmas card idea! It's really never too early to start Christmas cards is it? I made this one a while ago after seeing the Clean & Simple Challenge on Splitcoaststampers to make a tent card. I had made a tent topper card in the past so I went with the choice of learning how to make the tent card. My card isn't anywhere near "clean" or "simple" so I didn't post it to the challenge. It's still a cool card and a great idea if you have a friend or relative that saves and displays every card you send them. This card is great to display and can be folded up flat for storage until next Christmas!
My card didn't start off as a square card but after some measuring difficulties it turned into a square card! I used the Festival of Prints DSP pack as well as the Ornament Keepsake and matching Framelits. The Window Framelits were used to cut the viewing window on the card front and the sentiment panel.
Here's the side view which shows the "tent" part pretty well!
Thanks for looking! Did you stamp today?
Stamps: Ornament Keepsakes, Petite Pairs
Ink: Cherry Cobbler, Lucky Limeade, Silver Shimmer paint
Paper: Very Vanilla, Cherry Cobbler, Festival of Prints DSP
Accessories: Windows Framelits, Holiday Ornaments Framelits, baker's twine, rhinestones, circle punch, seam binding ribbon
Here's the side view which shows the "tent" part pretty well!
The ornament looks cool dangling down into the window. I used Cherry Cobbler baker's twine for that part and then seam binding ribbon for the big bow.
This was a fun card to put together and I may try other variations in the future....you could have all sorts of things hanging down!
Thanks for looking! Did you stamp today?
Stamps: Ornament Keepsakes, Petite Pairs
Ink: Cherry Cobbler, Lucky Limeade, Silver Shimmer paint
Paper: Very Vanilla, Cherry Cobbler, Festival of Prints DSP
Accessories: Windows Framelits, Holiday Ornaments Framelits, baker's twine, rhinestones, circle punch, seam binding ribbon
Monday, September 10, 2012
Birthday Balloons
Happy Monday! I hope everyone had a great weekend and got lots of stamping time in. I did a little bit of stamping but the weather was so nice yesterday that I spent a good part of the afternoon outside reading. I did finish this card on Friday combining a few challenges though. I wouldn't want you to think I was slacking off or anything!
I used the ColourQ combination of Calypso Coral, So Saffron, Soft Sky, Chocolate Chip and white. I didn't have any Soft Sky (I don't think I ever owned that color at all!) so I thought that Pool Party was a pretty close match. For the layout I used the Sketch Challenge over at Splitcoaststampers.
I had fun mixing and matching the balloon colors to get the right balance. Some fun details that I like on this card are the Whisper White craft ink clouds on the Pool Party card base and then the clouds are stamped again on the balloon panel in Pool Party. I also like the polka dot DSP that was edged with the scallop edgelit. And finally the little punched flowers with the rhinestones in the center....too cute if I do say so myself!
I'm off to a busy day of grocery shopping, laundry and general running to and fro. Hope you have a great start to the week!
Thanks for looking! Did you stamp today?
Stamps: Up, Up and Away
Ink: Chocolate Chip, So Saffron, Pool Party, Calypso Coral, white craft
Paper: Pool Party, Pool Party In Color DSP pack, Chocolate Chip, Whisper White, So Saffron, Calypso Coral
Accessories: oval punch, Itty Bitty punch pack, stitched grosgrain ribbon, scallop edgelit, rhinestones, dimensionals
Saturday, September 8, 2012
Folded Paper Flowers
Happy Saturday everyone! It is one lazy morning here at our house that's for sure. Last night we hostessed a "happy hour" get together with some of our neighbors. It turned into quite the late evening with good food and good company. Needless to say we are all lounging around right now trying to get motivated to do 'something'. Does blogging count? Ha!
My card today is one I made a while ago. I saw this card made by Christina on Pinterest and really liked how the bright colors popped against the black background. I, if you can believe it, don't own a flower die or punch! I had to make due with creating my flowers from folded pieces DSP.
I used an old Color Challenge at Splitcoaststampers; Real Red, Wisteria Wonder and Island Indigo. Kind of a crazy set of colors in my world but I think it works. To make the flowers I used my 1 1/4" circle punch and punched out 4 circles in each of my patterns. Then I folded each one in half and then in half again. I adhered them to the card base with the open flap part facing the same direction going around in a circle. Then I added the buttons with baker's twine bows using glue dots.
To keep the card from being too dark I added the Sweet Essentials sentiment stamped on a piece of Whisper White with some Wisteria Wonder trim at the bottom. I cut the trim using one of the Finishing Touches Edgelits. Two mini silver brads anchor the sentiment panel and rounded corners at the bottom finish this card off.
Thanks for looking! Did you stamp today?
Stamps: Sweet Essentials
Ink: Black Stazon
Paper: Basic Black, Whisper White, Wisteria Wonder, Summer Smooches DSP, In Color DSP Pack
Accessories: circle punch, buttons, baker's twine, mini brads, Finishing Touches Edgelit
My card today is one I made a while ago. I saw this card made by Christina on Pinterest and really liked how the bright colors popped against the black background. I, if you can believe it, don't own a flower die or punch! I had to make due with creating my flowers from folded pieces DSP.
I used an old Color Challenge at Splitcoaststampers; Real Red, Wisteria Wonder and Island Indigo. Kind of a crazy set of colors in my world but I think it works. To make the flowers I used my 1 1/4" circle punch and punched out 4 circles in each of my patterns. Then I folded each one in half and then in half again. I adhered them to the card base with the open flap part facing the same direction going around in a circle. Then I added the buttons with baker's twine bows using glue dots.
To keep the card from being too dark I added the Sweet Essentials sentiment stamped on a piece of Whisper White with some Wisteria Wonder trim at the bottom. I cut the trim using one of the Finishing Touches Edgelits. Two mini silver brads anchor the sentiment panel and rounded corners at the bottom finish this card off.
Thanks for looking! Did you stamp today?
Stamps: Sweet Essentials
Ink: Black Stazon
Paper: Basic Black, Whisper White, Wisteria Wonder, Summer Smooches DSP, In Color DSP Pack
Accessories: circle punch, buttons, baker's twine, mini brads, Finishing Touches Edgelit
Wednesday, September 5, 2012
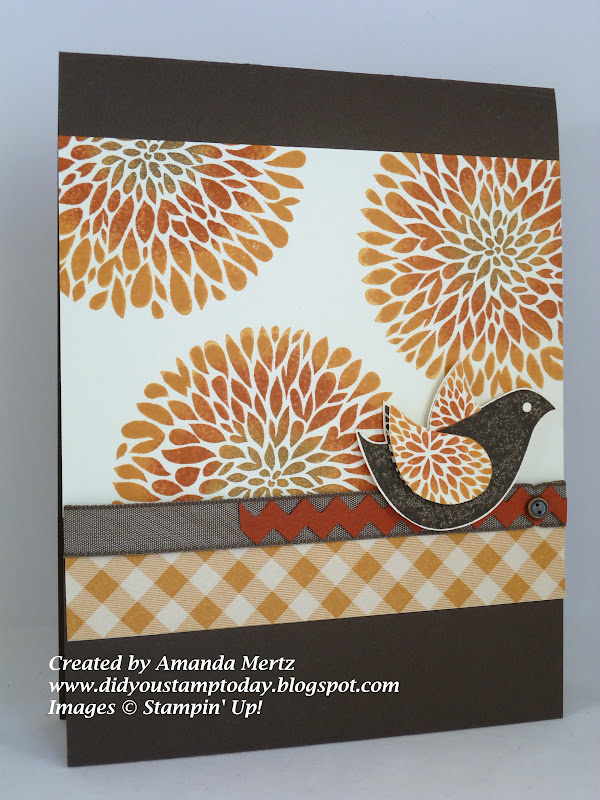
Autumn Betsy's Blossoms
The first day of school went great for both boys yesterday. Ryan said his favorite part of school was recess and Alex said his favorite was snacktime! Boys! Now just to get into the routine of getting up early and getting everyone where they need to be on time! I think I'm going to have to work on being disciplined this year with getting errands and housework done instead of heading right for the stamp room! I better get a schedule going....any suggestions? But this week I'm going to be lazy and stamp a lot as a reward to myself for making it through the summer! Ha!
I made this card yesterday because I needed to send a check to someone and I think those long, white business sized envelopes are so boring and impersonal so I wanted something pretty to send.
I liked the sketch so much for the brand new Fab Friday challenge that I wanted to use it to make another card. I love how just changing colors and stamp sets on the same sketch gives a whole different feel. Here is the card that I made for my design team submission: Watercolor Sky. Totally different isn't it?
I got busy with my sponge daubers for this card. For the flowers I used More Mustard, then daubed a ring of Cajun Craze and then a bit of Early Espresso in the centers. I did that 3 times on Very Vanilla.
Then I recreated the look of the flowers for the bird. The bird was first stamped in Early Espresso on Very Vanilla and then cut out. I cleaned my stamp and then inked it up again in More Mustard and daubed a bit of Cajun Craze and then cut out just wings and popped them up on the bird body with dimensionals.
I used the More Mustard pattern from the Autumn Harvest DSP and added a bit of Early Espresso taffeta ribbon, a small strip of Cajun Craze cut with the Tasteful Trim die and finally a Vintage Trinket brad to anchor it all down. The bird is then popped up with dimensionals.
We'd love to have you play along with us for this challenge at Fab Friday!
Thanks for looking! Did you stamp today?
Stamps: Betsy's Blossoms
Ink: More Mustard, Cajun Craze, Early Espresso
Paper: Early Espresso, Cajun Craze, Very Vanilla, Autumn Harvest DSP
Accessories: Tasteful Trim die, Vintage Trinket brad, Taffeta ribbon, dimensionals, sponge daubers
I made this card yesterday because I needed to send a check to someone and I think those long, white business sized envelopes are so boring and impersonal so I wanted something pretty to send.
I liked the sketch so much for the brand new Fab Friday challenge that I wanted to use it to make another card. I love how just changing colors and stamp sets on the same sketch gives a whole different feel. Here is the card that I made for my design team submission: Watercolor Sky. Totally different isn't it?
I got busy with my sponge daubers for this card. For the flowers I used More Mustard, then daubed a ring of Cajun Craze and then a bit of Early Espresso in the centers. I did that 3 times on Very Vanilla.
Then I recreated the look of the flowers for the bird. The bird was first stamped in Early Espresso on Very Vanilla and then cut out. I cleaned my stamp and then inked it up again in More Mustard and daubed a bit of Cajun Craze and then cut out just wings and popped them up on the bird body with dimensionals.
I used the More Mustard pattern from the Autumn Harvest DSP and added a bit of Early Espresso taffeta ribbon, a small strip of Cajun Craze cut with the Tasteful Trim die and finally a Vintage Trinket brad to anchor it all down. The bird is then popped up with dimensionals.
We'd love to have you play along with us for this challenge at Fab Friday!
Thanks for looking! Did you stamp today?
Stamps: Betsy's Blossoms
Ink: More Mustard, Cajun Craze, Early Espresso
Paper: Early Espresso, Cajun Craze, Very Vanilla, Autumn Harvest DSP
Accessories: Tasteful Trim die, Vintage Trinket brad, Taffeta ribbon, dimensionals, sponge daubers
Tuesday, September 4, 2012
Back to 'Spool' Promotion
How fun is this promotion?? You know I can't say no to ribbon so this one is right up my alley! I love the In Color satin stitched ribbon. For my local ladies this promo will still be going on when we meet at the end of the month!! Get your wish list together! You can get free ribbon to use on your Christmas cards! If you're out of town or can't make it at the end of the month you can order online HERE. If you have any questions just let me know!
Promotion Details: While the kids are heading back to school, Stampin' Up! is going back to 'spool'! For the month of September, get a FREE package of 3/8" Stitched Satin Ribbon-an $8.95 value-for every $40 you spend!
The Fine Print
- Any order type qualifies for this promotion-customer, demonstrator, workshop, or online.
- This promotion has no limits-for every $40 you spend, you'll get a free package of 3/8" Stitched Satin Ribbon. Go crazy!
- Sorry-hostess dollars don't count toward this promotion.
- You need to take advantage of this deal before the following deadline: Sunday, September 30, 2012; 11:50 PM (MT)
First Day of School!
After a long and mostly great summer, school has resumed in our area! After all the back to school open houses, endless forms and packing snacks and a lunch the day has finally arrived. Everyone got going this morning at the right times and the boys made it to their respective schools. Alex wasn't too thrilled about getting his picture taken but other than that it went quite smoothly this morning!
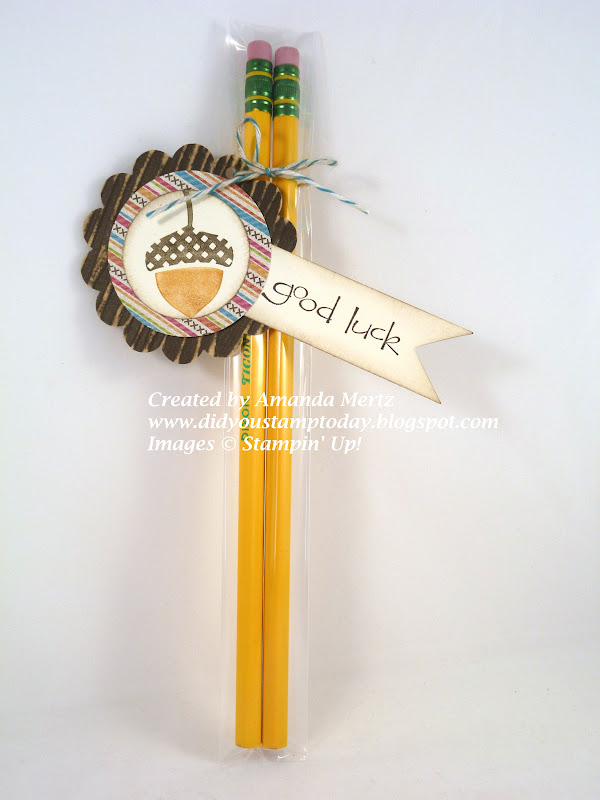
And of course I had to make a back to school project. There were several "back to school" themed challenges from this past week but I think I missed the deadline for all of them. Oh well....it was still fun to be stamping! I made a bunch of these back to school pencils that we gave out to the various teachers and office staff at both schools this morning. I think the adults need just as many "good luck" wishes as the kids do...maybe even more since the adults are totally out numbered at school! This is a variation of the owl themed back to school pencils I did last year.
I punched the scallop circles from the new Core'dinations Early Espresso cardstock and then ran them through the Big Shot with the new Woodgrain embossing folder (Love it!). Then I added a punched circle from the Orchard Harvest DSP. I colored the acorn with More Mustard and Early Espresso markers and stamped it on Very Vanilla. Another circle punch and some Crumb Cake sponging. I hand trimmed the banner after stamping the sentiment and doing some more punching. I tied the whole tag to cello pencil back with Island Indigo baker's twine. Since the baker's twine is white I sponged some Crumb Cake ink on that too so it wouldn't be so stark against the Very Vanilla.
Thanks for looking! Did you stamp today?
Stamps: Wonderfall, So Happy for You (retired)
Ink: Early Espresso, More Mustard, Crumb Cake (sponging)
Paper: Very Vanilla, Early Espresso Core'dinations, Orchard Harvest DSP
Accessories: Scallop circle punch, 1 3/4" circle punch, 1 3/8" circle punch, Island Indigo baker's twine, 1" x 8" cello bags, Woodgrain embossing folder, pencils
![]() |
| Is it just me or do Ryan's shoes look huge?? |
![]() |
| The grudging "smile" |
Thanks for looking! Did you stamp today?
Stamps: Wonderfall, So Happy for You (retired)
Ink: Early Espresso, More Mustard, Crumb Cake (sponging)
Paper: Very Vanilla, Early Espresso Core'dinations, Orchard Harvest DSP
Accessories: Scallop circle punch, 1 3/4" circle punch, 1 3/8" circle punch, Island Indigo baker's twine, 1" x 8" cello bags, Woodgrain embossing folder, pencils
Subscribe to:
Posts (Atom)