Showing posts with label Anniversary. Show all posts

Tuesday, July 7, 2026

Buzzy Bee Love - Stampin' Up!® Bee My Valentine

   I'm pulling out an oldie stamp set today for the newest CAS Colours & Sketches challenge!  I'm using the Bee My Valentine stamp set and punch for this sketch challenge and while it may seem out of season you can send 'love you' card any time of the year!!


Joanne has given us this fun layout with the elements clustered up in the top corner.  It took me a few minutes to land on the stamp set but I think the Bee My Valentine set works for it.  I was a little loose with the shapes but the bee is kind of boxy looking and I substituted a heart for the star on the sketch.  


  This one starts with a Pool Party base, then a layer of Berry Burst, then the top layer of Basic White cut with the Perennial Postage dies.

  The Bee My Valentine set and punch have been out for quite a while and it must still be fairly popular for Stampin' Up!® to have kept it for so long.  It's not hard to see why though!  Look at that sweet little thing!

  I stamped and punched out the bee and popped it up on dimensionals at the end of the stamped buzzy path that connects to the sentiment.

 The heart in lieu of a star is punched with the bee builder punch and is the long retired Soft Shimmer Paper in Berry Burst.

  I can't wait to see all the creative ways you come up with to use this sketch.  Be sure to keep your design clean and simple and share it in our challenge gallery!

Thanks for looking!  Did you stamp today?

All of the current supplies used to make this card can be purchased in my ONLINE STORE.

Stamps: Bee My Valentine

Ink: Daffodil Delight, Memento Black, Pool Party

Paper: Pool Party, Berry Burst, Basic White, Soft Shimmer paper (retired)

Accessories: Bee Builder punch, dimensionals, Perennial Postage dies

Friday, May 15, 2026

Simply Loved - Stampin' Up!® Simply Beautiful

  I'm not ready to let the Simply Beautiful bundle head to the retired products box just yet!  I've enjoyed creating with this fun floral set and if you still haven't gotten it you can still find it in the Last Chance section but only in the French version.  If you don't care about the sentiments being in French and only want the images and dies then order it soon before it sells out!  I used it to make a few of the Mother's Day cards that I needed this year.  I paired it up with some new products for a pretty spring card.


  I wanted to play around some more with the new In Color Hydrangea Hue so I pulled out my supplies and got to work.  I started with a Hydrangea Hue card base, then added a layer of Wood Textured Specialty paper which is also on the Last Chance list.  This paper gives a really great wood grain texture which doesn't show well in my photo but is a nice detail on a nature inspired card.  This paper is fun because you can blend it with ink to create any color wood texture that you would like!

  Next I added a panel of the new Paper Medley DSP which gives a sweet little background for the show stopping flower!  I stamped the flower in Versamark onto Hydrangea Hue cardstock then embossed it in gold.  I repeated the process with the leaf but used the new Peaceful Pine instead.  Using the same ink I blended a bit onto the center of the flower and the base of the leaf for depth.  Once they were die cut I popped them on the card front over a length of gold ribbon.  I used Gold Glimmer paper to die cut a flower center and popped that up on top of the embossing.

  The sentiment is from Banner Sayings and tucks in nicely next to the flower.  A gold bow and some retired Brushed Brass Butterflies are the perfect accent to finish this design.

  Thanks for looking!  Did you stamp today?

All of the current supplies used to make this card can be purchased in my ONLINE STORE.

Stamps: Simply Beautiful (English version retired, French version still available), Banner Sayings (Online Exclusive)

Ink: Versamark, Hydrangea Hue, Peaceful Pine

Paper: Hydrangea Hue, Peaceful Pine, Wood Textured Specialty paper, Paper Medley DSP, Basic White, Gold Glimmer (retired)

Accessories: Simply Beautiful dies, gold embossing powder, gold trim (retired), dimensionals, Brushed Brass Butterflies (retired)

Monday, May 4, 2026

Retirement Sailing - Stampin' Up!® Sunset Coast

   I am trying to stock up on some cards for occasions besides the main ones like birthday, thank you and thinking of you so I pulled out the new Sunset Coast bundle and made a retirement card.  The front sentiment could be for a new job, graduation, moving/goodbye card or other occasion but my inside sentiment is a happy retirement one.  The blue and yellow prompt over at The Color Hues Challenge gave me the color combo. 


  I haven't done any ink techniques lately so I thought it would be fun to use some watercolor paper and a water painter to make my own background using blues and yellows.  I started at the top with Darling Duckling then Azure Afternoon and finally Night of Navy on the bottom.  I wet my water color paper first by spritzing it and then used the wide water painter and drops of reinker to spread the color all the way down. After I dried it with my heat tool I added it to a Basic White thick card base.

  Using the very cool Sunset Coast dies I cut the sailboat scene out of a panel of Night of Navy.  I wanted to jazz up the waves beneath the sailboat so I cut just that section out of some Peaceful Garden Glimmer paper (currently on the Last Chance list at a discount!) and inlaid the shimmer pieces to the openings in the big panel.  And to add a bit more shimmer the sails are covered with Wink of Stella.  The Sunset Coast bundle is available tomorrow when the Stampin' Up!® May-August 2026 catalog goes live.  

  A Darling Duckling band anchors the sentiment label and a few die cut shells out of more Peaceful Garden Glimmer paper are nice accents to the side.  

  I pulled out some retired Adhesive-Backed Milky Dots in Night of Navy to add to the 4 corners.

Thanks for looking!  Did you stamp today?

All of the current items used to make this card can be purchased in my ONLINE STORE.  Items marked with a * will be available on May 5, 2026.

Stamps: Sunset Coast*

Ink: Darling Duckling, Azure Afternoon, Night of Navy

Paper: Basic White thick, watercolor paper, Night of Navy, Darling Duckling, Peaceful Garden Glimmer Paper

Accessories: Sunset Coast dies*, dimensionals, Wink of Stella, Adhesive-Backed Milky Dots(retired), Tasteful Label dies (retired)


Wednesday, January 21, 2026

Beautiful Wedding - Stampin' Up!® Simply Beautiful


   The New at SU! blog hop team is back this month with a really fun (and timely) theme!  We are focusing on Handcrafted Hearts, in other words, Love!  We are creating projects for Valentine's Day, Love, Wedding, Engagement etc. We hope you hop around with us to see the wonderful inspiration from around the world and get inspired to create your own project!  You can find the hop list at the end of my post!

  At first I was going to do the easy and more pressing project and focus on Valentine's Day but then I realized I don't have a single card that I could use for an engagement congratulations or a wedding card!  I guess where I am in my stage of life I don't have much need for them but I like to keep a well stocked selection of cards so off I went!  The Simply Beautiful bundle has perfect sentiments and the coordinating Lovely & Beautiful DSP just has "spring wedding" written all over it!


  A simple layout with the gorgeous DSP and a layered Fresh Freesia blossom is perfect for an engagement card!


  The gold accents on the paper as well as the gold sequins really makes for an elegant look.


  I created a second card with similar supplies but used Basic White and Calypso Coral ink to make the large layered flower for this wedding card.


  The layers of the flower are popped on dimensionals make for a really full look.

  I hope these cards have given you some inspiration to start thinking about your own project with a "Handcrafted Hearts" theme!  Hop around with us to see more inspiration!

  Thanks for looking! Did you stamp today?

All of the supplies used to make these project can be purchased in my ONLINE STORE.

Stamps: Simply Beautiful

Ink: Basic Gray, Calypso Coral

Paper: Basic White, Fresh Freesia Two-Toned Cardstock, Old Olive Two-Toned cardstock, Darling Duckling, Peach Pie, Old Olive, Lovely & Beautiful DSP

Accessories: Simply Beautiful dies, dimensionals, gold sequins, Pearlized Faceted Circles

Saturday, July 5, 2025

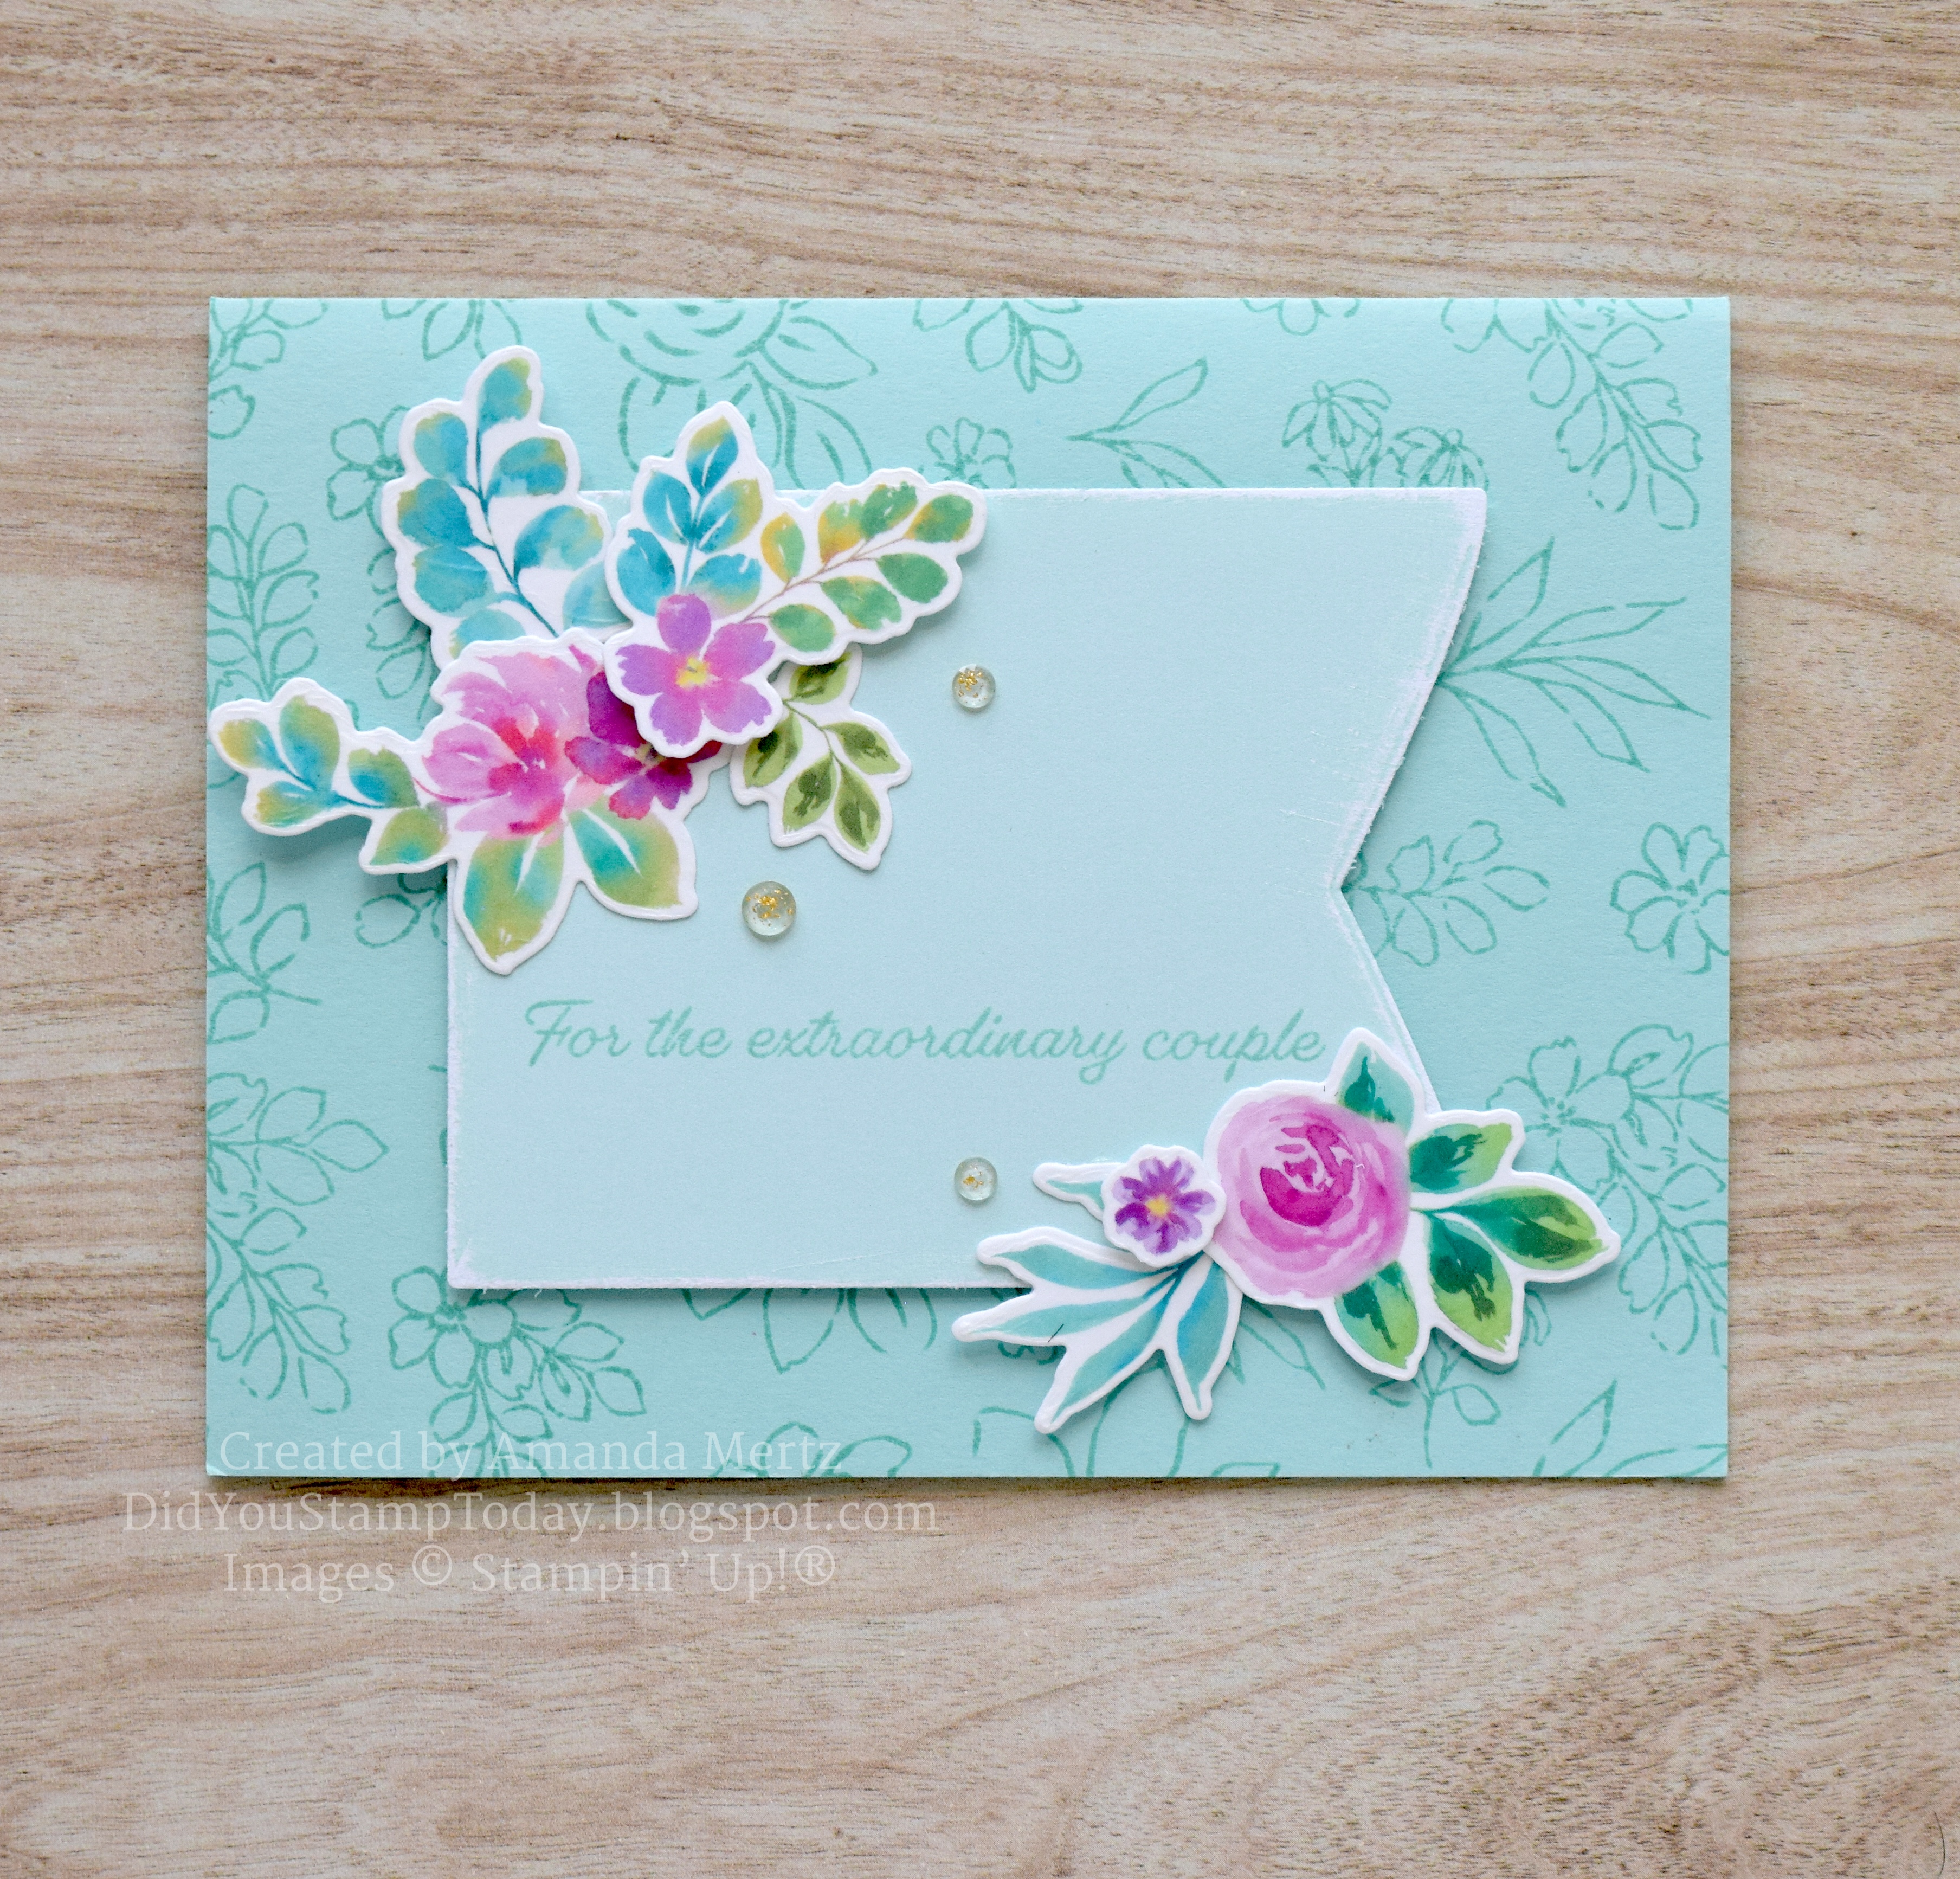
Extraordinary Wedding - Stampin' Up! Extraordinary Flora

 The Extraordinary Flora bundle and washi tape are apparently a huge hit as they are out of stock until later this month.  My stampers really enjoyed seeing these products in action at my last class.  It's so fun seeing how the washi tape images line up perfectly to be cut by the big die giving you almost instant flowers to use on your projects.  Add in the stamps and there are really a lot of possibilities!  Sign up in the online store to get a notification when these items are back in stock so you don't miss out!


  This card starts with a Pool Party base stamped with the Extraordinary Flora stamp in Pool Party ink.  The Party Banners dies and a bit of Two Toned Pool Party card stock team up to make the banner. The lighter side is used and a sanding block was was taken to the edges to show off a bit of the white core.  Such a fun was to use this paper!  The sentiment is stamped in Pool Party along the bottom of the banner before popping it on dimensionals.

  The trick to die cutting the washi tape is to first adhere it to a piece of Basic White which makes the colors pop beautifully.  There are 2 sets of colors, each length about 5 1/2" so you can alternate between Petunia Pop and Strawberry Slush blossoms. I make sure to use a bit of painters tape or a post it to keep my die from sliding on the washi.  Even with a magnetic platform the die slides a bit more than normal with the slickness of the washi.  And you don't want to waste any of these beautiful flowers!

  The flowers are added around the banner, to the inside of the card and even to the envelope.  Some are popped on dimensionals. You can even peel the washi tape away from the Basic White backing and adhere the images to the envelope for a nice smooth finish.  Some Strawberry Slush & Pretty in Pink Gems are added for a bit of sparkle.

Thanks for looking!  Did you stamp today?

All of the supplies used to make this card can be purchased in my ONLINE STORE.

Stamps: Extraordinary Flora

Ink: Pool Party

Paper: Pool Party, Two Toned Pool Party, Basic White

Accessories: Extraordinary Flora washi tape, Extraordinary Flora dies, Party Banner Dies, dimensionals, Strawberry Slush & Pretty in Pink Gems (Online Exclusive)


Monday, June 23, 2025

Extraordinary Congrats - Stampin' Up!® Extraordinary Flora

 Last week I finally got my May customer thank you cards designed, stamped and mailed out.  I send a card to every customer who orders during the month and I leave the card blank so that they can add it to their stash for use and inspiration. Who doesn't love some happy mail right?  The Extraordinary Flora bundle and coordinating washi tape are so fun to create with.  I've never been a big washi user but this roll is so cool in that it's super wide (3 1/4"!) and you can use it like regular washi but also use the die to cut out a whole length of the flower/leaf designs!  So cool!


  The design alternates between a section of pink and then purple flowers so every 5 1/2 inches or so the colors change.  I used both colors for my cards.  I used the sketch challenge from As You See It for the layout.  The 3 panels are the perfect elements to add the washi die cuts to!

  I started with a Soft Sea Foam base then a slightly smaller layer of Soft Sea Foam embossed with the Damask Designs embossing folder.  3 narrow Basic White rectangles are cut using the Textured Notes dies.  A white baker's twine bow goes across the middle of the card.


  I used the really skinny Textured Notes die for the colored sentiment bar.  I used Strawberry Slush and Petunia Pop to coordinate with the colors in the washi tape.

  To make the washi tape elements I rolled out a length of the washi tape and adhered it to a piece of Basic White making sure to smooth out any bumps or pockets of air.  I found that by using my bone folder and working from the center to the edges worked really well.  The white cardstock really makes the designs pop. Then I ran the washi panel and die through my die cutter and came away with a neat little pile of flowers and leaves.  Be sure to tape the die down with a sticky note or painters tape even if you're using a magnetic platform as the washi is very smooth and I found that the die slide around a bit more than normal and you don't want to mis-cut and waste any of the washi.

  I added some flowers to the card front with dimensionals and glued some down to the inside of the card.  The washi pulls away nicely from the cardstock so if you wanted to use an extra flower to decorate an envelope or wanted to use the washi die cuts on their own as straight tape you can.

  Finally I added a gold Low Profile dot on the sentiment strip to finish this card off.

Thanks for looking!  Did you stamp today?

All of the current supplies used to make this card can be purchased in my ONLINE STORE.

Stamps: Extraordinary Flora

Ink: Strawberry Slush, Petunia Pop

Paper: Soft Sea Foam, Basic White, Strawberry Slush, Petunia Pop

Accessories: Damask Designs embossing folder, Textured Notes Dies, Extraordinary Flora Washi Tape, Extraordinary Flora die, dimensionals, white baker's twine, Low Profile dots (Online Exclusive)


Wednesday, January 22, 2025

Blue Crab Love - Stampin' Up! Ocean Friends

   I'm trying to get back in the stamping groove after a few days away from home so I thought I would start with a Clean and Simple (CAS) card inspired by the Addicted to CAS challenge which has a prompt of code word Blue.  What's better than a blue crab saying "love you"???  Not much!


  The trick with a CAS card is to make it balanced without overdoing anything as well as maintaining open space without it looking empty.  They are harder to make than the finished product would have you believe!

  For this one I started with a Basic White thick card base.  I'm always trying to use up narrow scraps as best as I can and I thought that embossing 3 Basic White strips with the Soft Waves embossing folder and adding them to the bottom of the card would be a nice way to use them up as well bring some textural interest to the card.

  The lovely blue crab is stamped in Blueberry Bushel and Azure Afternoon.  Once he was die cut I popped him up with dimensionals.  I used the Spring Corners die for the heart and tucked it into the claw.

  The sentiment from the Ocean Friends set is stamped just above the top embossed strip in Blueberry Bushel ink.

  I'm thinking this card might be a good Valentine's Day card for one of my boys.  Not too mushy and if I give it with enough candy I might even get a smile!

  Thanks for looking!  Did you stamp today?

All of the current supplies used to make this card can be purchased in my ONLINE STORE.

Stamps: Ocean Friends

Ink: Blueberry Bushel, Azure Afternoon

Paper: Basic White thick, Basic White, Blueberry Bushel

Accessories: Ocean Friends dies, Spring Corners dies (Online Exclusive), Soft Waves embossing folder, dimensionals


Monday, January 20, 2025

You're My Lobster - Stampin' Up! Ocean Friends

   If you're of a certain age like me and watched Friends back in the day (or reruns now!) you're sure to remember the line "She's your lobster" so I made a Valentine's Day card with a lobster.  If that doesn't make sense to you at all check out the YouTube link below to see a clip that will explain everything, well as much as Phoebe Buffet can be explained lol!


  I used a piece of retired Well Suited DSP for the card background because Night of Navy just makes the Calypso Coral lobster pop don't you think??  

  I wrapped some Night of Navy linen thread around a stitched rectangle that I had in my scraps and tied it in a bow.  The lobster is popped up on dimensionals over the thread.  And then a little punched heart is added to the bow with a glue dot.

  Finally I stamped the 'love you' sentiment from the Ocean Friends set and trimmed it down and adhered it to the lobster.  


  Thanks for looking!  Did you stamp today?

All of the current supplies used to make this card can be ordered in my ONLINE STORE.

Stamps: Ocean Friends

Ink: Calypso Coral, Night of Navy

Paper: Basic White, Well Suited DSP

Accessories: Ocean Friends dies, dimensionals, Natural Tones linen thread, House Builder punch (heart), Stitched Rectangle dies (retired)

Saturday, September 7, 2024

Autumn Wedding - Stampin' Up! Heartfelt Hexagons

   I'm off to a wedding today so I needed to get a card made for it.  I don't do too many wedding cards these days so it was fun to pull out some supplies and come up with a design that used some of the bride's colors and of course a nice fall theme!


  It's hard to see in the photo but I used the new Birch Wood embossing folder for the Very Vanilla background.  It's a nice natural/organic texture and worked perfectly for my fall theme.  I wrapped a lit of retired Very Vanilla ribbon around the embossed panel before adhering it.  The ribbon has a nice sheen to it in real life.

  Next I used the Wildflower Designs dies to cut the frame and inner panel in Night of Navy (one of the brides colors).  Using the Heartfelt Hexagon stamp set and punch I stamped the frame in Night of Navy and then the words in Versamark before heat embossing with copper embossing powder and then punching it out.

  I used 2 die sets to cut out all the leaves and twigs that are tucked behind the hexagon.  The copper leaves and the Early Espresso twigs use the Autumn Leaves dies and then Very Vanilla sprigs are cut with the Textured Floral dies.  The whole leaf/twig/hexagon thing is popped on dimensionals.  It's quite a thick card but since it's being hand delivered I didn't need to worry about it making it through the mail!

  Finally a few retired Elegant Faceted Gems are sprinkled around the card front.  I thought this champagne color matched the copper foil nicely to tie it together.

  Thanks for looking!  Did you stamp today?

All of the current products used to make this card can be purchased in my ONLINE STORE.

Stamps: Heartfelt Hexagons (Online Exclusive)

Ink: Night of Navy, Versamark

Paper: Very Vanilla, Night of Navy, Early Espresso, Copper foil (retired)

Accessories: Birch Wood embossing folder, Wildflower Designs dies, Heartfelt Hexagon punch (Online Exclusive), Autumn Leaves dies, Textured Floral dies, dimensionals, copper embossing powder, Very Vanilla ribbon (retired), Elegant Faceted Gems (retired)

Thursday, February 1, 2024

Lavender Love - Stampin' Up! Painted Lavender

   This is the second card that my local stampers made at class this week.  The Perennial Lavender suite is just so pretty and hits all the right notes with the colors, images and coordination between all the products.  I've probably used the Perennial Postage dies the most so far just because they work for so many different designs and the 12 dies means there is a size for every need!


 I wanted to make sure my stampers got to use several patterns from the Perennial Lavender DSP and also because it's hard to pick just one to use so I designed a postage stamp collage look for this project!  

  We started with a Crumb Cake base, then used a layer of Lost Lagoon on which to arrange the DSP die cuts. We used 5 of the postage stamp dies and 2 pieces of DSP and used both sides for a nice variety. The smallest die cut is Fresh Freesia cardstock.

  To make the two-toned lavender flowers we inked the stamp up with Fresh Freesia ink and before stamping it we used a sponge dauber and Gorgeous Grape ink and dabbed some darker ink directly onto the stamp.  We huffed some hot breath on the stamp to make sure it was nice and moist and then stamped it on Basic White.  The stem is stamped in Shaded Spruce.  

  Once the images were die cut they are popped on the card front with dimensionals.  The sentiment from Perennial Postage stamp set is stamped in Gorgeous Grape and then fussy cut and also popped on dimensionals.

  A baker's twine bow and a few Fresh Freesia tinsel gems finish off the details.

  I think Painted Lavender bundle will be fantastic for Mother's Day and other spring cards.  All of the products used to make this card can be purchased in my ONLINE STORE.

  Thanks for looking!  Did you stamp today?

Stamps: Painted Lavender, Perennial Postage

Ink: Fresh Freesia, Gorgeous Grape, Shaded Spruce

Paper: Crumb Cake, Lost Lagoon, Fresh Freesia, Basic White, Perennial Lavender DSP

Accessories: Painted Lavender dies, Perennial Postage dies, dimensionals, white baker's twine, tinsel gems

Tuesday, January 30, 2024

XOXO Valentine - Stampin' Up! Heartfelt Hellos

   I probably don't need any more Valentine's Day cards but I just can't stop making them!  The Most Adored DSP which is one of the Sale-a-Bration choices is the perfect paper for these cards.  And most of the patterns aren't overt V-day designs at all which makes them even more versatile!  How pretty are those gold patterns??  You've got until Feb. 29 to place a qualifying order to get this paper pack for free.

  I combined challenges for my card today; the sketch comes from CAS Colours & Sketches and the use of the x's and o's is from the Inspired By challenge.

  The diagonal angle was a fun element to contemplate while still keeping the card clean and simple so I thought a clean simple plaid pattern in gold against a white background would work.  What do you think?


  I took a 4" x 5.25" panel of the DSP and cut it on the diagonal for a nice clean line across the card.  I used the other side to decorate the inside of the or you could make a second card with it.  It's a win either way.  After adhering the DSP to the Basic White thick card base I got to work on my x's and o's.

  I used the retired Playful Alphabet dies but any smaller alphabet die set would work well.  First I cut 2 of each letter from some gold specialty paper.  I used the retired Fine Shimmer but gold foil or distressed gold paper would work too.  I repeated the die cuts again but used the foam adhesive sheets.  I adhered the gold letters to the foam and then put them all on a Stylish Shapes square die cut.  The straight edges and using Basic White cardstock kept the look clean and simple.

  Finally to follow the sketch I had to add a sentiment in the lower right hand corner.  I pulled out another Sale-a-Bration reward Heartfelt Hellos stamp set and stamped it in Real Red and fussy cut the 'love' and trimmed the 'you' and popped them both on dimensionals. The bit of red really pops with the white and gold of the rest of the card.

  All of the current products used to make this card can be purchased or earned for free in my ONLINE STORE.

  Thanks for looking!  Did you stamp today?

Stamps: Heartfelt Hellos (SAB)

Ink: Real Red

Paper: Basic White thick, Basic White, Most Adored DSP (SAB), Fine Shimmer gold (retired)

Accessories: Stylish Shapes dies, dimensionals, foam adhesive sheets


Monday, January 29, 2024

Bright Floral Anniversary - Stampin' Up! Textured Floral

   My card today is one that I made more than a week ago to celebrate my downline's one year anniversary of being a Stampin' Up! demonstrator.  I didn't want to post it until I knew she had gotten it first!  She's a fabulous stamper and I've enjoyed cheering her on as she jumps right on in on each new challenge to build her business and have fun stamping.  She's on Instagram and Facebook as @scattersomejoy so give Kimberly a follow and wish her happy anniversary!  And if you're a stamper in Dallas maybe you can join her at her next class!!

  Anyway on to the card!  It was such gray and cold weather when I was choosing a stamp set and color palette that I just had to go for bright florals which made me think of full bloom summer gardens!  The Textured Floral stamp set was perfect for these colors which came from the As You See It Challenge.  Melon Mambo, Granny Apple Green, Mossy Meadow and Crushed Curry are the specific colors in the challenge.


  I started with a Mossy Meadow base and then stamped my own DSP on a piece of Basic White.  I just stamped the flowers and leaves all over filling in the white spaces.

  Then I stamped each flower and leaf again and then die cut them with the coordinating dies.  I didn't want to cover up that gorgeous background so I used a piece of vellum as a kind of frame/anchor for the die cut flowers and leaves which I adhered with dimensionals.

  The sentiment from Ringed with Nature is stamped in Mossy Meadow and also popped on dimensionals.  Finally I added a few of Iridescent adhesive-backed discs in Melon Mambo.  These embellishments were in the Sept.-Dec. 2023 mini catalog but are still available online for the time being!  

  All of the products used to make this card can be purchased in my ONLINE STORE.

  Thanks for looking!  Did you stamp today?

Stamps: Textured Floral, Ringed with Nature

Ink: Melon Mambo, Granny Apple Green, Mossy Meadow, Crushed Curry

Paper: Mossy Meadow, vellum, Basic White

Accessories: Textured Floral dies, dimensionals, Iridescent adhesive-backed discs


Friday, December 15, 2023

CAS Sweet Bee - Stampin' Up! Bee My Valentine

   The card that I'm sharing today is made for the CAS on Sunday?/Friday? challenge (I'm confused as to which day they are since it shows up differently on their blog web address vs. the blog title page) in which they want us to use black and white and one additional color.  There are so many possibilities with these parameters!  I looked through my new(er) stamp sets and decided that the Bee My Valentine stamp set would be perfect for a clean and simple mostly black and white card!


  This was an impossible card to get a decent photo of!  I tried over the past 2 days taking probably 50 photos the way I usually do and everything looked washed out and very blue-ish no matter what I changed.  Anyway I finally took the card outside and and tried it with lots of direct sunlight!  Believe me when I tell you that this was better than the others but still just 'eh'! Anyway....just use your imagination that the card is much cuter in person!

  I started with a Basic White thick base, then a layer of Basic Black and a layer of Basic White.  I stamped the little dashed flight path around the the card a bit.  Then stamped the sentiment and punched it out and popped it up with dimensionals.

  The bee is stamped in Lemon Lolly and Memento black and I'm thinking now that Daffodil Delight would have been a better choice as it would have shown up more bold in the photo. But I like the softness of the Lemon Lolly. I punched the bee out, added the face, punched vellum wings and stamped and punched antennae. Once the bee was put together I popped it up with dimensionals above the sentiment and added a little adhesive-backed hearts & flower embellishment.

  All of the current products used to make this card can be purchased in my ONLINE STORE.  Items marked with a * will be available for purchase starting January 4, 2024.

  Thanks for looking!  Did you stamp today?

Stamps: Bee My Valentine

Ink: Memento Black, Lemon Lolly

Paper: Basic White thick, Basic White, Basic Black, vellum

Accessories: Bee builder punch*, dimensionals, circle punch, adhesive-backed hearts & flower*

Monday, July 17, 2023

Anniversary Florals - Stampin' Up! Textured Florals

   I made this pretty floral card the other day for my in-laws anniversary.  I think I used a closed challenge for the colors but I didn't mark down which one.  I thought they were a nice bright combo for a summer anniversary.


  I started with a Bubble Bath card base and then another layer of Bubble Bath.  I used the Gorgeous Garden dies to emboss the background pattern.  Stampin' Up! used to have a set of rubber mats and plates to be able to use dies as embossing folders so I pulled those out to get the pretty floral background.

  2 pieces of Bright & Beautiful DSP are used to anchor the flower grouping.  The flowers are stamped in Lemon Lolly and Bubble Bath and then cut out.  The leaves are cut out of another pattern of Bright & Beautiful DSP.

  The flowers are popped on dimensionals as is the sentiment.  I pulled out some retired gems and added them around the flowers for a bit of sparkle.

  All of the current products used to make this card can be purchased in my ONLINE STORE

  Thanks for looking!  Did you stamp today?

Stamps: Textured Florals, Ringed with Nature

Ink: Bubble Bath, Lemon Lolly, Lemon Lime Twist, Smoky Slate

Paper: Bubble Bath, Basic White, Bright & Beautiful DSP

Accessories: Gorgeous Garden dies, Textured Floral dies, dimensionals, faceted gems (retired)

Sunday, July 2, 2023

Love Birds - Stampin' Up! Bird's Eye View

   I'm probably going to say this every time I use this set but....I love the Bird's Eye View stamp set!  I'm going to sound like a broken record but it's just adorable and good for so many occasions as well as color combinations!  I used it this time around with the As You See It challenge.  The sketch with the large center circle was the perfect place to show off more birds!

  I made this one for my husband for our upcoming anniversary.  The Love Birds are so cute and they look exactly like us lol!


   I started with an Orchid Oasis card base, the topped it with a piece of Basic White embossed with the Twisted Rope embossing folder.  I added the center panel edged with some scallops made with the Basic Borders dies.  I cut 2 lengths of scallops for each side as the die doesn't make a long enough cut for the whole piece.  The seam where they meet up is hidden under the circle.

  The circle is cut with the Stylish Shapes dies.  The birds are stamped in Memento black and then colored in with Blends markers (colors listed below) and then fussy cut and popped on dimensionals on the circle. Using a black Stampin' Write marker I added some eyelashes to the girl bird to give her a little bit more personality.

  The heart is punched out of retired 2022-2024 In Color Glimmer paper in Sweet Sorbet.  I had to add a smaller heart at the bottom because somehow I got some ink smudged there after I had the whole card put together.  But I'm going to call it a design decision if anyone asks!

  The sentiment from Just My Type is stamped in black and then snipped apart and added to the card front on dimensionals.

  All of the current products used to make this card can be purchased in my ONLINE STORE

  Thanks for looking!  Did you stamp today?

Stamps: Bird's Eye View, Just My Type

Ink: Memento Black

Blends: Pool Party light & dark, Highland Heather light & dark, Orchid Oasis light, Daffodil Delight light, Balmy Blue light & dark, Azure Afternoon light

Paper: Orchid Oasis, Basic White, Pool Party, 2022-2024 In Color Glimmer Paper (retired)

Accessories: Twisted Rope embossing folder, Stylish Shapes dies, heart punch, Crafting With You dies (small heart), dimensionals, Basic Borders dies


Saturday, July 1, 2023

Wedding Table 8 - Stampin' Up! Textured Floral

   When I saw the current Inspired by Challenge I laughed out loud.  We have a running joke for the last 20 years with a group of friends stemming all the way back to our own wedding and Table 8.  When doing our seating plan for our reception we had a group of friends who didn't all know each other from various times/places of our lives but we knew they would have a good time together so we sat them all together.... at Table 8. And boy did they have a good time!!  They were the fun, rowdy table, laughing the whole night and having a great time with those Kodak table cameras that were all the rage back then.  Subsequently over the years we have been seated at Table 8's at their weddings even when having a table 8 made no sense to the seating plan.  We've continued the tradition of being the fun table as well as texting and sharing photos from other weddings we've attended where, just randomly, we've been seated at Table 8.  It's like someone knows that's the table we've got to be seated at! 

  This card was meant to be for a wedding was it not??  I also actually needed one for a wedding we're attending in a few weeks and while I don't know what table we'll be seated at fingers crossed for 8!  I was inspired by the floral arrangement and colors.


  This one starts with a Basic White thick card base, then a layer of Basic Black, then a layer of Basic White embossed with the retired Subtle embossing folder and then blended some Pool Party ink lightly in the background.  I created the "vase" with Basic Black cardstock and cut a partial shape with the Countryside Corners dies and then embossed it with the Stripes embossing folder (from the 2 pack Stripes & Splatters).  It's hard to see the textured as well as the Wink of Stella that I colored on for some sparkle.

  Next I stamped a bunch of flowers in Flirty Flamingo and used the stamped off versions and layered several for a more full look. The leaves at stamped (and stamped off) in Shaded Spruce.  The wispy greens are cut from Pool Party card stock.  One flower is stamped off in Petal Pink to follow the colors in the inspiration photo.  After all the die cutting was done I arranged the flowers in the "vase" with some being popped up with dimensionals and others laying flat.

  The sentiment from Sentimental Park is stamped in Memento Black and then trimmed down and layered over a length of retired crinkled seam binding ribbon.  Retired White Opaque Adhesive-Backed gems are placed all around the arrangement for subtle sparkle and shine.

  This was definitely a fun card to make and remember all of our own Table 8 shenanigans!

  All of the current supplies used to make this card can be found in my ONLINE STORE.

  Thanks for looking!  Did you stamp today?

Stamps: Textured Floral, Sentimental Park

Ink: Flirty Flamingo, Shaded Spruce, Pool Party, Petal Pink

Paper: Basic White thick, Basic White, Basic Black, Pool Party

Accessories: Textured Floral dies, Stripes & Splatters embossing folders, Wink of Stella, dimensionals, Subtle embossing folder (retired), Opaque Adhesive-Backed gems (retired), crinkled seam binding ribbon (retired)


Friday, May 5, 2023

Floral Embroidery Hoop - Stampin' Up! Crafting with You

   One of the new bundles in the 2023-2024 Stampin' Up! Annual catalog is the Crafting with You bundle and I love the different craft/hobby images in the stamp set but I think the dies are even better.  Not only do you have dies that match the images you have extras like thread spools, a ruler, buttons and a paper trimmer but you have an embroidery hoop!  Think of all the small images that you can highlight within this hoop!!  Letters!  Little animals! Sentiments!  It's such a cool little die and I'm sure this won't be the last time you see it on one of my cards!

  I used the gorgeous color combo over at CAS Colours & Sketches to make today's card.  Pool Party, Night of Navy & Flirty Flamingo. 


  I started with a Pool Party base, then a layer of Basic White embossed with the retired Tufted embossing folder.  Next I cut out the hoop shape in some retired wood grain paper called Natural Touch Specialty paper but any wood grain paper would work or you could color your own with Blends for a custom look.  I backed the hoop with a Basic White circle with a little bit of Pool Party ink blended on with a blending brush.

  I colored the flower image with markers in the challenge colors and stamped it on Basic White and cut it out and popped it with dimensionals on the hoop.  The whole hoop is adhered with more dimensionals to the card front.

  The sentiment is stamped in Night of Navy with a Flirty Flamingo hearts (stamped off once) and then punched with a 1" circle punch.  A tiny Night of Navy baker's twine bow is the finishing touch for this CAS card.

  Check out the new Crafting with You Bundle as well as all the other new products just released by Stampin' Up! in my ONLINE STORE.

  Thanks for looking!  Did you stamp today?

Stamps: Crafting with You 

Ink: Night of Navy, Flirty Flamingo

Markers: Night of Navy, Pool Party, Flirty Flamingo

Paper: Pool Party, Basic White, Natural Touch Specialty Paper (retired)

Accessories: Crafting with You dies, Tufted embossing folder (retired), dimensionals, baker's twine


Wednesday, March 29, 2023

I Love You Hearts - Stampin' Up! Country Bouquet

   The Country Bouquet punch has been out of stock for quite a while but it's back in the online store now!  The bundle is great for all your heart stamping needs!  They aren't just for Valentine's day people.  You can add hearts to cards all year round.

  I made this card a while back and I think I will be using it for my husband for our anniversary this year.  I like the soft understated colors and the gold embossing bring a nice bit shine.


  The card base is Basic White thick, then a layer of Basic White embossed with the retired Pinewood Planks embossing folder.

  I used Blushing Bride, Basic White and Pool Party to emboss gold hearts and then punched them out with the Country Bouquet punch.  I arranged them in a cascade down the front of the card with a few getting popped with dimensionals.

  I stamped and embossed the sentiments then used the Stylish Shapes dies to cut the banner shapes.  Those are then popped on dimensionals as well.

  The final embellishment is a Blushing Bride baker's twine bow right above the "I love you".

  All of the current products used on this card can be purchased in my ONLINE STORE.

  Thanks for looking!  Did you stamp today?

Stamps: Country Bouquet

Ink: Versamark

Paper: Basic White thick, Basic White, Blushing Bride, Pool Party

Accessories: Country Bouquet punch, gold embossing powder, Stylish Shapes dies, dimensionals, baker's twine, Pinewood Planks embossing folder (retired)

Monday, March 13, 2023

Love You Hearts - Stampin' Up! Country Bouquet

   I know I'm not the only card maker with a basket or bin full of card parts that didn't make the cut to be used on a card but were too good to just toss.  I have panels of embossed cardstock, die cuts, stamped images and off cuts that "might be good for something" sitting in a bin on my stamp desk.  Every once in a while I cull it and toss what I know I will never use no matter how many times I tell myself I will.  The rest sit there waiting for their second chance.

  Thanks to the current challenge over at As You See It a few of those orphaned card parts made onto a card finally.  For the challenge they are asking us to "Spring Clean the Stash" and use up some bits and pieces that we've been holding onto!  


  The bits of this card that I already had sitting around are the large stamped heart; it was die cut and everything with the Stylish Shapes dies just sitting and waiting!  The Cane Weave embossed panel was also an orphaned card part as well as the baker's twine bow.  

  I added all the pieces to a card base and added a panel of Country Gingham DSP and a smaller embossed heart in Sweet Sorbet and a sentiment.  A few In Color dots finish up this card that was completely based around a few pieces I had saved "just in case"!

  Thanks for looking!  Did you stamp today?

Stamps: Country Bouquet

Ink: Mint Macaron, Sweet Sorbet, Versamark

Paper: Basic White thick, Basic White, Mint Macaron, Country Gingham DSP, Sweet Sorbet

Accessories: Stylish Shapes dies, Cane Weave embossing folder, white embossing powder, dimensionals, Country Bouquet punch, baker's twine, In Color Matte Decorative Dots


Friday, January 27, 2023

Rainbow Hearts - Stampin' Up! Country Bouquet

 I have tons of paper to cut for an upcoming class as well as prepping a big personal project that I'll share whenever I get it finished but I wanted to share this quick Valentine's Day card that I made the other day.  I think this one is perfect for a guy without a lot of fussiness and a nice bright color palette.


  This is really easy to put together!  Basic White thick card base, layer of Starry Sky, then a layer of Basic White embossed with the Brick & Mortar embossing folder.

  Then using 5 ink colors I stamped the 2 hearts from the Country Bouquet stamp set and added them to the card front with dimensionals in a circle.  The smaller hearts were added with a dab of glue and then the sentiment is stamped in Memento Black and added with more dimensionals.

  So easy!  You could swap out the ink colors for 5 pastels or all shades of pinks, favorite team colors; lots of possibilities.  

  Thanks for looking!  Did you stamp today?

Stamps: Country Bouquet

Ink: Sweet Sorbet, Mango Melody, Mint Macaron, Balmy Blue, Starry Sky, Memento Black

Paper: Basic White thick, Basic White, Starry Sky

Accessories: Brick & Mortar embossing folder, Country Bouquet punch, dimensionals