I've been slacking off on getting ahead on my Christmas cards so far this year. Last year I joined the Christmas card challenge over on Splitcoaststampers and it really spurred me on to make some cards ever month so I would be all set when Christmas rolled around. It was wonderful to just mail them out and not have to add that one (large) item to my to Christmas do list. Well this year I started off pretty good but got sidetracked with other projects. I'm trying to get back on track and this week's Clean and Simple challenge using dark blue and white seemed like a great start.
This card comes together really quick if you need to make multiples. The base is Midnight Muse with a layer of Whisper White on top. I rounded the corners of the Whisper White panel and then ran it through the Big Shot with the new Holiday Frame embossing folder. Next, I sprayed the whole layer with Shimmer Mist using rubbing alcohol and shimmer paint. It's hard to see in the photo but it has a nice all over sparkle.
For the ornament I stamped it in Midnight Muse and used the matching Holiday Ornament Framelit and cut it out. I added a taffeta ribbon hanger and a fork bow (click HERE for a tutorial). The ornament is popped up on dimensionals.
The Ornament Keepsakes stamp set and the matching Holiday Ornaments Framelits are on page 3 of the Holiday catalog. It's awesome that Stampin' Up! is offering them as a bundle to save 15% on the cost! Very cool. With the different sizes of ornaments I think this set has so many possibilities. Remember, if you'd like to place an order please visit my online store and make sure my name is listed as the demonstrator.
Thanks for looking! Did you stamp today?
Stamps: Ornament Keepsakes
Ink: Midnight Muse
Paper: Midnight Muse, Whisper White
Accessories: taffeta ribbon, dimensionals, Holiday Ornaments Framelits, Shimmer Mist
Amanda Mertz ~ Independent Stampin' Up!® Demonstrator ~ didyoustamptoday@gmail.com
Wednesday, August 8, 2012
Tuesday, August 7, 2012
It Finally Happened! A Visit from the Tooth Fairy
After about a month of wiggling, Ryan lost his first tooth! This past week he had been wiggling it more and more and had asked Matt and I to try to pull it out. The tooth was so little and slippery that we couldn't get a good grip on it. We even had a pair of pliers at the ready but the tooth held on! We were ready to try the string tied to the tooth tied to the door trick on Sunday until Matt ruined the moment by Googling if it was a good idea or not. Darned internet! Anyway after eating an apple at lunch yesterday the poor tooth was just barely hanging on and after dinner Ryan let Matt give it a quick pull! Out it came!
I'm already paranoid that the new tooth is terribly crooked! That's a mom for you right? I better sell some more stamps so I will be able to pay the orthodontist! =)
Of course we had to put the tooth in a very special place so the tooth fairy could find it while Ryan was asleep. Knowing that this day would eventually come I was actually prepared with a special tooth holder (is that what you even call these things?? We're entering new territory here!) that I made a few weeks ago.
I just made this little tooth fairy box out of an empty Stampin' Up! embellishment container (because I just can't bring myself to recycle them!). A few die cut circles, a hand drawn tooth, a bit of Dazzling Details and a reminder to smile and we've got a tooth holder. This was a really simple, fast project except for drawing the tooth. I am not an artist, not even a doodler...that's why I stamp. I don't have to draw since Stampin' Up! has such great images but since Stampin' Up! is lacking in the "giant tooth" stamp department I had to go out on my own. I probably drew about 9 or 10 to get the right look and size to fit on top of the container. When I finally got one I liked I glued it down on the Midnight Muse circle so fast I forgot to emboss the top like I was intending! Oh well....Ryan is 6 and I'm sure he doesn't really care about the design!
I outlined the tooth with Dazzling Details and added a face. I wrapped some retired Real Red grosgrain around the outside of the container. I inked up the "smile" portion of a sentiment from Petite Pairs with my Midnight Muse marker and stamped it on Whisper White and punched it out with the jewelry tag punch. I adhered it to the top of the box with a red brad. The paper piercing tool goes right through the plastic lid by the way.
Using My Digital Studio I created a circle template the same size as the inside of the lid. I made a blank list so that we can write in the date of when each tooth comes out. I thought it would be fun to see the progression from first lost tooth to the last one. Of course I matched the color of the printing to the rest of the project...a great perk with MDS, you can keep everything matching in Stampin' Up! colors!
I'm happy to report that the Tooth Fairy made a stop at our house last night and found the tooth holder just fine. She left Ryan a fancy gold $1 coin! Which Alex swiped when Ryan showed it to him, ran upstairs and shoved the coin in his own piggy bank! Bratty little brother! =)
Check out some of my other projects using empty embellishment containers: Mini Album, Baker's Twine Holders, Personalized Gifts.
Thanks for looking! Did you stamp today?
Stamps: Petite Pairs
Ink: markers: Midnight Muse, Black
Paper: Whisper White, Midnight Muse
Accessories: Circles #2 die, jewelry tag punch, brad, Dazzling Details, grosgrain ribbon, My Digital Studio, empty SU embellishment container
| Get out your magnifying glass...the smallest tooth ever! |
![]() | |||
| New Smile! The adult tooth is already starting to peek out! |
Of course we had to put the tooth in a very special place so the tooth fairy could find it while Ryan was asleep. Knowing that this day would eventually come I was actually prepared with a special tooth holder (is that what you even call these things?? We're entering new territory here!) that I made a few weeks ago.
I outlined the tooth with Dazzling Details and added a face. I wrapped some retired Real Red grosgrain around the outside of the container. I inked up the "smile" portion of a sentiment from Petite Pairs with my Midnight Muse marker and stamped it on Whisper White and punched it out with the jewelry tag punch. I adhered it to the top of the box with a red brad. The paper piercing tool goes right through the plastic lid by the way.
Using My Digital Studio I created a circle template the same size as the inside of the lid. I made a blank list so that we can write in the date of when each tooth comes out. I thought it would be fun to see the progression from first lost tooth to the last one. Of course I matched the color of the printing to the rest of the project...a great perk with MDS, you can keep everything matching in Stampin' Up! colors!
I'm happy to report that the Tooth Fairy made a stop at our house last night and found the tooth holder just fine. She left Ryan a fancy gold $1 coin! Which Alex swiped when Ryan showed it to him, ran upstairs and shoved the coin in his own piggy bank! Bratty little brother! =)
Check out some of my other projects using empty embellishment containers: Mini Album, Baker's Twine Holders, Personalized Gifts.
Thanks for looking! Did you stamp today?
Stamps: Petite Pairs
Ink: markers: Midnight Muse, Black
Paper: Whisper White, Midnight Muse
Accessories: Circles #2 die, jewelry tag punch, brad, Dazzling Details, grosgrain ribbon, My Digital Studio, empty SU embellishment container
Sunday, August 5, 2012
Bird Love
I'm combining two fun challenges for this card today. The Colour Q challenge this week is to use Lucky Limeade, Pink Pirouette, Tangerine Tango and Poppy Parade. The second challenge is from CAS-ual Fridays. This is the first time I've played along with them only having just discovered this challenge blog over the weekend! The challenge there is to make a Clean and Simple (CAS) card using something you'd see in the sky. The bright colors from Colour Q paired with a CAS card seemed like a great combination!
When using bright colors like these I always find my cards turn out better if I leave a lot of white or "open" space. I try not to fill up the whole card as it just ends up looking too busy. So what do you think? Did I fulfill both challenges?
The base of the card is Whisper White and then a smaller layer of Whisper White embossed with the Perfect Polka Dots embossing folder. I added a narrow strip of Designer Series Paper from the Summer Smooches pack.
For the image panel I stamped the birds from For the Birds in black Stazon. I used the new Apothecary Accents framelits to cut out the tag. The matching piercing template made the piercing really easy and fast. I colored in the image with my markers. I added a tiny little bit of Dazzling Details to the heart.
For the final details I put 2 silver brads in the label and then added a little Lucky Limeade baker's twine bow to the top. I popped the label up with dimensionals so it wouldn't get lost against the white background.
I didn't use a sentiment but can add that later depending on the occasion I need the card for.
Thanks for looking! Did you stamp today?
Stamps: For the Birds
Ink: Black Stazon, markers- Lucky Limeade, Poppy Parade, Tangerine Tango, Pink Pirouette
Paper: Whisper White, Summer Smooches DSP
Accessories: Perfect Polka Dot e.f., Apothecary Accents Framelits, Paper piercing template, silver brads, baker's twine, dimensionals, Dazzling Details
Saturday, August 4, 2012
Simple Flower
Happy Saturday! I hope your weekend is off to a good start. We had our neighbors over last night for some smores on the firepit so all the kids certainly had fun. How can a sugar sandwich not be fun right? It looks like it's going to be hot here in Central Virginia today so I think the pool is calling our names.
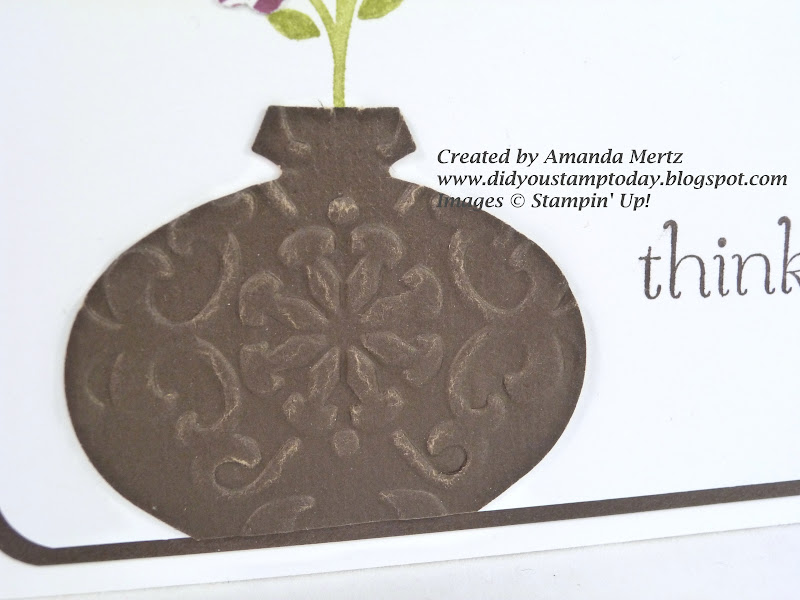
I really like how this card turned out. It's super simple but the texture on the vase and the rhinestones on the flowers really give it some interest.
I used the ornament punch to make the vase. After I punched it out of the new Core'dination cardstock I snipped of the point of the ornament and then ran it through the Big Shot using the Vintage Wallpaper embossing folder. The Core'dinations cardstock is so cool...you can sand down the raised part of the embossing and there is a lighter colored core that shows through. It comes in Early Espresso, Gumball Green and Cherry Cobbler. Check it out in the new Holiday Catalog.
I inked up one of the stem stamps in the Bright Blossoms set with my Lucky Limeade marker and stamped it onto Whisper White. To make the flowers I used one of the Itty Bitty Punch pack flowers and the Rich Razzleberry pattern from the Summer Smooches DSP. I tried to line the punch up in the same place on the pattern so the flowers look alike. I adhered them with a tiny dab of Mono Multi glue and then added the rhinestones.
I used the corner rounder on the top two layers and then added the "thinking of you" sentiment from Sweet Essentials (my favorite sentiment set right now- I just love the font and the size is just right!).
Thanks for looking! Did you stamp today?
Stamps: Bright Blossoms, Sweet Essentials
Ink: Early Espresso
Paper: Whisper White, Early Espresso, Core'dinations Early Espresso, Summer Smooches DSP
Accessories: ornament punch, Itty Bitty Punch pack, rhinestones, corner rounder, Vintage Wallpaper embossing folder
I really like how this card turned out. It's super simple but the texture on the vase and the rhinestones on the flowers really give it some interest.
I used the ornament punch to make the vase. After I punched it out of the new Core'dination cardstock I snipped of the point of the ornament and then ran it through the Big Shot using the Vintage Wallpaper embossing folder. The Core'dinations cardstock is so cool...you can sand down the raised part of the embossing and there is a lighter colored core that shows through. It comes in Early Espresso, Gumball Green and Cherry Cobbler. Check it out in the new Holiday Catalog.
I inked up one of the stem stamps in the Bright Blossoms set with my Lucky Limeade marker and stamped it onto Whisper White. To make the flowers I used one of the Itty Bitty Punch pack flowers and the Rich Razzleberry pattern from the Summer Smooches DSP. I tried to line the punch up in the same place on the pattern so the flowers look alike. I adhered them with a tiny dab of Mono Multi glue and then added the rhinestones.
I used the corner rounder on the top two layers and then added the "thinking of you" sentiment from Sweet Essentials (my favorite sentiment set right now- I just love the font and the size is just right!).
Thanks for looking! Did you stamp today?
Stamps: Bright Blossoms, Sweet Essentials
Ink: Early Espresso
Paper: Whisper White, Early Espresso, Core'dinations Early Espresso, Summer Smooches DSP
Accessories: ornament punch, Itty Bitty Punch pack, rhinestones, corner rounder, Vintage Wallpaper embossing folder
Friday, August 3, 2012
Faux Linen Postage Due
I hope my local ladies aren't bored with seeing all the projects they made on Tuesday. This is the last one then I'll be sharing some new things I've been working on.
When the new catalog first came out I didn't even notice the Postage Due set. Then I saw a sample or two around the internet and I thought it was cool and figured that it was a retired set that I didn't recognize. Come to find out it's a brand new set that I completely overlooked in my initial browsing of the catalog. It's a great set for vintage inspired cards, travel scrapbooking and masculine cards.
I wanted to teach my stamping ladies the Faux Linen technique as I had a pile of glossy cardstock that I wanted to do something with. I bought it a REALLY long time ago for some technique or other and didn't use hardly any of it. This is a really easy technique that gives a cool look to your card. You can see a step by step tutorial HERE at Splitcoaststampers. And what makes this even easier is the new sanding block that is in the Holiday catalog. You can replace the pieces of sandpaper when they wear out and the foam block is easy to hold.
The base of the card is Soft Suede. We used the Labels Framelits to cut labels out of Cajun Craze and our stamped piece of Glossy cardstock. After you have your labels cut you want to do the sanding on the glossy cardstock. Go across the label and then up and down to get the linen look. Then sponge some ink on (doesn't have to be perfectly even) and sand the same way again, across and then up and down getting all the gloss of. You can always add more sponging and sand again to get your desired look.
We stamped one of the postage stamps and punched it out with the postage stamp punch. There is a little bit of sponging around the edges of the stamp to keep with the vintage feel of the card. The light weight seam binding is perfect finishing touch for this card.
I think I may use this technique to make a handful of notecards to have on hand for last minute occasions.
I just want to take a minute to welcome all of the new followers to Did You Stamp Today. It seems over the last 2 months there have been quite a few new faces added. If you have any questions about any of my projects or Stampin' Up! promotions going on just leave a comment or send me an e-mail and I'd be happy to help. I'm glad you've joined us here at Did You Stamp Today!
Thanks for looking! Did you stamp today?
Stamps: Postage Due
Ink: Soft Suede, Early Espresso (now that I'm looking closer at my photos I think I forgot to put Early Espresso out for my stamping ladies on Tuesday for the background image. They used Soft Suede for stamping and sponging...it works fine either way! That's what I get for designing projects too far ahead of time...I forget exactly what I used!)
Paper: Soft Suede, Cajun Craze, Glossy White, Very Vanilla
Accessories: sanding block, Labels Framelits, seam binding ribbon, postage stamp punch, dimensionals
When the new catalog first came out I didn't even notice the Postage Due set. Then I saw a sample or two around the internet and I thought it was cool and figured that it was a retired set that I didn't recognize. Come to find out it's a brand new set that I completely overlooked in my initial browsing of the catalog. It's a great set for vintage inspired cards, travel scrapbooking and masculine cards.
I wanted to teach my stamping ladies the Faux Linen technique as I had a pile of glossy cardstock that I wanted to do something with. I bought it a REALLY long time ago for some technique or other and didn't use hardly any of it. This is a really easy technique that gives a cool look to your card. You can see a step by step tutorial HERE at Splitcoaststampers. And what makes this even easier is the new sanding block that is in the Holiday catalog. You can replace the pieces of sandpaper when they wear out and the foam block is easy to hold.
The base of the card is Soft Suede. We used the Labels Framelits to cut labels out of Cajun Craze and our stamped piece of Glossy cardstock. After you have your labels cut you want to do the sanding on the glossy cardstock. Go across the label and then up and down to get the linen look. Then sponge some ink on (doesn't have to be perfectly even) and sand the same way again, across and then up and down getting all the gloss of. You can always add more sponging and sand again to get your desired look.
We stamped one of the postage stamps and punched it out with the postage stamp punch. There is a little bit of sponging around the edges of the stamp to keep with the vintage feel of the card. The light weight seam binding is perfect finishing touch for this card.
I think I may use this technique to make a handful of notecards to have on hand for last minute occasions.
I just want to take a minute to welcome all of the new followers to Did You Stamp Today. It seems over the last 2 months there have been quite a few new faces added. If you have any questions about any of my projects or Stampin' Up! promotions going on just leave a comment or send me an e-mail and I'd be happy to help. I'm glad you've joined us here at Did You Stamp Today!
Thanks for looking! Did you stamp today?
Stamps: Postage Due
Ink: Soft Suede, Early Espresso (now that I'm looking closer at my photos I think I forgot to put Early Espresso out for my stamping ladies on Tuesday for the background image. They used Soft Suede for stamping and sponging...it works fine either way! That's what I get for designing projects too far ahead of time...I forget exactly what I used!)
Paper: Soft Suede, Cajun Craze, Glossy White, Very Vanilla
Accessories: sanding block, Labels Framelits, seam binding ribbon, postage stamp punch, dimensionals
Thursday, August 2, 2012
Spooktacular Offer from Stampin' Up!
Wow! Stampin' Up! is making it even sweeter to join as a Demonstrator during the month of August! If you sign up during August you'll receive this really cool printer's tray Halloween project. You'll get everything (except the ink) to make this fun decorative tray. It's a $60 value and is exclusive to Stampin' Up! How fun!

Now I know some of you are thinking..."Geez, that's a great project. I'd love to get it but I don't want to have to sell anything." Well guess what, when you sign up you never have to sell a thing...not even to yourself. But you might enjoy the 20% off demonstrator discount! There is never any obligation when you join, everything in your kit is yours to keep regardless of if you want to build a business or just want to get everything on your wish list (you know you have one!).
People join for lots of reasons:
If you're ready to join my team head over to my Demonstrator website and Click "Join the Fun"

Now I know some of you are thinking..."Geez, that's a great project. I'd love to get it but I don't want to have to sell anything." Well guess what, when you sign up you never have to sell a thing...not even to yourself. But you might enjoy the 20% off demonstrator discount! There is never any obligation when you join, everything in your kit is yours to keep regardless of if you want to build a business or just want to get everything on your wish list (you know you have one!).
People join for lots of reasons:
- to get $125 worth of Stampin' Up! products for just $99
- for the 20% off discount
- to be able to see all the sneak peeks before the public
- access to Stampin' Connection (the demostrator only online forum)
- to be invited to exclusive Stampin' Up! events
If you're ready to join my team head over to my Demonstrator website and Click "Join the Fun"
3x3 For the Birds Birthday
All of these late nights watching the Olympics are starting to catch up to me! The dog and I haven't gotten up to do our usual early morning walks the last 2 mornings. I've felt the need to sleep in a bit later to be able to make it through the day because the boys certainly seem to have the same amount of energy!
The card I'm sharing today is another one we did on Tuesday at stamp club. The For the Birds set is so cute and covers a lot of occasions. I've decided to separate the sentiments from the images so I can mix and match more easily and not have to worry about masking off the sentiments....I always make a mess of that! The images are so cute in this set and just take a moment to color.
The base of this 3x3 card is Baja Breeze that was run through the Big Shot with the new Chevron embossing folder. A strip of Midnight Muse edged with the new scallop edgelit die and then paper pierced along the edge using the piercing templates (hard to see in the photo). We used a length of new stitched In Color ribbon in Primrose Petals to accent the straight side of the scalloped piece.
For the image, we stamped with Stazon onto Whisper White cardstock, colored in the birds with markers and then punched it out with the large oval punch. Of course we have to pop the oval up since it's one of my cards and I just can't say no to dimensionals (I guess there are worse things to be addicted to right?). The finishing touch is a rhinestone.
I pulled my color combination for this card from the Patio Party DSP and wanted to teach my ladies how to make their own envelopes to match the card using the Simply Scored Diagonal plate. We took a 5x5 piece of DSP and and scored across all 4 corners at 2 3/8". Then just cut out the tiny bit of area where the score lines intersect to make nice clean folds and then adhere with just a bit of Tombow glue along 3 flaps. Super easy. I think it takes longer to write it out than to actually do it.
Thanks for looking! Did you stamp today?
Stamps: For the Birds
Ink: Stazon markers- Summer Starfruit, Primrose Petals
Paper: Patio Party DSP, Whisper White, Baja Breeze, Midnight Muse
Accessories: oval punch, Chevron embossing folder, stitched Primrose Petals ribbon, rhinstone, Simply Scored w/ Diagonal plate, dimensionals
The card I'm sharing today is another one we did on Tuesday at stamp club. The For the Birds set is so cute and covers a lot of occasions. I've decided to separate the sentiments from the images so I can mix and match more easily and not have to worry about masking off the sentiments....I always make a mess of that! The images are so cute in this set and just take a moment to color.
The base of this 3x3 card is Baja Breeze that was run through the Big Shot with the new Chevron embossing folder. A strip of Midnight Muse edged with the new scallop edgelit die and then paper pierced along the edge using the piercing templates (hard to see in the photo). We used a length of new stitched In Color ribbon in Primrose Petals to accent the straight side of the scalloped piece.
For the image, we stamped with Stazon onto Whisper White cardstock, colored in the birds with markers and then punched it out with the large oval punch. Of course we have to pop the oval up since it's one of my cards and I just can't say no to dimensionals (I guess there are worse things to be addicted to right?). The finishing touch is a rhinestone.
I pulled my color combination for this card from the Patio Party DSP and wanted to teach my ladies how to make their own envelopes to match the card using the Simply Scored Diagonal plate. We took a 5x5 piece of DSP and and scored across all 4 corners at 2 3/8". Then just cut out the tiny bit of area where the score lines intersect to make nice clean folds and then adhere with just a bit of Tombow glue along 3 flaps. Super easy. I think it takes longer to write it out than to actually do it.
Thanks for looking! Did you stamp today?
Stamps: For the Birds
Ink: Stazon markers- Summer Starfruit, Primrose Petals
Paper: Patio Party DSP, Whisper White, Baja Breeze, Midnight Muse
Accessories: oval punch, Chevron embossing folder, stitched Primrose Petals ribbon, rhinstone, Simply Scored w/ Diagonal plate, dimensionals
Wednesday, August 1, 2012
Triple Time Stamping
I had my monthly stamp club yesterday and it was wonderful too see everyone and show my stamping ladies some great new things!
For one of our projects I taught them how to do Dawn Olchefske's Triple Time Stamping technique. Dawn created this wonderful tutorial HERE. Check out her video to see how to do this fun and quick stamping technique. Her card is absolutely gorgeous! For the class we used the Reason to Smile stamp set that was the special promotion for July.
The base and colored layers are Raspberry Ripple paired with layers of Whisper White for the stamping. We stamped the flower outline stamp in Crumb Cake. On the left we tied a Crumb Cake seam binding knot. On this card I stamped the solid flower in Crumb Cake and then used Raspberry Ripple to outline it. After taking this photo I decided that I liked having the solid flower in the Raspberry Ripple and the outline in Crumb Cake so I switched it for class but didn't have time to take a new photo. This also saved some chaos of having to clean the stamps between each person using them. When you have 15+ people using the same supplies less complicated is definitely the way to go! We punched the flower out with the scalloped circle punch and then popped it up with dimensionals. And you can't see well in this photo but there is some Dazzling Details in the center of the flower.
The final touch is a sentiment from Sweet Essentials stamped in Raspberry Ripple.
Thanks for looking! Did you stamp today?
Stamps: Reason to Smile, Sweet Essentials
Ink: Raspberry Ripple, Crumb Cake
Paper: Whisper White, Raspberry Ripple
Accessories: Scalloped circle punch, dimensionals, Seam binding ribbon, Dazzling Details
For one of our projects I taught them how to do Dawn Olchefske's Triple Time Stamping technique. Dawn created this wonderful tutorial HERE. Check out her video to see how to do this fun and quick stamping technique. Her card is absolutely gorgeous! For the class we used the Reason to Smile stamp set that was the special promotion for July.
The base and colored layers are Raspberry Ripple paired with layers of Whisper White for the stamping. We stamped the flower outline stamp in Crumb Cake. On the left we tied a Crumb Cake seam binding knot. On this card I stamped the solid flower in Crumb Cake and then used Raspberry Ripple to outline it. After taking this photo I decided that I liked having the solid flower in the Raspberry Ripple and the outline in Crumb Cake so I switched it for class but didn't have time to take a new photo. This also saved some chaos of having to clean the stamps between each person using them. When you have 15+ people using the same supplies less complicated is definitely the way to go! We punched the flower out with the scalloped circle punch and then popped it up with dimensionals. And you can't see well in this photo but there is some Dazzling Details in the center of the flower.
The final touch is a sentiment from Sweet Essentials stamped in Raspberry Ripple.
Thanks for looking! Did you stamp today?
Stamps: Reason to Smile, Sweet Essentials
Ink: Raspberry Ripple, Crumb Cake
Paper: Whisper White, Raspberry Ripple
Accessories: Scalloped circle punch, dimensionals, Seam binding ribbon, Dazzling Details
Subscribe to:
Posts (Atom)