Thursday, October 31, 2024

Florals in Purples - Stampin' Up! Textured Florals

 When it comes to using my stamping supplies I'm a bit like the dog seeing the squirrel and losing focus on other things.  My 'squirrel' tends to be the newest stamping products to my stamp room and I'm so intent on using all of the new things that some of the older or retired items get forgotten about.  Right now that is all the Christmas focused items from the Sept.-Dec. Mini Catalog.  My card today uses a stamp set that's been available for quite a while; Textured Florals.  So here's a reminder to pull out an older stamp set and make a few cards with it even if you have newer products calling your name!


  The layout is from the closed Inspire Create Challenge and had a nice focal point on the upper right hand corner of the card and I thought a nice cluster of flowers would be pretty.

  I pulled out 3 complementary purples in Blackberry Bliss, Petunia Pop and Fresh Freesia and stamped 3 flowers then die cut them.  Mossy Meadow was a nice green to use for some leaves.

  The flowers are popped on dimensionals on top of a strip of Blackberry Bliss cardstock and a background of retired Silver & Gold 6x6 Specialty Paper in a silver strip pattern.

  The sentiment from Sweetly Scripted is stamped in Blackberry Bliss and fussy cut and is added to the side.  Silver Adhesive-backed Sparkle Gems are added all around the flower cluster.

  Thanks for looking!  Did you stamp today?

All of the current supplies used to make this card can be purchased in my ONLINE STORE.

Stamps: Textured Florals, Sweetly Scripted

Ink: Blackberry Bliss, Petunia Pop, Fresh Freesia

Paper: Basic White, Mossy Meadow, Blackberry Bliss, Silver & Gold 6x6 Specialty paper (retired)

Accessories: Textured Florals dies, dimensionals, Adhesive-backed Sparkle Gems

Wednesday, October 30, 2024

Hello Fall Home - Stampin' Up! Humble Home

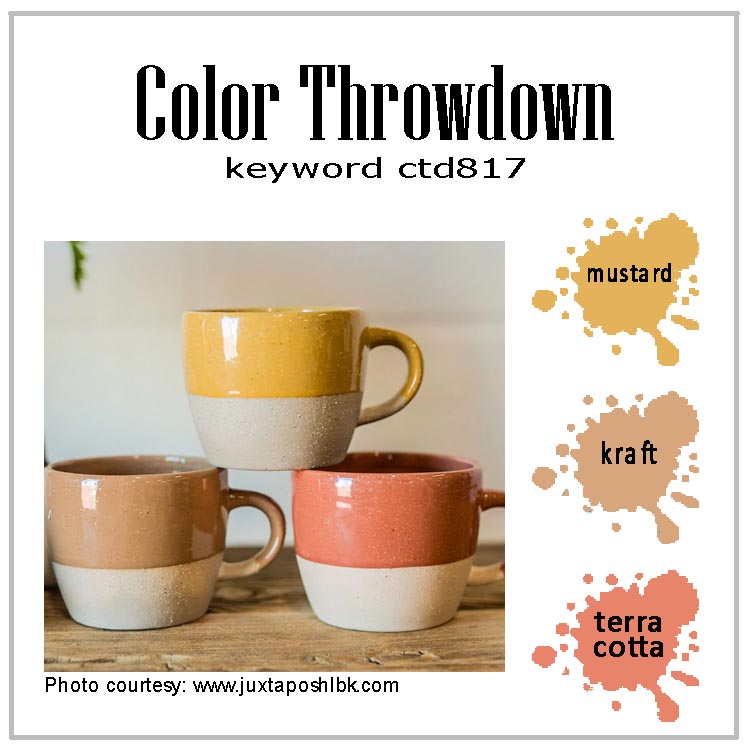
 I'm so honored to be a guest designer over at The Color Throwdown challenge this week!  I was picked as a Featured Stamper for my Birthday Tackle card from last week so now I get to play along with this fabulous team of stampers and their color combo!  These colors definitely felt like fall to me so I went with it!


  So we've got Mustard, Kraft and Terracotta as the challenge colors which I have translated into Crushed Curry, Crumb Cake and Copper Clay for Stampin' Up! colors.  Such great inspiration!


  I thought these colors would be perfect to make a cozy little house with some fall leaves as accents.  I've used a piece of Perennial Lavender DSP in a checked Crumb Cake pattern and then added the rest of the elements.

  The Humble Home punch bundle is just too cute and I've loved designing projects with it.  I added a bit of Early Espresso as a neutral for the roof and sentiment and Copper Clay is a perfect brick color for the body of the house.  I stamped the windows and door in Early Espresso and used Blends to color them in and then fussy cut.  A Crushed Curry heart above the door adds to the coziness.  The House is popped on a Spotlight on Nature circle die cut and then the whole thing is added to the card front over a linen thread bow.

  The Autumn Leaves dies are used to make the 3 leaves and a few Crumb Cake Adhesive-backed Speckled Dots are sprinkled around for the final touch.

  Thanks so much to the Color Throwdown team for having me join them on this challenge!!  

  Thanks for looking!  Did you stamp today?

All of the current supplies used to make this card can be purchased in my ONLINE STORE.

Stamps: Humble Home, Choose Happy

Ink: Early Espresso, Copper Clay

Blends: Crumb Cake light & dark, Daffodil Delight light

Paper: Perennial Lavender DSP, Basic White, Copper Clay, Crushed Curry

Accessories: Humble Home builder punch, Spotlight on Nature dies, Autumn Leaves dies, dimensionals, linen thread, Adhesive-backed Speckled Dots (retired)


Tuesday, October 29, 2024

Frosty Christmas - Stampin' Up! Hearts & Hugs

 It's always fun to try to take a non-Christmas stamp set and use it for a Christmas card!  I gave it a whirl with the Hearts & Hugs stamp set and made some Christmas walruses!


  I started this one with a Pool Party card base and then used 2 long narrow panels of Nests of Winter DSP for the background.  The snow is made using 2 layers of Basic White with the edges torn.

  I die cut 2 pine trees with the Peaceful Evergreen die set and layered them on the left side of the card.  Next come the stars of the the walruses!  I stamped them in Gray Granite and then colored them in with Stampin' Blends.  Once they were die cut I popped them on dimensionals.

  The sentiment from Peaceful Season stamp set is stamped in Gray Granite and punched out.  I backed it with a slightly larger circle punched out of retired white glimmer paper and a Pool Party ribbon flag.  I then dug deep into my retired embellishments and found some loose Pool Party sequins so I added a bunch of them to the background.

  Take a look at your non-Christmas stamp sets and see what you can use for a Christmas card.  You might be surprised at all the designs you can make!

  Thanks for looking!  Did you stamp today?

All of the current supplies used to make this card can be purchased in my ONLINE STORE.

Stamps: Hearts & Hugs, Peaceful Season

Ink: Gray Granite

Blends: Smoky Slate light & dark, Basic Black dark

Paper: Pool Party, Basic White, Garden Green, Nests of Winter DSP, white glimmer paper (retired)

Accessories: Hearts & Hugs dies, Peaceful Evergreens dies, dimensionals, circle punches, satin Pool Party ribbon (retired), loose sequins (retired)

Monday, October 28, 2024

Fall Birds Thank You - Stampin' Up! Wildflower Designs

   When I was contemplating the last sketch challenge I gave to my customers for a bit of creative inspiration I realized I had already made a card with the same sketch over the summer so for the second time around with the layout I decided to flip it to landscape.  The 4 panels in the sketch are perfect for showing off some coordinating papers.  I used a panel of Nest of Winter DSP for my inspiration for the rest of the card.


  I stared with a Crumb Cake card base then added the 2 longer panels of DSP and filled in the smaller rectangles with Crumb Cake cardstock embossed with the Bird Wood embossing folder for a little bit of texture. 

 I realized some of the flower images from the Wildly Flowering stamp set look very much like the flowers in the DSP so I stamped 2 of them in Crumb Cake and blended a bit of Copper Clay ink very lightly on the edges just to soften the start white.  I tucked the die cut flowers around the sentiment banner.

  A few birds from another pattern of the Nests of Winter DSP are fussy cut and added to the flowers with dimensionals.

  Some retired ribbon and faceted gold gems are added as the finishing touches.

  Thanks for looking!  Did you stamp today?

All of the current supplies used to make this card can be purchased in my ONLINE STORE.

Stamps: Wildly Flowering, Simply Said

Ink: Crumb Cake, Copper Clay

Paper: Crumb Cake, Basic White, Nests of Winter DSP

Accessories: Birch Wood embossing folder, Peaceful Season dies, Wildly Flowering Dies, dimensionals, natural/gold ribbon (retired), faceted gold gems (retired)


Sunday, October 27, 2024

Iconic Christmas - Stampin' Up! Iconic Imagery

   Even though I got the Iconic Imagery bundle in July I'm definitely not tired of using it!  I saw the newest Freshly Made Sketches challenge and immediately knew it would be perfect for the smaller images in this set.  The only thing I dithered about was the color combination!  I needed a set of colors that would work for the different Christmas images but still be complimentary!  I came up with Mossy Meadow, Old Olive, Berry Burst and Pretty in Pink.


 I ended up adding a few more circles than the challenge graphic had but I needed to add them for some balance.  I think it turned out cute if I do say so myself!

  The card front is a piece of retired Pearlescent Specialty paper that I found tucked away hardly used because "it was too pretty to cut into".  So I'm finally using it!  I embossed it with the Snowflake Sky embossing folder and then got to work on the circles.

  I used punches to cut a few from each of the colors I wanted to use and then stamped the images and die cut them.  The images are all popped on dimensionals and then arranged across the card front.  I added 3 Berry Burst circles for balance and spacing and trimmed off the overhang.  The word 'joy' is stamped in Mossy Meadow and then trimmed to fit.

 3 different embellishments are used to add some sparkle and shine; Iridescent Faceted Gems are used in the center of the snowflakes, 2024-2026 In Color Resin Dots are on each of the Berry Burst circles and Iridescent Adhesive-Backed Discs top the two Christmas trees.

  I had such a good time putting this card together.  If you have a stamp set that has several small images that can be hard to highlight on their own think about a layout like this where you can group them together.

  Thanks for looking!  Did you stamp today?

All of the current supplies used to make this card can be purchased in my ONLINE STORE.

Stamps: Iconic Imagery (Online Exclusive)

Ink: Mossy Meadow, Old Olive, Berry Burst, Pretty in Pink

Paper: Mossy Meadow, Old Olive, Berry Burst, Pretty in Pink, Very Vanilla, Pearlescent Specialty paper (retired)

Accessories: circle punches, Iconic Imagery dies (Online Exclusive), dimesionals, Snowflake Sky embossing folder, Iridescent Faceted Gems, 2024-2026 In Color Resin Dots, Iridescent Adhesive-Backed Discs


Saturday, October 26, 2024

Thanksgiving Pumpkin Latte - Stampin' Up! More Than Autumn

    It is definitely feeling more like fall around my neck of the woods.  We're starting to get some great color on the trees and the temps have been nice and cool for my morning walks with the Labradors.  So I'm carrying on the theme with my card today with a Thanksgiving card rocking the mostly neutral color combo from the Color Throwdown challenge. We're to use Cream, Kraft and Orange.  I translated that into the Stampin' Up! colors of Very Vanilla, Crumb Cake and Peach Pie.  


  I started with a Crumb Cake base with sponging around the edges...fall just feels like a time for some sponging doesn't it??  Then a piece of Very Vanilla die cut with the Deckled Rectangle dies and more sponging.  Then a band of Crumb Cake embossed with the Eyelet embossing folder and you guessed it, more sponging!

  I used the Autumn Leaves dies and the challenge colors to cut some leaves and even more sponging.  The cups and pumpkins from the More Than Autumn set are stamped in Crumb Cake and then colored with Stampin' Blends.  I added a little Peach Pie ribbon flag behind one of the cups.The pumpkins are popped on dimensionals.  

 The sentiment from Choose Happy is stamped in Crumb Cake and then finally a few retired Speckled Dots finish off the design.

  Thanks for looking!  Did you stamp today?

All of the current supplies used to make this card can be purchased in my ONLINE STORE.

Stamps: More Than Autumn, Choose Happy

Ink: Crumb Cake

Blends: Crumb Cake light & dark, Peach Pie light

Paper: Crumb Cake, Very Vanilla, Peach Pie

Accessories: Deckled Rectangle dies, Eyelet embossing folder, Autumn Leaves dies, More Than Autumn dies, dimensionals, Adhesive-backed Speckled Dots (retired)


Friday, October 25, 2024

Mr. Moose Christmas - Stampin' Up! Christmas Friends

   I haven't counted up how many Christmas cards I've made already but I do know I don't have nearly enough yet so I'm plugging away one design at a time!  I'll have a lot of new samples to show my stampers at class next week!  I used the Christmas Friends bundle again today and paired it with the Hand Stamped Sentiments sketch.  My coloring with colored pencils really leaves a lot to be desired but I think it turned out cute anyway!


  I wanted to use one of the patterns from the Sentimental Christmas DSP as the base for the card because I like the retro ribbon look and red and green is always a great starting place for a Christmas card.  While the green listed for this paper is Shaded Spruce I think a bit of Garden Green doesn't look bad here.  I used a panel of the Garden Green Two-Toned cardstock and roughed up the edges for some texture. I'm definitely looking forward to when we have all of our colors in the Two-Toned cardstock!

  I topped that with a piece of Basic White embossed with the Snowflake Sky embossing folder.  I adhered that to the card front on an angle keeping with the sketch.

 Mr. Moose is stamped in Early Espresso ink and then colored in with colored pencils.  Like I said it could be better so I'll keep trying...I definitely don't have that artist gene for coloring and need to work on shading!  

  The sentiment is stamped on a strip of Real Red Two-Toned cardstock in Versamark and then embossed in gold.  The I tore the end showing the white core and added a gold twine bow before popping it on dimensionals.  Mr. Moose is then also popped up right above it.

  For the little tabs at the top of the sketch I decided to make a little greenery sway with more of the Garden Green Two-Toned cardstock stacking 2 die cuts with a mini dimensionals in the middle. A Festive Glimmer Paper bow in Cherry Cobbler tops the swag.  

  One more Christmas card finished many more to go!  Thanks for looking!  Did you stamp today?

All of the current products used to make this card can be purchased in my ONLINE STORE.

Stamps: Christmas Friends

Ink: Versamark, Early Espresso

Paper: Sentimental Christmas DSP, Garden Green Two-Toned c.s, Real Red Two-Toned c.s., Basic White, Festive Glimmer Paper

Accessories: Snowflake Sky embossing folder, Christmas Friends dies, dimensionals, gold embossing powder, colored pencils, gold twine (retired)


Thursday, October 24, 2024

CAS Christmas Cheer - Stampin' Up! Christmas Friends

   After a bit of a break from Christmas card for a few days I'm back with a clean and simple Christmas card with a classic blue and gold color combo.  The layout is inspired by the CAS Colours & Sketches challenge.  The smaller mouse image from the Christmas Friends set seemed like a good choice to highlight a bit with this layout.


  I had Misty Moonlight cardstock still out from my card yesterday so I used that for my card base.  Then a layer of Basic White.  Following the sketch I used 2 narrow strips of retired Fine Shimmer paper in gold.  Gold and blue are always a classic color combo for Christmas!  Gold foil would be a good substitute if you wanted to re-create this one with current gold paper.

  I stamped the mouse in Basic Gray then used Blends markers to color him in.  I used a gold Wink of Stella pen to color the bell so it's a little bit sparkly gold to go along with the 2 strips.  The mouse is popped on dimensionals.

  Finally, holding my breath so I didn't goof and have to start all over I stamped the sentiment from Peaceful Season stamp set along the angle of the gold paper.  

  I can still see about 17 ways to give this card "more" but I'm restraining myself and posting it as is!

  Thanks for looking!  Did you stamp today?

All of the current products used to make this card can be purchased in my ONLINE STORE.

Stamps: Christmas Friends, Peaceful Season

Ink: Basic Gray, Misty Moonlight

Blends: Smoky Slate light & dark, Misty Moonlight light

Paper: Misty Moonlight, Basic White, Gold Fine Shimmer Paper (retired)

Accessories: Christmas Friends dies, dimensionals, gold Wink of Stella


Wednesday, October 23, 2024

Birthday Bluebird - Stampin' Up! Country Birdhouse

   The team over at Just Add Ink gave an interesting color challenge that I couldn't ignore.  They want us to use Misty Moonlight, Peach Pie and then one color of our choice.  The 2 colors on their own could be quite the challenge but then to have to pick a third really made me think!  Many of the Design Team samples used a green as the third color for leaves etc to go with flowers but I went for a neutral so I could use some off cuts of DSP.  Check it out!


  Gray Granite is my third color and I really like how this one turned out!  I started with a Gray Granite base then layered a piece of Basic White, then 3 panels of Nests of Winter DSP in a birch pattern.  I think my off cut started at 2 inches wide so I cut it down to 1 5/8" so I could evenly space 3 of them across the card front.

  My trusty Spotlight on Nature dies cut a nice fancy circle in Misty Moonlight and I popped it on dimensionals over a length of Peach Pie Bordered Ribbon.

  To bring some of the Gray Granite to the front of the card I cut a branch using the Textured Floral dies and adhered it over the circle.

  The bird from the Country Birdhouse stamp set is stamped in Gray Granite and then colored with Blends in the challenge colors.  I used the color lifter marker to lighten the overall saturation of the markers so that the bird wouldn't be overly dark.  The sentiment comes from the same set and is stamped in Misty Moonlight.

  The final embellishments are some 2024-2026 In Colors Shimmer Gems in Peach Pie added to the branch and a few to the side of the sentiment.

  Thanks for looking!  Did you stamp today?

All of the products used to make this card can be purchased in my ONLINE STORE.

Stamps: Country Birdhouse

Ink: Gray Granite, Misty Moonlight

Blends: Gray Granite light, Peach Pie light, Misty Moonlight light & dark

Paper: Misty Moonlight, Basic White, Nests of Winter DSP, Gray Granite

Accessories: Spotlight on Nature dies, dimensionals, Country Birdhouse dies, Textured Floral dies, Bordered ribbon, 2024-2026 In Color Shimmer Gems


Tuesday, October 22, 2024

October 2024 Stampin' Up! Starter Kit Special


   Only a few more days to take advantage of this great join special from Stampin' Up!  Join for the discount, to start a business, for early access to new products or to get everything on your wish list!  No matter your reason it's a great time to join the Stampin' Up! family and my Did You Stamp Today team!

  What will you get with $56 more free products???

  I'd love to be your upline and introduce you to all the great benefits of being a demonstrator!!  Drop a comment below for more info or reach out to me HERE.

Birthday Dots - Stampin' Up! Biggest Wish

   I'm on a role using retired DSP on my designs lately!  I didn't have anything current that worked for the Seize the Birthday challenge of using dots on my birthday card so I pulled out a piece of Dandy Designs DSP that was perfect.  Sometimes it pays off to be a bit of a paper hoarder!


I started with a Summer Splash card base.  The Dandy Design panel was first cut in a full panel and cut again on the diagonal to end up with 2 pieces.  I used some repositionable adhesive on the DSP to get an idea of where to stamp the large Happy from the Biggest Wish set without being fully committed in case I goofed and had to start over again.  Once I had the happy stamped I adhered the DSP permanently.

  The cake from Attention Shoppers stamp set is stamped in Summer Splash and then colored with Blends, die cut and popped on a Spotlight on Nature die cut circle.  The dots on the cake work really well with the dots on the DSP too!  Behind the circle which is hard to see in the photo is a length of Iridescent Striped Trim.  It really reflects the card colors beautifully.  

 Next I stamped the script 'birthday' in Versamark onto Fresh Freesia cardstock and embossed it in white.  After fussy cutting it I popped it up on dimensionals under the 'happy'

  One of the nice things about using retired supplies as a demo is not having to worry about using too much on a personal project that I won't have enough to use in a class.  So I went a bit crazy adding retired Adhesive-Backed glitter sequins to the card front.  The smaller size and the colors fit perfectly with the dots on the DSP so I added a bunch to make it very sparkly.

  Thanks for looking!  Did you stamp today?

All of the current products used to make this design can be purchased in my ONLINE STORE.

Stamps: Attention Shoppers, Biggest Wish

Ink: Summer Splash, Versamark

Blends: Fresh Freesia light & dark, Daffodil Delight light & dark

Paper: Summer Splash, Basic White, Fresh Freesia, Dandy Designs DSP (retired)

Accessories: Spotlight on Nature dies, Attention Shoppers dies, dimensionals, Iridescent Striped Trim, white embossing powder, Adhesive-Backed Glitter Sequins (retired)


Monday, October 21, 2024

Birthday Tackle - Stampin' Up! Gone Fishing

   Masculine themed cards tend to take a back burner don't they?  Sometimes we just want all the floof and glimmer and over the top layers but we do still need those masculine type cards so when I see a good color combo for one I try to jump on it before a grand "floofy" idea takes over!  I used the Gone Fishing set combined with 2 fun challenges to pull this one together.  The colors are from Color Throwdown and the layout is from Freshly Made Sketches.


  Sometimes it's a good thing to have so much choice in papers sometimes it isn't!  In this case I was happy that I had some pieces of the retired Enjoy the Journey DSP because there is a pattern in there that uses 2 of the challenge colors which I translated to Stampin' Up! to be Garden Green and Coastal Cabana so I used that for the background to my card.

  Following the sketch I cut a few Perennial Postage die shapes and started to think which pieces of tackle from the Gone Fishing set would fit where.  I started with the bottom left rectangle and stamped the sentiment from Saying Hey in Basic Gray at the bottom.  To fill the top portion I stamped and die cut a bobber adding in the third challenge color orange: Pumpkin Pie.

  Moving up I stamped the lure in Basic Gray and did the second step in Coastal Cabana. In the largest rectangle I used all 3 colors with 2 different images.  All of the tackle is popped on dimensionals.

  I wanted to add some embellishments but twine didn't seem to work anywhere even though I had some in all 3 colors!  I settled on some retired Classic Matte Dots in Basic Gray and used 3 groups of 3.

  I'm pleased with how this one turned out and think it could be a go to layout in the future changing up different color combos for fun looks.

  Thanks for looking!  Did you stamp today?

All of the current products used to make this card can be purchased in my ONLINE STORE.

Stamps: Gone Fishing, Saying Hey

Ink: Basic Gray, Pumpkin Pie, Garden Green, Coastal Cabana

Paper: Basic White, Enjoy the Journey DSP (retired)

Accessories: Gone Fishing Dies, Perennial Postage dies, dimensionals, Classic Matte Dots (retired)


Sunday, October 20, 2024

Fall Showers Note - Stampin' Up! Playing in the Rain

   After spending so much time lately with fall and Christmas stamps and papers I needed a bit of a break so when I saw the Color Hues challenge to use Mustard and Olive for a card I looked through my sets and thought that the older set Playing in the Rain would be a nice change of pace.  It still ends up having a little bit of a fall feel but it was nice to use some older supplies.


  There really isn't anything new technique wise on this card.  It was just a fun one to focus on the two challenge colors and create a little scene.  The base is Old Olive with the next layer being a piece of retired Design A Daydream DSP in a light olive crosshatch pattern.  I liked the lighter version of Old Olive here so that the other elements would pop a bit more against it instead of everything being darker.

  The fox is stamped in Memento Black and then colored with Blends.  The flower stems are die cut from Old Olive cardstock then topped with some retired Adhesive-Backed Hearts and Flowers enamel shapes.

  I used the Simply Said stamp set and a Stylish Shape die cut circle for the sentiment.  A bit of long retired Crushed Curry Mini Chevron ribbon is looped behind the sentiment to add more of that color to the top of the card and also completes the visual triangle of elements.

   Thanks for looking!  Did you stamp today?

All of the current products used to make this card can be purchased in my ONLINE STORE.

Stamps: Playing in the Rain, Simply Said

Ink: Memento Black

Blends: Old Olive light & dark, Daffodil Delight light & dark, Cajun Craze light & dark

Paper: Old Olive, Basic White, Design a Daydream DSP (retired)

Accessories: Playing in the Rain dies, Stylish Shapes dies, dimensionals, Adhesive-Backed Hearts and Flowers (retired), Crushed Curry Mini Chevron ribbon (retired)


Saturday, October 19, 2024

Shades of Brown - Stampin' Up! Reindeer Fun

   Can you tell I've been having a good time creating with the Reindeer Fun bundle?  My card today is inspired by the 52 Christmas Card Throwdown challenge which is to use shades of brown.  It took me a minute to square up "brown" and "Christmas" and after looking through some papers and finding the lovely snowflake pattern in the Sentimental Christmas DSP an idea started!


  I started with a Basic White thick card base and I sponged Pecan Pie ink on the edges, next is the layer of Sentimental Christmas DSP.  Next is a panel of Basic White embossed with the Forever Plaid embossing folder with more sponged edges.

  I had a piece of the Wood Textured Specialty paper left from a previous project and it was already blended with Crumb Cake ink so I punched a tag top and you guessed it...more sponging.  I added a Crumb Cake ribbon to the tag and secured it with a long retired Glimmer Brad.

  Next are the deer stamped in Early Espresso, colored with Stampin' Blends and die cut.  I popped the deer with dimensionals and then worked on the sentiment.

  The sentiment is also from the Reindeer Fun stamp set and I stamped it in Early Espresso and cut the tag with the Unbounded Love dies.  And again more sponged edges.

  The finishing touch are the 4 retired candy dots in a shade of brown.  Could be Early Espresso, could be retired Chocolate Chip, who knows!

  I am pleasantly suprised with how good the "browns" work for a Christmas card and I'm glad I gave this challenge a try!

  Thanks for looking!  Did you stamp today?

All of the current products used to make this card can be purchased in my ONLINE STORE.

Stamps: Reindeer Fun

Ink: Early Espresso, Pecan Pie, Crumb Cake

Blends: Pecan Pie light & dark, SU300, color lifter

Paper: Basic White thick, Basic White, Sentimental Christmas DSP, Wood Texture Specialty paper

Accessories: Reindeer Fun dies, Forever Plaid embossing folder, Unbounded Love dies, dimensionals, tag topper punch (retired), Stitched Crumb Cake ribbon (retired), candy dots (retired), Glimmer Brad (retired)


Friday, October 18, 2024

Doe a Deer - Stampin' Up! Reindeer Fun Dies

   I was playing around with adding a bit of pink to a Christmas card design and came up with today's card for the Tic Tac Toe challenge. I wanted to make a deer card with the Reindeer Fun bundle but not use the antlers so I guess I wanted a girl deer hence the pink.  The tic tac toe board for the challenge had "wreath, any shape die, and embossing" as one of the lines so I went with that using the wreath die, deer die and the Forever Plaid embossing folder.  


 I started this one off with a Pretty in Pink base.  For the background I embossed 2 panels of Garden Green Two-Toned cardstock with the Forever Plaid embossing folder and then used a sanding block to distress the pattern.  I adhered these on the 2 ends and then put a strip of 2024-2026 In Color DSP in the center.

  I had the Spotlight on Nature die cut in my orphaned card parts so I added that next as place to put my deer.  The deer is cut from 3 layers of cardstock: back to front- Early Espresso, Basic Beige and Pecan Pie.  I trimmed off the antlers from the Early Espresso layer and glued them all together.  I used some Pretty in Pink Glimmer paper to cut the bow and nose.  The deer is tucked inside a double layer wreath cut from more of the Garden Green Two-Toned cardstock.  The dark layer is on the bottom with the lighter one on top.  The whole deer/wreath is popped on dimensionals.

  The only stamping on this card is the sentiment from Peaceful Season stamp set stamped in Garden Green onto a strip of Soft Sea Foam.  I added some die cut gifts with bows and some strings of lights at the top.  Finally 2 2024-2026 In Color Shimmer Gems are added for a bit more sparkle under the sentiment.

  This was a fun one to pull together using the challenge and my need to make a girl deer lol!

  Thanks for looking!  Did you stamp today?

All of the supplies used to make this card can be purchased in my ONLINE STORE.

Stamps: Peaceful Season

Ink: Garden Green

Paper: Garden Green Two-Toned cardstock (Scrapbooking Line) Pretty in Pink, 2024-2026 In Color DSP, 2024-2026 In Color Glimmer paper, Basic White, Early Espresso, Basic Beige, Pecan Pie, Soft Sea Foam

Accessories: Reindeer Fun dies, Forever Plaid embossing folder, dimensionals, 2024-2026 In Color Shimmer Gems


Thursday, October 17, 2024

Witchy Owl - Stampin' Up! Christmas Friends

   What do you do when you don't have a Halloween stamp set but you want to play along with the Festive Friday stamping challenge?  You pull out a Christmas stamp set and and get creating that's what!!  The choice board was fun this time around but the only main image stamp I had that worked with the choices was a Christmas owl from the Christmas Friends stamp set!  It's not called a challenge for nothing I guess.  And the way my stamping worked out this card works for the Just Add Ink challenge also!  For my pick two I actually ended up with all 3 - trees, circle & ink blending!


  From the Festive Friday choice board I used black, die cuts, owls, full moon and witches (hat).  I started with a Night of Navy base.  The next layer started off as just a Basic White panel!  I die cut a circle from scrap paper (a punched circle works too!) and adhered it to my Basic White panel with some re-positionable adhesive.  I started blending around the circle mask with Pool Party ink, then Blueberry Bushel and then Night of Navy to give me a progressively darker sky as I went further from the moon.  Next I took the piece of scrap paper with the circle cut from it and layered it over the moon and lightly blended a bit of Daffodil Delight ink on the moon.

  To make the tree I used the tall skinny evergreen from the Peaceful Evergreen stamp set and stamped it on it's side up the edge of the panel in Memento black ink.

  The owl from the Christmas Friends set is stamped in Memento black and then colored in with Blends markers.  I fussy cut her out and trimmed off the Santa hat since I was clearly going for a Halloween vibe!  I used an oval die and a triangle die (punches or hand cutting work too!) and some Black Glimmer paper and made her a fun witches hat.  The owl and hat are popped up on the tree with dimensionals.

  The final bit of stamping is the sentiment from an old set called Good Greetings.  I'm a little annoyed at myself that I stamped it kind of crooked but I wasn't doing the moon/sky all over again so it is what it is.  

  I think it came out pretty well for a Halloween card made with Christmas stamps!

  Thanks for looking!  Did you stamp today?

All of the current supplies used to make this card can be purchased in my ONLINE STORE.

Stamps: Christmas Friends, Peaceful Evergreens, Good Greetings (retired)

Ink: Daffodil Delight, Pool Party, Blueberry Bushel, Night of Navy, Memento Black

Blends: Pecan Pie light & dark, Ivory, Daffodil Delight dark

Paper: Night of Navy, Basic White

Accessories: dimensionals, blending brushes, Layering circle dies (retired), Layering Oval dies (retired), Stitched Triangle dies (retired)


Wednesday, October 16, 2024

Sweet Home Christmas - Stampin' Up! Humble Home

   Do you ever get great satisfaction in using up the tiniest bits of supplies?  I certainly do!  And when I saw the Addicted to CAS challenge of "wood" my thoughts went immediately to the narrow off cuts from one of the exclusive Autumn to Remember scrapbooking kit papers that I had been saving.  If we could buy full sheets of just this pattern it would be in my shopping cart so fast!  Anyway I used these narrow strips in a wood grain pattern and added in the sweet Humble Home stamp set for this clean and simple design.


 The card base is Basic White thick then a layer of Basic White embossed with the Snowflake Sky embossing folder.  I added 3 of the wood grain DSP on the side.  

  I stamped the house from the Humble Home stamp set in Gray Granite and then colored it in with Stampin' Blends.  Once the house was punched out I layered it with dimensionals over the top of a retired iridescent snowflake cut out.

  A Petunia Pop Glimmer paper heart is added to the house and the sentiment is stamped in Petunia Pop ink and trimmed to be added to the card front.

  If I had more of this DSP I would definitely be making multiples of this design!  It's so sweet and I love the colors.

  Thanks for looking!  Did you stamp today?

All of the current supplies used to make this card can be purchased in my ONLINE STORE.

Stamps: Humble Home 

Ink: Gray Granite, Petunia Pop

Blends: Gray Granite light, Pool Party light & dark, Lemon Lolly light

Paper: Basic White thick, Basic White, Autumn To Remember Scrapbooking Kit DSP (Scrapbooking Line), 2024-2026 In Color Glimmer Paper

Accessories: Humble Home builder punch, dimensionals, Snowflake Sky embossing folder, iridescent snowflake (retired)


Tuesday, October 15, 2024

Regal Evergreens - Stampin' Up! Peaceful Evergreens

    The Stampin' Up! Only Challenge has an interesting challenge of CASEing (Copy and Share Everything) page 34 of the Sept.-Dec. 2024 Mini Catalog.  Page 34 shows samples using the Regal Winter Suite so there are a lot of things that can be CASED.  I don't have any of these products but I knew the rich colors could be a great inspiration for use with another set.  I was right!  Check out this one!


  I pulled Pretty Peacock, Berry Burst and Blackberry Bliss from the colors used in suite and paired them up with the Peaceful Evergreen stamp set.  I love non-traditional Christmas colors and these just pop especially with the added gold!

  The base is Blackberry Bliss and then a layer of Berry Burst.  The top layer is Basic White and I cut out the large tree from the Peaceful Evergreen die set leaving the opening.  I stamped the Falling Snow background stamp in gold ink.  I used a piece of Season of Elegance DSP to back the tree cut out to show off that beautiful pattern.

 Next I stamped a tree in Berry Burst and a smaller one in Blackberry Bliss.  After they were die cut I added the embossed sentiment tag and added them all to the card front.  The tag is attached with a length of gold trim and added a bow to the side.

  Finally a die cut star in gold foil is added to the Berry Burst tree.  These colors paired with the gold accents are so pretty and I'm glad I gave them a try.  It is so much nicer in person!

  Thanks for looking!  Did you stamp today?

All of the current supplies used to make this card can be purchased in my ONLINE STORE.

Stamps: Peaceful Evergreens, Peaceful Season, Falling Snow

Ink: Versamark, Berry Burst, Blackberry Bliss, gold (retired)

Paper: Berry Burst, Blackberry Bliss, Season of Elegance DSP, Basic White, Pretty Peacock, gold foil

Accessories: Peaceful Evergreen dies, Peaceful Season dies, gold embossing powder, gold trim, dimensionals


Monday, October 14, 2024

You're Super - Stampin' Up! Tune In

   I saw this color combo last week on a challenge and I didn't get a card make in time to share it but I thought the colors were perfect for a bit of a retro look with the Tune In bundle.  So thanks to the Just Us Girls challenge for the inspiration!  Since my oldest is now a freshman off at college I'm trying to be good about designing cards that I can send to him.  The color combo of Balmy Blue, Basic Gray and Lemon Lime Twist seemed like a good start for a card for him.


  My son has never seen a TV that looked like this in real life but he does have a bit of an affinity for "older" tech so I think he'll appreciate it.  He likes listening to records and has dabbled with 90's camcorders and VHS players.  Who knows he might show up one day with an old wood box tv set from the thrift store lol!

  The card base is Basic Gray and the background layer is a piece of Balmy Blue with the stars stamped in Versamark and embossed in white to create the background.  I die cut a few stars in Lemon Lime Twist and added them as well.  Before adhering it to the card base I added a length of ribbon and tied a knot.

  The tv and antenna are stamped in Basic Gray and then colored in with Blends markers.  The sentiment is stamped in Basic Gray and then to make it pop a bit I outlined it with my Lemon Lime Twist Stampin' Write marker since the pen tip is a fine point and I didn't want a thick line around it.

  The tv is popped on dimensionals and accented with Lemon Lime Twist starburst die cut.  A faceted gem is added to the center for just a bit of sparkle.  It is for a teen boy after all I can't go too crazy lol!

  This was such a fun card to put together and the colors are so cool I just might have to try a Christmas card with them for nice retro vibe.

  Thanks for looking!  Did you stamp today?

All of the current supplies used to make this card can be purchased in my ONLINE STORE.

Stamps: Tune In

Ink: Basic Gray, Versamark

Blends: Smoky Slate light & dark, Balmy Blue light, Lemon Lime Twist light & dark

Stampin' Write Marker: Lemon Lime Twist

Paper: Basic Gray, Balmy Blue, Basic White, Lemon Lime Twist

Accessories: Tune In dies, dimensionals, white embossing powder, Lemon Lime Twist ribbon (retired), faceted gem (retired)

Sunday, October 13, 2024

Coffee Season - Stampin' Up! More Than Autumn

   Let's be honest, coffee season is every day for me but I think it tastes even better when the mornings are a little bit chilly.  While I don't go in for the flavored coffees (I'm a brew at home basic Folgers girl because once I add my cream and sugar it's all good!) I am all in on the fall coffee themes!  I used the fun Time Out Challenge inspiration photo to design today's card.


  I started with a simple polka dot pattern in Cajun Craze from the Iconic Celebrations DSP.  If you're looking for a 6x6 pack of paper that has patterns geared toward themes that are at the end of the year going into the new year (fall, winter/Christmas, New Years, Valentine's Day) then this pack of paper is for you.  You'll find it in the Online Exclusives section of the Stampin' Up! online store.

  Then I wanted to add a bit of texture so I adhered a length of retired burlap ribbon.  I think Tear & Tape is the best adhesive to use for this kind of ribbon; it definitely won't pop off!

  I hadn't done the chalkboard technique in a long time and this inspiration photo was definitely calling for it.  I used the retired Stitched Rectangle dies and Pecan Pie cardstock to create a frame and then embossed the sentiment in white onto a piece of Basic Black.  I added the little pumpkin because why not?!  Once the embossing was cooled off I used a piece of damp paper towel to pick up a bit of white craft ink and then lightly brushed it across the Basic Black panel to give a bit of a "chalk dust" look.  The chalkboard is then popped on dimensionals onto the card front.

  I stamped 2 of the coffee cups from the More Than Autumn set in Pecan Pie ink and then colored them in with the light Crumb Cake Blends marker.  The bands were colored in with Cajun Craze and Pumpkin Pie Blends.  I added the little 'coffee' die cuts to the band then popped them on dimensionals.

  A few leaf accents are cut as well as a little pumpkin and those are tucked around the cups along with a single Copper Clay Earth Tone Shimmer Gem.  

  This was such a fun seasonal card to design and I love the fall colors and texture.  Now which coffee lover do I send this one to??

  Thanks for looking.  Did you stamp today?

All of the current supplies used to make this card can be purchased on my ONLINE STORE.

Stamps: More Than Autumn

Ink: Versamark, Pecan Pie, white craft

Blends: Crumb Cake light, Cajun Craze light & dark, Pumpkin Pie light & dark

Paper: Iconic Celebrations DSP (Online Exclusives), Pecan Pie, Basic Black, Basic White, Pumpkin Pie, Cajun Craze

Accessories: white embossing powder, More Than Autumn dies, Earth Tones Shimmer Gems, dimensionals, burlap ribbon (retired), Stitched Rectangle dies (retired)


Saturday, October 12, 2024

Reindeer Joy - Stampin' Up! Reindeer Fun Bundle

   The Reindeer Days bundle was one of the first items I added to my cart during the demonstrator preorder and it is sooooo cute!  I love the classic red/green color combo of the DSP, the adhesive peppermints are adorable and the stamp and die bundle has a great mix of line art images and stand alone die cut shapes.  I had fun designing this card for the Freshly Made Sketches challenge.


  How cute is this one??  I started with a Real Red base and then added the Reindeer Days DSP cut on an angle to follow the sketch.  I added a narrow band of Garden Green Two-Toned cardstock on the edge of the DSP to define the angle a bit more.

  I cut a Basic White tag using a retired punch and then die cut the pieces for the deer and pieced him together.  I added a red glimmer paper nose because you can't go wrong with a Rudolph!  

  The holly leaves are die cut from Garden Green Two-Toned card stock.  I cut 2 and stacked then with the bottom leaves on the lighter side.  The top leaves are adhered with a dimensional and then Red Glimmer paper berries are added on top.

  The sentiment is from the Peaceful Season stamp set and is stamped in Real Red and fussy cut and added to the side of the holly.

  A Garden Green linen thread bow is tied to the top of the tag and a few Garden Green Earth Tones Shimmer gems are added to center band.

  Thanks for looking!  Did you stamp today?

All of the current supplies used to make this card can be purchased in my ONLINE STORE

Stamps: Peaceful Season

Ink: Real Red

Paper: Real Red, Reindeer Days DSP, Festive Glimmer Paper, Garden Green Two-Toned cardstock (Scrapbooking Line), Early Espresso, Basic Beige, Pecan Pie

Accessories: Reindeer Fun dies, Natural Tones Linen Thread, Earth Tones Shimmer Gems, dimensionals, tag punch (retired)


Friday, October 11, 2024

CAS Autumn Birthday - Stampin' up! Autumn to Remember

 I usually make heavily layered cards with ribbon and gems and all the 'stuff' so when I make a clean and simple card it can seem a bit naked and I have to stop myself from doing more! My card today is for The CAS Colours & Sketches challenge is to use Pumpkin Pie, Night of Navy and Wild Wheat.  I tried out a bunch of different ideas but nothing seemed to look just right.  I'm still feeling that this one is a bit too basic but it's certainly clean and simple!


 I would usually say that Wild Wheat was the problem but this time I had a hard time with the Pumpkin Pie and ended up just using it with the little candy dot accents.

 The card base is Night of Navy, then a layer of Basic White.  On top of that is a smaller piece of Basic White with all the stamping.  The trees from Autumn to Remember stamp set are stamped in Wild Wheat.  I used Night of Navy ink and the Sweetly Scripted stamp set to stamp the sentiment right across the trees.

  To bring in the last challenge color Pumpkin Pie I dug through my stash of retired embellishments and I came up with these candy dots.  I must have had thousands of them because they retired like 8 years ago and I still have a bunch!  Feels good to use them up but I have a long way to go!

  Thanks for looking!  Did you stamp today?

All of the current supplies used to make this card can be purchased in my ONLINE STORE.

Stamps: Autumn to Remember (Scrapbooking Line), Sweetly Scripted (Online Exclusive)

Ink: Wild Wheat, Night of Navy

Paper: Night of Navy, Basic White

Accessories: dimensionals, candy dots (retired)


Thursday, October 10, 2024

Layers of Flowers - Stampin' Up! Layers of Beauty

  My card today uses the challenge colors that I'm giving my customers for our twice a month stamping challenge on our group Facebook page.  One of the best parts of being a demonstrator is the community of stampers that I am a part of.  So many of them I would never have met if it were not for stamping and I'm so thankful for all the wonderful people I now know and call friends.  All because I am (over)enthusiastic about ink and paper and they just might be as well!


 I drew the colors randomly from a list so it definitely pulls me out of my comfort zone of using mainly seasonal colors this time of year!  I had been wanting to get out my Layers of Beauty bundle and do a little ink blending and I thought this trio of colors would look great as a floral.  As a bonus I had just a small bit of DSP from the Frames & Flowers Specialty pack that was mostly Lost Lagoon so I incorporated that as well.

  This card starts with a Lost Lagoon base then a piece of the Frames & Flowers DSP cut to 5 1/4" x 4" and then cut in half on the diagonal.  Before adhering it to the card front I added a length of white Frayed Grosgrain ribbon.

  The large image is stamped in Lost Lagoon and then colored in with blending brushes and inks.  Then the whole image is die cut and adhered with dimensionals.

  The sentiment from Simply Said is stamped in Flirty Flamingo, then trimmed and is added to the card.  

  Finally a few Adhesive-Backed Dots for Days in Flirty Flamingo are added to the card front to finish the design.

  I hope you were inspired by these colors and if you're a customer of mine who would like to join our Facebook group please let me know!

 Thanks for looking!  Did you stamp today?

All of the supplies used to make this card can be purchased in my ONLINE STORE.

Stamps: Layers of Beauty, Simply Said

Ink: Lost Lagoon, Flirty Flamingo, Blackberry Bliss

Paper: Lost Lagoon, Frames & Flowers Specialty DSP, Basic White

Accessories: Layers of Beauty dies & masks, dimensionals, Frayed Grosgrain ribbon, Adhesive-Backed Dots for Days


Wednesday, October 9, 2024

Bountiful Blessings - Stampin' Up! Autumn to Remember

   I love how Stampin' Up!'s new scrapbooking line can also be used in card making.  I have gotten a lot of cards made with the Autumn to Remember stamp set which is one of the coordinating stamp sets to the the fall scrapbooking kits and other products.  And I haven't even mentioned the DSP and Two-Toned cardstock.  The Autumn to Remember set is used for all the stamping on this card.  I am playing along with the Hand Stamped Sentiments challenge with their color combination of Peach Pie, Pecan Pie and Pumpkin Pie (all that pie!!).


  I cut 1.5 inch strips of each of the colors and then stamped the line of trees all the way across in the same color of ink. They were added to the Pumpkin Pie card base and then the overhang was trimmed off.

  The large sentiment is stamped in Pecan Pie on a Basic White tag.  I added the trio of trees in stamped off once Peach Pie ink on the tag as well for a nice layered look.

  The small oak leaf from this set is stamped in each of the 3 challenge colors and then fussy cut and added to the tag.  Some Peach Pie bordered ribbon is added to the tag and then tied with a linen thread bow.  

  A few copper colored sequins are added for a bit of shine as the last touch.

  Thanks for looking!  Did you stamp today?

All of the current supplies used to make this card can be purchased in my ONLINE STORE.

Stamps: Autumn to Remember (SU Scrapbooking Line)

Ink: Peach Pie, Pecan Pie, Pumpkin Pie

Paper: Peach Pie, Pecan Pie, Pumpkin Pie, Basic White

Accessories: dimensionals, linen thread, Peach Pie Bordered ribbon, Neutrals Adhesive-Backed sequins, Tailor Made Tags dies (retired)


Tuesday, October 8, 2024

Autumn Home - Stampin' Up! Humble Home

 I think my campaign to bring autumn weather to central Virginia by making autumn themed cards is working.  It seems that it might be a bit cooler today if I can believe the forecast!  I created this card as my customer thank you card for orders placed in September.  I mailed out a whole big stack the other day so thank you to all of my fabulous customers who continue to support my small business!  The Humble Home stamp and punch continue to make adorable cards (if I do say so myself!).


  Fall seems to be the time I use Crumb Cake the most and I've used here as it is a nice neutral background.

  A piece of the new 12x12 Two-Toned cardstock in Early Espresso that I used a sanding block on is a nice rustic touch behind the main images.  Linen thread wrapped around the panel adds to the rustic feel as well.

  To make the maple leaf I started with a piece of Basic White and then used blending brushes and Cajun Craze, Pumpkin Pie, Crushed Curry and Old Olive ink pads to cover the whole panel.  I used smaller blobs of color so I would be sure to get a little of each color.  I made a lot of this design and used almost a full 8.5x11 piece of cardstock.  Once my whole piece was covered I spritzed it lightly with water for some variation of color then die cut the leaves with the Autumn Leaves die set.  To bring a bit of texture to the cut leaves I crumpled them and then adhered them to the card front.

 The roof the of the house is stamped in Early Espresso and the house is in Crumb Cake and then punched out.  The windows and door are stamped in Early Espresso, colored with blends markers and then fussy cut before being added to the house. A Cajun Craze heart is also punched and added.  The finished house is adhered with dimensionals to the card front.

  I pulled out the Choose Happy stamp set for the sentiment and stamped it in Early Espresso.  Finally a few Faux Glass dots in Cajun Craze (but any from this set of embellishments works on this card design! They are prefect fall colors!) finish this card.

 Thanks for looking!  Did you stamp today?

All of the supplies used to make this card can be purchased in my ONLINE STORE.

Stamps: Humble Home, Choose Happy

Ink: Early Espresso, Crumb Cake  Leaf: Cajun Craze, Pumpkin Pie, Crushed Curry, Old Olive

Blends: Cajun Craze light, Crumb Cake light, Pool Party light

Paper: Crumb Cake, 12x12 Early Espresso Two-Toned cardstock (SU scrapbooking line), Basic White, Cajun Craze

Accessories: Humble Home punch, Autumn Leaves dies, linen thread, Faux Glass Dots

Monday, October 7, 2024

Pink Pie Please - Stampin' Up! More Than Autumn

  You just never know when you might need a pie forward card right?  Thank goodness Stampin' Up! gives us so many stamp set choices that you can make a card for just about any occasion!  I don't know who I might send this one to but I've got it just in case!  And it also reminds me of that UPS commercial from years ago when the guy says "Brown says 'how about more pie?' Nah, Brown doesn't say that."  This was a fun one to make thanks to the Festive Friday challenge where they are using National Dessert Day for inspiration.  It's October 14th if anyone needs to mark the calendar!


  From the challenge choice board I used pink, brown, ribbon, dessert and food related sentiment.  After deciding I was going to go with a pink pie it made me think if there were any pink pie recipes out there so I hit up google and found a pink lemonade pie recipe that I just had to try out.  It was quite good and will definitely make it again.  My grocery store didn't have pink lemonade so I used regular and added a few drops of food coloring because of course it had to be pink lol!

  I used Early Espresso embossed with the Forever Plaid embossing folder for the card front.  Then a large Stitched Shapes circle that I already had cut gave me a nice "plate" for my pie slices.

  The More Than Autumn stamp set pie image is stamped 3 times in Pecan Pie, colored with Blends and die cut.  I added some dollops of whipped cream that are stamped off Pretty in Pink ink on Basic White.  

  A piece of Pretty in Pink 2024-2026 In Color DSP is flagged and gives a nice area to add a sentiment.

  I mixed and matched the great sentiments from this set to come up with 'this calls for pie & more pie' with some trimming and fussy cutting.  All the sentiments pieces are popped on dimensionals.

  The fork bow is seam binding ribbon and a few In Color Shimmer gems are the final elements for this sweet treat of a card.

  Thanks for looking!  Did you stamp today?

All of the current supplies used to make this card can be purchased in my ONLINE STORE.

Stamps: More Than Autumn

Ink: Pecan Pie, Early Espresso

Blends: Pretty in Pink light & dark, Pecan Pie light & dark

Paper: Early Espresso, Basic White, Pretty in Pink, 2024-2026 In Color DSP

Accessories: Forever Plaid embossing folder, Stitched Shapes dies, More Than Autumn dies, dimensionals, In Color Shimmer gems, seam binding ribbon (retired)