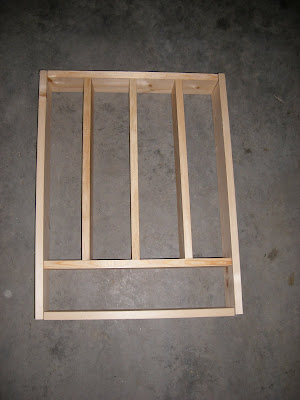
Well lo & behold, there was some figuring & measuring and a trip to Lowe's for supplies....a few consultations...a request for a shelf and some decorative molding and I got a wall mounted ink pad storage unit for Christmas from my dear husband! He was smart (way smarter than I am) and took some pictures during the building process and I had him write up the instructions to share with you all. If you have any questions please don't hesitate to leave a comment or send me an e-mail and he'll get back to you as soon as he can. Hopefully you have someone in your life (maybe even yourself!) that is handy with wood and could be persuaded to get the sawdust flying to make this ink pad storage unit for you. I love mine and it makes it so easy having all of my ink color options within reach of my stamping table. So a HUGE thank you to my husband for building & then writing up the instructions about making my ink pad storage!
***And don't worry....I have WAY more ink pads than are shown in the final photo. I had a lot pulled out for my stamp club as well as another project when the picture was taken!***
This storage is about 21 ¼ inches wide and 24 ¾ inches tall (without the molding pieces) and can hold 60 ink pads.
Parts list
- 2 6-foot pieces of ¾ pine
- 1 4-foot piece of ¾ pine
- 1 2 x 2 foot piece of ¼ board (backer board)
- 1 4 x 2 foot piece of ¼ board (shelves)
1) Cut the ¾ pine for the frame.
a. 2 Sides: 24 ¾ inches
b. 3 Top/Bottom: 17 ¾ inches
c. 3 Middle: 18 1/2 inches (****this measurement was originally 18 1/5 inches....this was incorrect and I have updated it to read the correct measurement of 18 1/2*****)
2) Mark the grooves in the side pieces, which will hold the shelves. I allowed for 1 inch gaps so I marked the top of the side pieces and then started with a 1 ¾ inch mark from the top of the wood. In the end this gave me a smaller top shelf spacing (3/4), because I didn’t allow for the first groove cut width, so you could modify this, but it worked the way I did it. From that first mark 1 ¾ inch from the top of the sides I marked a center line every 1 ¼ inch, making 13 more marks. These marks are where you will cut the grooves for the shelves.
3) Mark the grooves in the middle pieces. Top/bottom doesn’t matter with these. Start by marking at 1 inch and then every 1 ¼, again making 13 more lines.
4) Cut your grooves. I used a table saw with a ¼ inch dado saw blade at a ¼ inch depth. Center the dado blade on your marks. Because the side and middle pieces have different measurements for the grooves I cut them at different times. I did, however, make sure to use each measurement to make all of the cuts I could before changing the fence. For the sides this meant only two cuts but for the middle pieces each measurement will give 12 cuts. 3 boards, two sides and two ends. Just keep flipping the board and make all the cuts.
5) I would paint a few coats now (which I did not), which will make your life easier later. You will have to do some topcoats later, but get a good base down now.
6) Cut strips of your 4 x 2 x ¼ board to start making the shelves. You will need 5 lengths to make the 56 shelves and will have waste at the 4x2 size. Using the table saw, cut them along the 4-foot length at 3.5 widths (this matches the width of the ¾ pine boards)
7) I made a simple jig for my miter saw to make this next cut go faster. Just clamp a block giving you 4 ¼ inches to the jig side of the blade. At 4 ¼ inches the shelves should slide into the frame.
8) Paint your 56 shelves. You will be very sick of this step. Remember at least one of the 4 ¼ inch edges will be showing, so you need to paint it as well.
9) Once your frame pieces are dry you can start assembly. The way I built this the top and bottom pieces fit inside and flush to the sides. The outer middle sections are 5 inches (on center) from the outside edge of the frame. The very middle is centered between those, which is 4 5/8 inches, from center to center. The bottom section has a 4-inch gap, so 4 ¾ from center of the bottom board to the center of the bottom piece of the shelf section.
10) I had various pieces of molding from other projects, which I used to dress up the joints a little. I have another jig for molding (again from another job) which makes corners that much easier. Your project will be painted at this point, of course!

11) Mark the 2x2 backer board to fit your finished frame and nail it on. Paint this first, again.
Here is the finished product in the stamp room.


