Friday, July 31, 2020

Beautiful Blues & Yellows - Stampin' Up! Beautiful Autumn - Fab Friday 195

Fab Friday is back with a fun sketch challenge this time around.  Look at that big panel!!  So many things you can do with it!


  I paired the sketch with my own personal challenge to my local stampers.  I gave them the card on page 121 of the Annual Catalog as an inspiration.  My stampers could take the colors, layout or floral images as their starting point. I decided to used the colors as my inspiration and thought my new Beautiful Autumn stamp set would be fun to try out.


  The Beautiful Autumn stamp set is bundled with the Autumn Punch pack but I decided to just use the images in this set that don't have a matching punch to see what I could come up with. 

  I started with a Misty Moonlight card base.  I created my own DSP for the large sketch panel using Misty Moonlight in full strength and stamped off once, Bumblebee in full strength and stamped off once and finally Seaside Spray.

  I edged the 2 sides of the DSP panel with trimmed bits of the new Square Vellum doilies (page 153 Anual catalog in case you missed them!).

 The sentiment is embossed in white onto Misty Moonlight and I highlighted the end of it with 2 stamped leaf stalks in Bumblebee which I fussy cut and popped on dimensionals.  I added a tiny linen thread bow to the stems for a final detail.

  Check out the rest of the Fab Friday Design Team for more inspiration on this great sketch challenge!

  Thanks for looking!  Did you stamp today?

Stamps: Beautiful Autumn (Aug.-Dec. Mini catalog)

Ink: Versamark, Bumblebee, Misty Moonlight, Seaside Spray

Paper: Misty Moonlight, Whisper White, Bumblebee

Accessories: Square Vellum doilies, white embossing powder, dimensionals, linen thread

Thursday, July 30, 2020

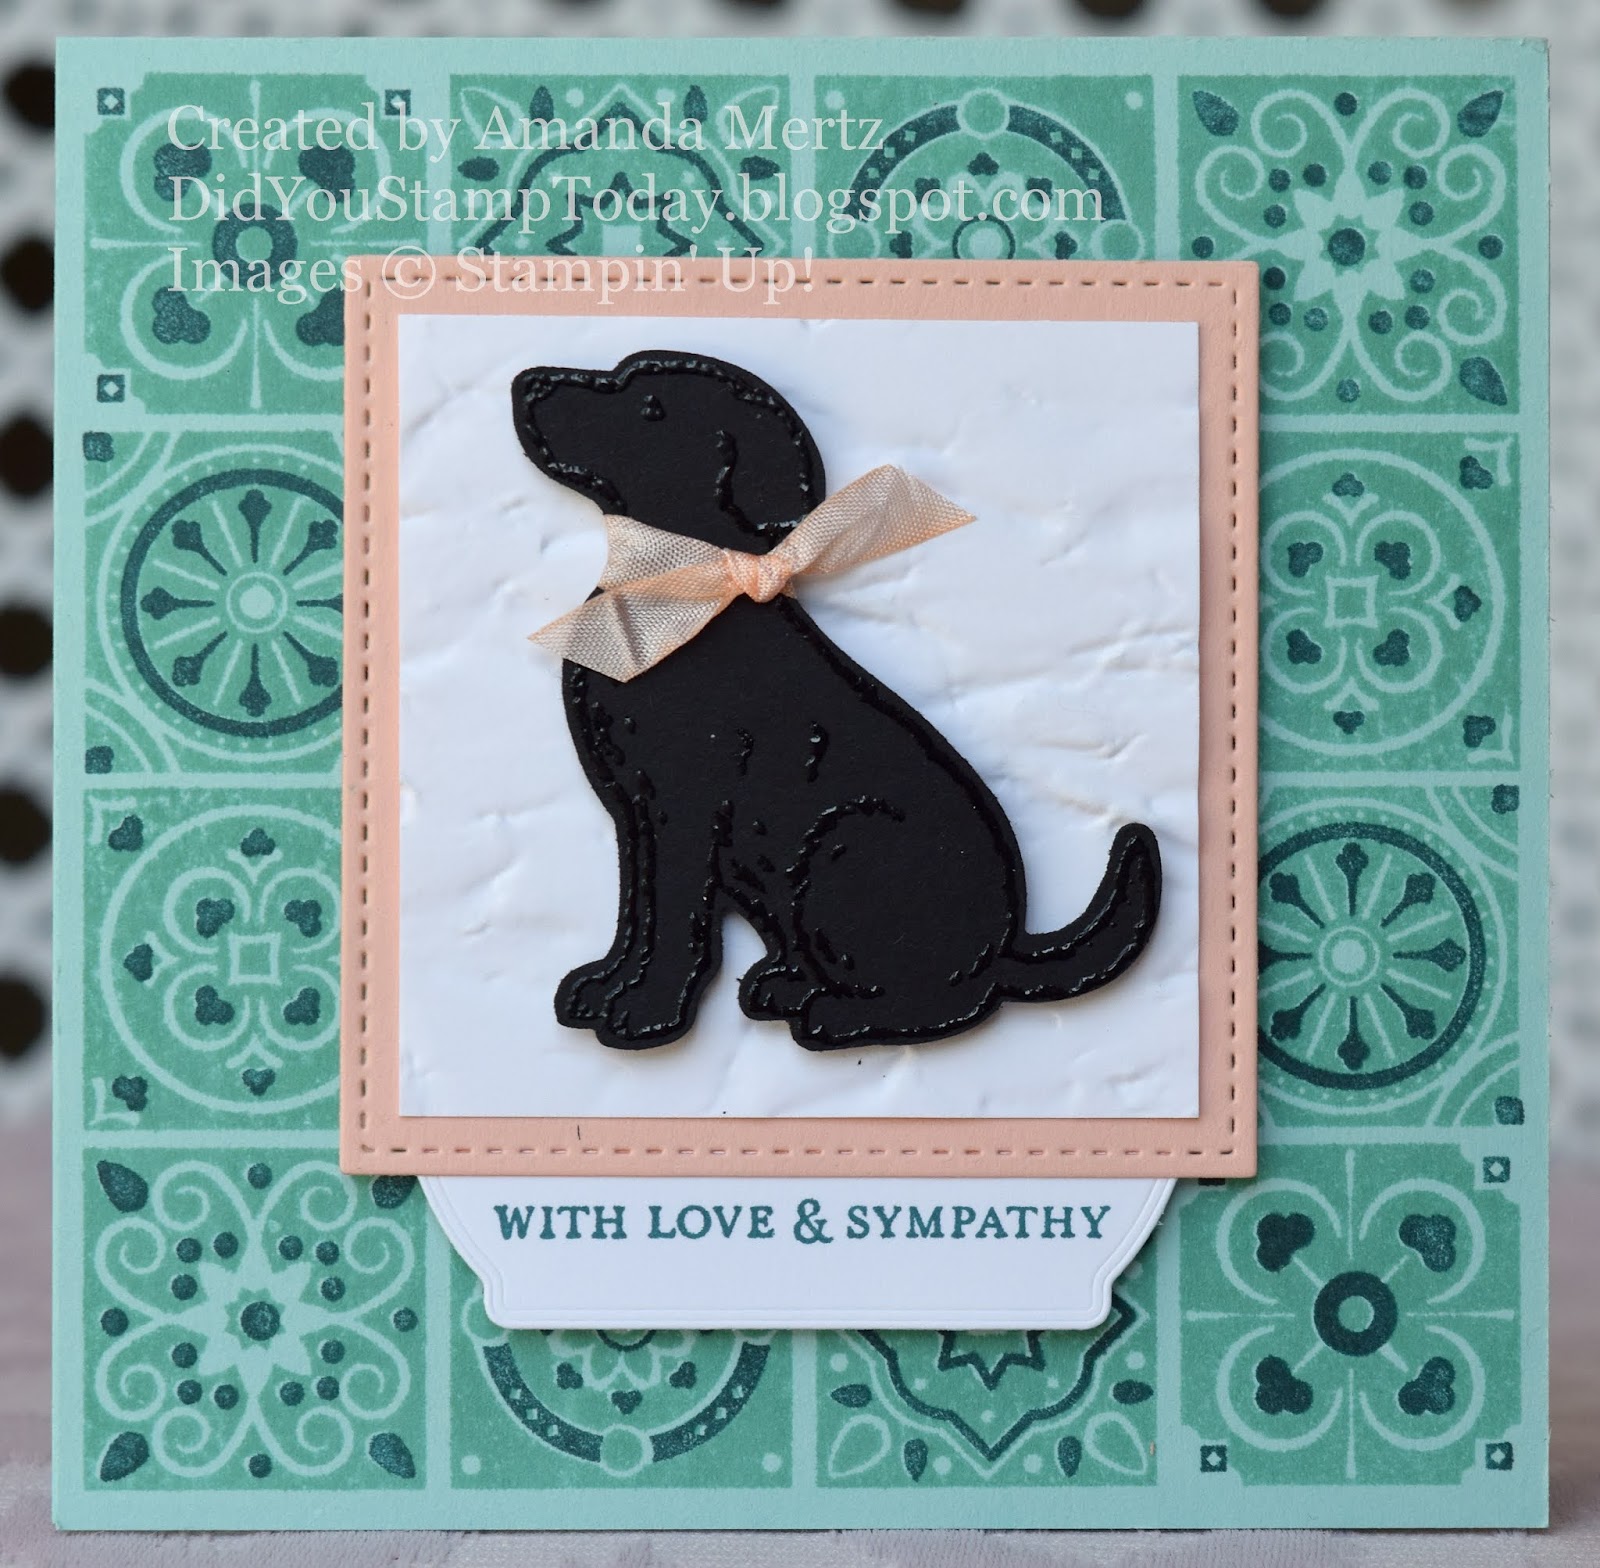
Sweet Pup Sympathy - Stampin' Up! Today's Tiles

  As with all sympathy cards they are never the ones you want to sit down and make.  A dear friend had to say goodbye to her sweet pup recently and I wanted to let her and her family know how sorry I was about it.

  Thankfully I held onto the retired Happy Tails set that coordinates with the dog punch to make a big black dog card.

 
 The card base is Pool Party and I stamped the background tiles in Pool Party and Pretty Peacock.  And not going to lie, it took a few tries with scrap paper to get the panels lined up with even spacing but I think the effort is worth the final look.  The card front is 4.25" x 4.25" and can fit the tile stamp twice.

  The black embossed pup is mounted on a Whisper White panel embossed with the Old World Paper embossing folder which is adhered to a Petal Pink panel cut with the Stitched Shapes dies.

  The sentiment from Itty Bitty Greetings is stamped in Pretty Peacock and cut with the Tasteful Label dies.

  I used my dark Petal Pink Blends marker to color a length of white crinkled seam binding for a coordinating look.

  Thanks for looking!  Did you stamp today?

Stamps: Today's Tiles, Itty Bitty Greetings,  Happy Tails (retired)

Ink: Versamark, Pool Party, Pretty Peacock

Blends: Petal Pink dark

Paper: Pool Party, Petal Pink, Whisper White, Basic Black

Accessories: clear embossing powder, Old World Paper embossing folder, Stitched Shapes dies, Tasteful Label dies, dog punch, crinkled seam binding ribbon, dimensionals

Wednesday, July 29, 2020

A Bale of Turtles - Stampin' Up! Whale Done

  You learn something new every day if you're paying attention.  I googled "what is a group of turtles called" and I got the answer; A Bale.  Cool huh?  So my card today shows off a bale of turtles in all the colors in the Whale of a Time DSP.  I'm playing along with the Global Design Project theme challenge which is "aquatic".


  Besides the fussy cutting of all the turtles this is a pretty simple card.  It starts with a Pretty Peacock base topped with a layer of the Whale of a Time DSP in a Pretty Peacock tone on tone pattern.

  The turtles are stamped and cut out and then popped up with dimensionals across the card front.

  The sentiment from Many Mates is stamped in Versamark and embossed on Pretty Peacock DSP.  I used the Tasteful Labels dies to make the flag.  It's popped up over a length of Bumblebee twill ribbon.

  I dug through my stash and found some silvery/gray adhesive sequins to scatter around the turtles.

 Thanks for looking!  Did you stamp today?

Stamps: Whale Done, Many Mates

Ink: Versamark, Blackberry Bliss, Pretty Peacock, Pacific Point, Balmy Blue, Pool Party, Shaded Spruce, Just Jade, Granny Apple Green, Calypso Coral, Bumblebee

Paper: Pretty Peacock, Whale of a Time DSP, Whisper White

Accessories: Tasteful Labels dies, white embossing powder, Bumblebee twill ribbon, dimensionals, sequins (retired)


Tuesday, July 28, 2020

Triangle Congrats - Stampin' Up! The Right Triangle

  Just a quick share today as I have some cleaning to do!  The house gets so dirty with everyone home all day every day! 

  I made this one a week or two back as my husband got to promote someone on his team and wanted to send a congrats card.


   I cut out a bunch of Stitched Triangles and then stamped them with one of the patterns in the Right Triangle.  Once they were adhered with dimensionals on the embossed Whisper White panel I trimmed off any overhang and mounted the whole panel on a Just Jade card base.

  The "congrats" from Many Mates is stamped in Basic Gray and cut out with the Tasteful Labels dies.  I added a tiny little Just Jade twill ribbon flag peeking out from the edge.

  Since I had all the card parts out I made a second version just with a different pattern.


  Thanks for looking!  Did you stamp today?

Stamps: The Right Triangle, Many Mates

Ink: Just Jade, Mint Macaron, Basic Gray, Soft Seafoam

Paper: Whisper White, Just Jade, Mint Macaron, Basic Gray, Soft Seafoam

Accessories: Stitched Triangle dies, Tasteful Label dies, Tasteful Textiles embossing folder, dimensionals, Just Jade twill ribbon

Monday, July 27, 2020

Jar of Greenery - Stampin' Up! Forever Fern

  I made a bit of time yesterday to head to the stamp room and play along with the Paper Players new sketch challenge.  At first I was going to use some of my new Holiday mini preorder products that arrived on Friday but honestly I was a bit overwhelmed with all the new stuff I had bought and didn't quite know where to start.  Add in the fact that it was like 100 degrees I just couldn't get motivated to do fall or Christmas right then.  I thought a nice greenery based card would be cool and refreshing!

 
  Looking at the card now I think I should have chosen a different patterned paper for the background....it seems a bit busy at the moment; or maybe that's just Monday talking??

  The card base is Whisper White thick, then a layer of the Forever Greenery DSP.  Next is a strip of Pretty Peacock embossed with the Dainty Diamonds embossing folder.

  The base for the focal images is a Stitched Rectangle in Whisper White.  I dug around in my retired embellishments and found some gold brads and added those to the two corners on the right. 

  I embossed the jar from Jar of Flowers in gold onto vellum paper and then punched it out with the jar punch.  Remember that vellum scorches pretty easily with a heat gun so be sure to not overheat your embossing powder.

  The greenery is stamped from back to front in Shaded Spruce, Just Jade and Soft Sea Foam and are cut out and tucked into the jar.

  I wanted a longer skinnier sentiment for the strip across the front in the sketch so I looked through all my stamps and thought this sentiment from Butterfly Gala fit the bill.  I embossed it in gold onto a strip of Pretty Peacock and adhered it across the bottom of the jar.

  The final detail is a gold twine bow adhered with a glue dot.

  Stay cool!

  Thanks for looking!  Did you stamp today?

Stamps: Forever Fern, Jar of Flowers, Butterfly Gala

Ink: Versamark, Shaded Spruce, Just Jade, Soft Sea Foam

Paper: Whisper White thick, Whisper White, Pretty Peacock, vellum

Accessories: Forever Flourishing dies, Jar punch, dimensionals, Dainty Diamonds embossing folder, Stitched Rectangle dies, gold embossing powder, gold brads (retired), gold twine (retired)


Thursday, July 23, 2020

Sweet Glimmer Bow - Stampin' Up! Wreath Builder Dies

  My card today is a super simple Christmas card using one of my new die sets; Wreath Builder dies.  I found a bit of retired Christmas DSP and some retired Merry Merlot Glimmer paper and put them together for an easy design.


  The card base is Whisper White thick then a layer of Merry Merlot.  I topped that with a pattern of retired Joyous Noel DSP. 

  The label is cut in Whisper White from Tasteful Label dies. I stamped the sentiment from Itty Bitty Christmas in Shaded Spruce which isn't quite a perfect match to the DSP but once I realized I had grabbed the wrong color I already had the bow and rhinestones attached and I didn't want to re-do it. 

  The bow is cut with the Wreath Builder dies and is several bows pieced together to make a more full, round bow with 5 loops.  The Merry Merlot Glimmer paper is from the retired Joyous Noel Glimmer Paper pack which for some reason I seemed to have hoarded and should have used more of it when it was current! I popped the bow on a mini dimensional onto the label.

  A few small rhinestones in the corners of the label are the last touch for this clean and simple Christmas card.

  Definitely don't overlook smaller dies that are part of a larger set like the Wreath Builder.  Very often you can highlight small dies on their own with the right layout.  And clearly this is a good layout to use up some DSP as well!

  Thanks for looking!  Did you stamp today?

Stamps: Itty Bitty Christmas

Ink: Shaded Spruce

Paper: Whisper White thick, Whisper White, Merry Merlot, Joyous Noel Glimmer paper (retired), Joyous Noel DSP (retired)

Accessories: Wreath Builder dies, Tasteful Label dies, dimensionals, rhinestones

Wednesday, July 22, 2020

Simple Striped Thank You - Stampin' Up! Ornate Thanks

  It's always nice to say thanks and I've found that my thank you card stockpile is quite low and what I do have on hand is more fall themed so I decided to concentrate on getting a few thank you cards made and set aside.

  My local stampers have asked me to give them some challenges or inspiration for their at home stamping so I've been posting some sample photos from the annual catalog in our facebook group to get them started with layouts or color combos and of course I have to play along.  The most recent challenge card is the one on the top right corner of page 69 in the annual catalog which is a cute little square layout.

  I stuck with the square format and decided that the stripes were a fun element to CASE.  I pulled my colors from the CAS Colours & Sketches challenge which is to use Calypso Coral, Mint Macaron and Balmy Blue.


   I had some fun with my Stampin' Blends to make the background.  Clearly I have a tilt going on but I think the overall look came out nicely with the random wide/thin stripes.

  The card base is Calypso Coral then a piece of Whisper White embossed with Subtle embossing folder.  Next is the striped piece popped on dimensionals.

  I broke out my new Dainty Diamonds embossing folder to make the Balmy Blue flag.  It's a nice texture and I think it will pair nicely with the new Stitched Triangle dies. 

  The sentiment is from Ornate Thanks stamped in Balmy Blue.  A quick change of sentiment and this one can be for just about any occasion.

The embellishments were kept simple just like the inspiration card on page 69.  I dug through my retired sequins and found these which I think are from an old Paper Pumpkin kit and then I colored some small rhinestones with the dark Balmy Blue Blends marker for the centers.  And a little Calypso Coral baker's twine bow is the last thing.

  I think I will definitely try my own striped panels again and see what I can use to keep my lines more straight.  I did try a ruler but the tip of the wide end of the Blends kind of bled underneath for a sloppy looking line.  If you have any suggestions please comment.

  Thanks for looking!  Did you stamp today?

Stamps: Ornate Thanks

Ink: Balmy Blue

Blends: Calypso Coral light & dark, Mint Macaron light & dark, Balmy Blue light & dark

Paper: Calypso Coral, Whisper White, Balmy Blue

Accessories: Dainty Diamonds embossing folder, Subtle embossing folder, sequins (retired), rhinestones, Calypso Coral baker's twine (retired), dimensionals

Tuesday, July 21, 2020

Double Casted Sloth - Stampin' Up! Back on Your Feet

  My card today was unfortunately designed for a family member who had a trip and fall and broke bones in both their feet.  What a mess!  And of course with all that's going on we can't do too much to help at the moment other than wishing them well.

  I used the Global Design Project sketch challenge for the layout.  It was a nice design to be able to highlight the sloth with his 2 boo boo legs.


  I started this one with a Soft Sea Foam card base, then a layer of Just Jade embossed with the Greenery embossing folder.  The embossed layer is tilted per the sketch and then a layer of Forever Greenery DSP.

  For the circle element of the sketch I used the Painted Labels dies to cut it from Soft Sea Foam. 

  The sloth is stamped in Memento black and colored with Blends.  I stamped the cast 2 more times and then cut them out and popped them up on the 2 legs.  I fussy cut the sloth also and popped it up on the circle.

  And for the sentiment what more could you say for 2 broken feet other than numerous ouches??

  The final touch is a black bakers twine bow on the side of the sentiment flag.

  Thanks for looking!  Did you stamp today?

Stamps: Back on Your Feet

Ink: Memento black

Blends: Smoky Slate light, Gray Granite dark, Crumb Cake light & dark, Soft Suede light & dark

Paper: Soft Sea Foam, Just Jade, Forever Greenery DSP, Whisper White

Accessories: Greenery embossing folder, Painted Labels dies, dimensionals, black bakers twine, dimensionals


Monday, July 20, 2020

Sweetest Pineapple Thanks - Stampin' Up! Cute Fruit

    I had some more fun with the Cute Fruit stamp set over the weekend.  I needed to make a thank you card and I thought this set would fit the bill.


   I used the CAS Colours & Sketches challenge for the layout.  I liked the larger center circle as a nice way to show off the pineapple.

  I started with a Cinnamon Cider card base, then a layer of Whisper White embossed with the Tasteful Textile embossing folder.  I used a Layering Circles die to cut out the circle from a piece of In Color DSP.

  To stamp the pineapple I first inked it up with Bumblebee ink and then sponged a bit of Cinnamon Cider ink around the edge before stamping it.  The stem is inked in Just Jade and lined up on the top.  The sweet face is stamped with Memento black.  I fussy cut the pineapple and then popped it up on the circle with dimensionals.

  The sentiments from Many Mates are stamped in Just Jade and then cut with Layering Oval dies.  They are both tucked under the edge of the pineapple and the bottom one has a bit of Just Jade twill ribbon in a flag.

  Thanks for looking!  Did you stamp today?

Stamps: Cute Fruit (Beginner Brochure #153301), Many Mates

Ink: Bumblebee, Cinnamon Cider, Just Jade, Memento Black

Paper: Cinnamon Cider, Whisper White, 2020-2022 In Color DSP

Accessories: Layering Circles dies, Layering Ovals dies, dimensionals, Tasteful Textile embossing folder, Just Jade twill ribbon


Sunday, July 19, 2020

Stitched Triangle Santa - Stampin' Up! Stitched Triangle Dies

  Sometimes inspiration hits and you just have to roll with it even if it's time to clean up the stamp room and start making dinner.  I was stamping yesterday and it was slow going for the first project then things started to pick up for the second project.  Then I scrolled through my list of challenges to see what grabbed my attention for a third project and I came to the 52 Christmas Card Throwdown and their Santa themed challenge.  The only problem was that I have not a single Santa stamp or even any Santa DSP.  Nada. Zip.  Zilch. Well it's not called a challenge for nothing!

  When you need a certain image and you don't have a stamp that matches, punch art/die art is always a great way to create what you need.  I briefly thought about a punch art Santa but then I had the big idea to use my new triangle dies to do a die art Santa instead.  It came out pretty cute if I do say so myself!  I scrolled through Pinterest for a few ideas then got to work.


  Besides the circles for the eyes and nose and the hand cut tree trunks everything is a triangle die from the new Stitched Triangle die set.  It's hard to see but the background is embossed with the retired Winter Knit embossing folder (but it looks like it's currently on the Clearance Rack if you missed out on it the first time around).  And the triangles for the beard/mustache are embossed with the Subtle embossing folder for some extra texture which is hard to see in the photo.


  Make your own triangle Santa using these dies.  Here's how I put each part together.  For size reference triangle #1 is slightly less than 2 inches wide.

  • Trees = triangles #4, #5 & #6
  • Hat Pompom = #3***
  • Hat = #4 with the tip folder over
  • Hat Cuff = #1 trimmed
  • Face = #1
  • Mustache = #2 x 2 (embossed)
  • Beard = #1 (embossed)
  • Shirt = #1 x 2
  • Eyes & Nose = small circle punches
*** For the hat pompom I punched a small circle and covered it with glue and just stuck the little tiny triangles all over it until it was covered.

  All the pieces are popped up on the background with dimensionals except for the small, wide tree in the background.

  This was really a fun card to put together and a fun challenge to solve.  Sometimes it pays to not have every image in stamp form!

  Thanks for looking!  Did you stamp today?

Stamps: None

Ink: None

Paper: Whisper White thick, Whisper White, Soft Suede, Perfectly Plaid DSP (retired), Real Red, Petal Pink, Basic Black

Accessories: Stitched Triangle dies, Subtle embossing folder, Winter Knit embossing folder (retired), dimensionals, circle punches, Stitched Rectangle dies


Friday, July 17, 2020

Bright Boy Birthday - Stampin' Up! The Right Triangle

  Not only is it Friday today it's a Fab Friday Challenge day!  Woo-Hoo!  We've got a fantastic color combo for you this time!

  This color combo came at the perfect time when I needed to make a birthday card for my oldest who just turned 14.  Yikes!  I'm not old enough to have a 14 year old is all I know!  lol!

  I combined these fun, bright colors with the Right Triangle stamp set and dies as well as the Playful Alphabet dies. 


  I cut  variety of triangles out of the challenge colors; stamped some of them with the Right Triangle patterns and then arranged them on top of a piece of Whisper White embossed with the Subtle embossing folder.

  To make the fun puffy letters I used the new Foam Adhesive Sheets with the Playful Alphabet dies.  The foam sheets are basically dimensionals that aren't cut so you can die cut your shapes right from it.  I cut a second set of letters in Whisper White and applied those for a nice smooth look.


  The "birthday" banner is stamped with the Well Said stamp set and embossed in white and highlighted with a Bermuda Bay candy dot.

  I hope to see your creation with these colors in our gallery!  Check out more inspiration from the rest of the Fab Friday Design Team!

  Thanks for looking!  Did you stamp today?

Stamps: The Right Triangle, Well Said

Ink: Pumpkin Pie, Poppy Parade, Daffodil Delight, Versamark

Paper: Bermuda Bay, Basic Black, Pumpkin Pie, Poppy Parade, Daffodil Delight, Whisper White

Accessories: Subtle embossing folder, Stitched Triangle dies, foam adhesive sheets, Playful Alphabet dies, white embossing powder, Stitched Rectangle dies, dimensionals, candy dot (retired)

Thursday, July 16, 2020

Bar Mitzvah Star - Stampin' Up! Stitched Triangle Dies

  Our family needed to send a bar mitzvah card so I was pleased to be able to use the Stitched Rectangle dies to create a star of David.  The Paper Players color challenge was just right for this card as well. 


  The card base is Seaside Spray and then a layer of Smoky Slate topped by a layer of Whisper White embossed with the Old World Paper embossing folder. 

  To make the star I cut 2 triangles from Seaside Spray cardstock then cut the centers out with a smaller triangle die.  I nested the 2 triangles together and then backed it with So Saffron cardstock. 

  I stamped the sentiment from Itty Bitty Greetings in Smoky Slate ink and then popped the star on the card front with dimensionals.

  I added some retired candy dots between the star points for a little extra detail. 

  Thanks for looking!  Did you stamp today?

Stamps: Itty Bitty Greetings

Ink: Smoky Slate

Paper: Seaside Spray, Smoky Slate, Whisper White, So Saffron

Accessories: Stitched Rectangle dies, Old World Paper embossing folder, dimensionals, candy dots (retired)


Tuesday, July 14, 2020

Sweet Summer Friend - Stampin' Up! Cute Fruit

  Are you frantically scanning through your annual catalog trying to find the stamp set Cute Fruit?  Are you feeling that maybe your catalog is missing a page or two?  Are you maybe wondering if I've started using stamps from a company other than Stampin' Up!?  Don't worry I've not gone off Stampin' Up! nor is there anything wrong with your catalog!

  Stampin' Up! has created a "beginner" brochure with a very limited group of products for new stampers so they aren't overwhelmed by the big catalog and where to start.  It's kind of like the "You can make it too" boxes in Sale-a-Bration that shows a group of items that makes the $50 purchase to earn the freebie. 

  The Cute Fruit set is only in the beginner brochure but is available to all.  It's a photopolymer set and the item # is 153301 for $16.  It's really cute and I enjoyed getting it inky for the first time.


  I ended up combining 2 challenges that worked perfectly for the card I wanted to make.  I used the Festive Friday challenge which had a nice group of inspiration elements.  I used friendship, pink, green, polka dots and diecuts.  For the Daring Cardmakers their challenge was to use polka dots and stripes so I got both with my DSP.

  Pulled out some retired Tropical Escape DSP which has the perfect patterns for the watermelon and the challenges.

  I stamped the watermelon with Granny Apple Green for the rind and Melon Mambo for the flesh with one being full strength and the other being stamped off once.  I hand cut them and popped them up on a Stitched Circle.  The seeds are colored in with Basic Black Blends.

  After stamping the sentiment it's also popped up and then I layered some retired green sequins with retired Melon Mambo candy dots.

  Thanks for looking!  Did you stamp today?

 Stamps: Cute Fruit

Ink: Melon Mambo, Granny Apple Green, Memento black

Blends: Basic Black

Paper: Whisper White thick, Whisper White, Basic Black, Tropical Escape DSP (retired)

Accessories: Stitched Shapes dies, dimensionals, sequins (retired), candy dots (retired)


Friday, July 10, 2020

Quilty Note Cards - Stampin' Up! Quilted Christmas

   A few weeks ago my mom requested some note cards using the retired Quilted Christmas stamp set and matching Quilt Builder dies.  She runs her church's charity quilt ministry as well as does quilting for fun and craft shows so she can always use some themed cards to send out.  It's a good thing this one of the few retired sets I've kept over the years!

  I had so much of the retired Woven Threads DSP left that I decided to use that pack to make an assortment of cards with the same layout but different color combos.


  I think I ended up making 2 or 3 of each design and even then I didn't put much of a dent into the DSP! 

  I won't go into the details because the cards are pretty basic and some of the supplies are retired but I will list all the supplies below.  Don't underestimate giving people packs of notecards as a "just because" these days.  They will get used!

  Thanks for looking!  Did you stamp today?

Stamps: Quilted Christmas (retired)

Ink: Pretty Peacock, Terracotta Tile

Paper: Purple Posy, Seaside Spray, Terracotta Tile, Pretty Peacock, Whisper White, Sahara Sand, Woven Threads DSP (retired)

Accessories: Quilt Builder dies (retired), dimensionals, corner rounder, scalloped linen trim, In Color faceted gems

Thursday, July 9, 2020

Summer Colored Flowers - Stampin' Up! Jar of Flowers

  Today I'm playing along with the All Sorts Challenge which has "Summertime" as it's theme.  I don't have any stamps with a lazy lady reading books which is pretty much my summer theme this year so I decided to look to my yard for color inspiration.  I always plant some zinnias in one of my flower beds and they seem to be bit slow to get going but by mid/late summer they are gorgeous and full of bright blossoms.  It's a nice mix of colors this year and I thought they might translate into a card.


  While the Jar of Flowers stamps are supposed to work with the Jar punch they also can be used just fine on their own.  For my card I started with a Calypso Coral card base with the cluster of sunflowers stamp as the background in the same color ink.

  I stamped the cluster of flowers again in Basic Gray and colored using Blends all of which were inspired by zinnias in my own garden.

  The sentiment is from Ornate Thanks and is stamped on Whisper White and cut with the Stitched Rectangles dies and backed with a Granny Apple Green rectangle.  Before mounting all the elements on the card front I wrapped a length of crinkled seam binding ribbon around and adhered the ends under the sentiment layer.  A fork bow "ties" it all together on the side.

  I fussy cut the flowers after coloring and adhered with dimensionals.  I also had a pink sequin (Melon Mambo?) that matched the Magenta Madness really well so I added it and a rhinestone to the corner of the sentiment.

  I hope you all have some bright summer colors like this to enjoy in your yard!

  Thanks for looking!  Did you stamp today?

Stamps: Jar of Flowers, Ornate Thanks

Ink: Calypso Coral, Basic Gray

Blends: Calypso Coral light & dark, Granny Apple Green light & dark, Mango Melody light & dark, Magenta Madness light & dark

Paper: Calypso Coral, Whisper White, Granny Apple Green

Accessories: Stitched Rectangle dies, crinkled seam binding ribbon, dimensionals, sequin (retired), rhinestone

Wednesday, July 8, 2020

Soft Sympathy - Stampin' Up! Forever Fern

  It's never nice to have to make sympathy cards but it's got to be done on occasion.  I usually try to make a few of the same design when I hit on a layout I like so I can have an extra or two set aside.  I played along with the closed Just Add Ink challenge for this design.  I thought the angles were a fun element and might make for an interesting card using neutral shades.

  I pulled out two of the In Good Taste DSPs and cut my angles from them.  I stacked a piece of each pattern together when making my cuts so I could use the pieces to make 2 cards which are a mirror image of each other. 

 
  This card starts with a Whisper White thick card base topped with a smaller piece of Whisper White embossed with the Tasteful Textile embossing folder.  Next I added my 2 pieces of In Good Taste DSP using dimensionals to pop them up.

  I stamped the sentiment from Itty Bitty Greetings in Gray Granite and then cut it out with a Stitched Shape circle.

  The berry/leaf image from Forever Fern is also stamped in Gray Granite and cut out and popped on the side of the sentiment.  A bit of Braided Linen trim on the stem is the only bit of embellishment. 

  I hope the textures and patterns keep this card from being too understated but at the end of the day it's the thought that counts right?

  Thanks for looking!  Did you stamp today?

Stamps: Itty Bitty Greetings, Forever Fern

Ink: Gray Granite

Paper: Whisper White, Whisper White thick, In Good Taste DSP

Accessories: Tasteful Textile embossing folder, Stitched Shapes dies, dimensionals, Forever Flourishing dies, Braided Linen trim

Friday, July 3, 2020

Birds & Greenery - Stampin' Up! Birds & Branches - Fab Friday 193

  Well those 2 weeks have just flown by haven't they?  I've been away from my stamp room for a few days so it's nice to share a brand new project using new annual catalog items.  Even though Stampin' Up! demos just got to see the new holiday catalog I am still fully into the annual catalog.  Today for the new Fab Friday challenge I mixed and matched the Birds & Branches stamp set with the Forever Greenery DSP for a very nature-y look.

  Check out the Fab Friday sketch for this challenge:


  I substituted a branch for the banner but I hope you can still see the bones of the sketch!


  It was hard not to make a blue bird but I did it!   I tried to make the birds more like they are in nature with the male being more bold and the female more subdued so the one bird is Cinnamon Cider and Bumblebee and the other is black and Bumblebee.  They are both popped on dimensionals.

  For the branch element I cut the first one in Shaded Spruce then cut another in Just Jade and snipped some of the leaves off to add some extra fullness to the main one.  The Shaded Spruce branch is popped up on itty bitty bits of dimensionals and the Just Jade leaves are adhered flat.  I actually tried 3 different colors of berries until I settled on the Pretty Peacock ones.  I was originally planning to use the opposite side of this Forever Greenery DSP but when I flipped it over to add adhesive I saw the berries and decided that the ones on my branch had to match and that I wanted to use this design instead.

  The Stitched Rectangle is embossed with the Old World embossing folder for some texture and I trimmed an edge of a length of the Pretty Peacock scalloped linen trim for under the bottom edge fitting with the sketch.

  The sentiment from Forever Fern is stamped in Shaded Spruce and popped on dimensionals.

  I hope you'll check out the rest of the Fab Friday Design Team and see all the fabulous inspiration from them.  I always get so many ideas from them!

  Thanks for looking!  Did you stamp today?

Stamps: Birds & Branches, Forever Fern

Ink: Memento Black, Bumblebee, Cinnamon Cider, Shaded Spruce

Paper: Whisper White thick, Whisper White, Shaded Spruce, Just Jade, Pretty Peacock, Forever Greenery DSP

Accessories: Birds & More dies, Stitched Rectangle dies, Old World Paper embossing folder, dimensionals, scalloped linen trim