Thursday, August 31, 2023

Framed Kindness - Stampin' Up! Timeless Arrangements

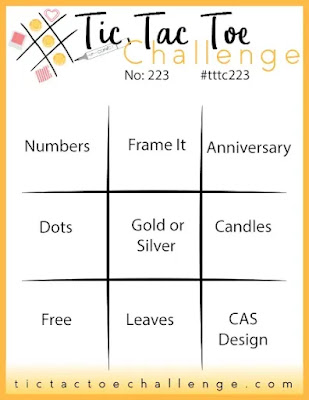
   Last week I had to buckle down and design my projects for class this week so I was browsing some challenges to just spark some ideas and see what I could come up with and I looked at the Tic Tac Toe Challenge.  They always have a great choice board giving 8 different combos of elements to use.  I started putting something together to see if it would work for a class card.  It ended up that I loved the results but I did so much die cutting to create it there was no way 20 people would be able to make it in a class.  Oh well.  But check back tomorrow to see how I used elements from this card on different design for class!


  I ended up using the middle down column: Frame it, gold or silver and leaves.  Can you see now why this wouldn't work for a big group class??

  I started with a Very Vanilla thick base and then another layer of Very Vanilla embossed with the new Distressed Tile embossing folder.

  The frame is made with Pretty Peacock cardstock and 2 of the Deckled Rectangle dies.  I popped the frame on dimensionals.  

  Next is more die cutting with the Timeless Arrangements die set to get all the leafy elements; 2 of each to go around the sentiment and the sentiment itself which is stamped in Pretty Peacock.  After arranging all the leaves I tore a strip of Distressed Gold Specialty paper to go behind the whole arrangement.  Finally a few dimensionals adhere it to the card front.

  My retired embellishment stash held a few faceted gold gems so I scattered them around the leaves for a bit of shine.

  All of the current items used to make this card can be purchased in my ONLINE STORE.  Items marked with a * will be available September 6, 2023.

  Thanks for looking!  Did you stamp today?

Stamps: Timeless Arrangements

Ink: Pretty Peacock

Paper: Very Vanilla thick, Very Vanilla, Cajun Craze, Pretty Peacock, Wild Wheat, Petal Pink, Distressed Gold Specialty paper

Accessories: Timeless Arrangement dies, Deckled Rectangle dies, dimensionals, Distressed Tile embossing folder*, gold faceted gems (retired)


Wednesday, August 30, 2023

Autumn Layers - Stampin' Up! Layering Leaves

   I used the fabulous fall colors from the current Hand Stamped Sentiments challenge to design this card that my customers made in class this week.  These could also be great colors to base a masculine card on.


  I started with a Very Vanilla thick base and then embossed a piece of Very Vanilla with the soon to be released Distressed Tile embossing folder and adhered it to the card front.

  For the strips I used Midnight Muse, a piece of the new All About Autumn DSP in a Copper Clay/ metallic copper design and a piece of Pecan Pie.  The Midnight Muse and Pecan Pie are both stamped with the same color ink with stamps from the Layering Leaves stamp set.

  On top of the strips I added a tag made with the Tailor Made Tags dies.  The sentiment is stamped in Pecan Pie.  A bit of Copper Clay textured ribbon and vanilla bakers twine are tied on before adhering it with dimensionals.

  2 leaf sprigs are stamped; one in Misty Moonlight on Very Vanilla cardstock and the other in Copper Clay ink on the same color of cardstock.  Both are punched out with the Bough punch.  A bit of highlight coloring on both springs with Blends markers.

  Finally a tiny bough is punched from the new Oxidized Copper specialty paper and the 3 boughs are added to the side of the tag. A few mini dimensionals at the top of the sprigs help secure them to the card front.

  Final details is an adhesive-back speckled dot at the base of the stems.

  All current items used to make this card can be purchased in my ONLINE STORE.  Items marked with a * will be available starting September 6, 2023.

  Thanks for looking!  Did you stamp today?

Stamps: Layering Leaves

Ink: Pecan Pie, Misty Moonlight, Copper Clay

Blends: Misty Moonlight light, Copper Clay light

Paper: Very Vanilla thick, Very Vanilla, Pecan Pie, Misty Moonlight, Copper Clay, All About Autumn DSP*, Oxidized Copper Specialty paper*

Accessories: Bough punch, Distressed Tile embossing folder*, Tailor Made Tags dies, dimensionals, Copper Clay textured ribbon, very vanilla twine, adhesive-back speckled dot*


Tuesday, August 29, 2023

Musical Bird Birthday - Stampin' Up! Bird's Eye View

     I'm playing along with Seize the Birthday and their fun topping theme of of "make it musical".  I had to combine a bunch of different products to get this one to be musical because I don't have a musical theme stamp set that I could focus on.  But it is called a challenge for a reason!


  I started this one with a Very Vanilla thick base which I've used a lot lately since it's now kind of the autumn season and that seems to be the only time I use Very Vanilla with any regularity.  It's like my fall version of white for some reason.  During the rest of the year Vanilla just isn't crisp enough for me so I rarely use it unless matching a DSP.  But it works for now right?

  I pulled out the little music note stamp from the Sweet Songbirds set and stamped it on a narrow strip of Pool Party and paired it up with a strip from Let's Go Fishing DSP, a piece of Very Vanilla embossed with the Merry Melody embossing folder and then finally a strip of Joy of Christmas DSP which is kind of a woodgrain and music notes pattern.  I adhered these onto a square of Very Vanilla and adhered it to the card base.

   Since birds sing and make their own kind of music I decided to use one of the birds from Bird's Eye View as the focal image o go with the theme a little bit more.  It's stamped in Pecan Pie ink onto Very Vanilla and then colored in with Blends markers.  It's then fussy cut and popped up on a bit of twine and a Tree Rings Hybrid die cut that I had in my orphaned card parts bin.

  The sentiment also comes from the Sweet Songbird stamp set and is stamped in pecan Pie under the strips.

  Finally I added a few retired Pale Papaya gems (they always looked more yellow than orange so they work well with these colors.)

  All of the current products used to make this card can be ordered in my ONLINE STORE.  Items marked with a * will be available starting September 6, 2023.

  Thanks for looking!  Did you stamp today?

Stamps: Bird's Eye View, Sweet Songbirds

Ink: Pecan Pie, Pool Party

Blends: Pool Party light & dark, Daffodil Delight light & dark

Paper: Very Vanilla thick, Very Vanilla, Pool Party, Let's Go Fishing DSP, Joy of Christmas DSP*, Crumb Cake

Accessories: Tree Rings Hybrid dies/embossing folder, Merry Melody embossing folder, dimensionals, twine, gems (retired)


Monday, August 28, 2023

Summer Fun Birthday - Stampin' Up! Silly Goose

   I pulled out a carry over stamp set from the spring mini catalog to use for my card today.  In my neck of the woods school has already started so the summer fun is over but the weather is still very much "summer" so I thought I would play along with the As You See It Challenge and give this carry over set  some love.   The Just Add Ink Challenge had a great layout that was perfect for this image.


    The Silly Goose stamp set is cute and super easy to color and since the theme is summer I went with the sweet little goose enjoying some time on the water with a friend.
  
  I started with a Blueberry Bushel base, then a piece of Bright & Beautiful DSP backed with a piece of Lemon Lolly.  The wavy pattern went perfectly with the water on the stamp and gave me a lot of colors to incorporate with my Blends markers.  I cut a second circle from a different pattern in the Bright & Beautiful pack and used it as the sky and added a few clouds die cut with the Zany Zoo die set.

  The sentiment is from a retired set called Itty Bitty Birthdays and was the right scale to fit with the sketch.  I stamped it in Berry Burst and cut it apart and popped it on dimensionals.  The "birthday" has a bit of Lemon Lolly sheer ribbon behind it for some detail.
  
  A few sparkle gems finish off the details for this summer birthday card.
  
  All of the current products used to make this card can be purchased through my ONLINE STORE.  

  Thanks for looking!  Did you stamp today?

Stamps: Silly Goose, Itty Bitty Birthdays (retired)

Ink: Memento Black, Berry Burst

Blends: Azure Afternoon light & dark, Lemon Lolly light & dark, Berry Burst light & dark, Lemon Lime Twist light & dark, Bubble Bath light, Crumb Cake light, Daffodil Delight dark

Paper: Blueberry Bushel, Lemon Lolly, Bright Beautiful DSP, Basic White

Accessories: Stylish Shapes dies, dimensionals, Zany Zoo dies, Lemon Lolly Sheer Ribbon, Sparkle Gems


Friday, August 25, 2023

Colorful Tree Fun - Stampin' Up! Wishes All Around

  For my card today I was inspired by a new to me challenge site called Time Out Challenges and their current theme is "colorful".  A few of my stamping friends have shared cards inspired by this site and I thought it was high time to add it to my list.  You can never have enough inspiration right?  And it's 2 week challenge which is nice because sometimes I just can't do a one week turnaround lol!  

  I used the Wishes All Around bundle again today and I definitely love how this one came out but I think it might be a one and done kind of design lol!  It's a bit fussy and time consuming even with the 3 tree dies in the set (which I love, definitely makes things go faster but still...21 trees!).  For my local customers who attend my classes; don't hold your breathe, we won't be doing this one in class!


  The actual design is very simple with a Basic Black base topped with a piece of Whisper White embossed with the coming soon Snowflake Sky embossing folder.

  Next I stamped the trees 3 times in each of my 7 colors (listed below).  I was happy to use up a bunch of small scraps for the trees so that's always a good thing! Then comes the die cutting for the trees.  

  The sentiment banner is stamped with one of the sentiments from another new set; Merry & Bright.  I stamped it in Versamark and then embossed it in white on Basic Black cardstock.  One of the banners from Stylish Shapes dies cuts it out.

  Now I'm ready to assemble the card.  Not gonna lie here, I took a bit of time to arrange the trees and banner to get a feel for spacing and such.  I used my grid paper to help line things up and to try to maintain spacing.  Once I had everything set I added a mini dimensional to the back of each tree and some regular sized ones to the banner.  I started adhering at the bottom row and from the 2 outside trees in towards the middle to help maintain even spacing.  Then I worked my way up the card with the banner and 2 other tree rows.  I think I did ok and only see one tree that's a little wonky.

  After that it was just a matter of adding a few embellishments.  I added a Sweet Sorbet baker's twine bow and then some of the new Iridescent-Backed Discs.  They are actually more white but the iridescent pink tones showed up in the photo so it looks like they don't quite match.  And that's that, another Christmas card for the stash.

  All of the items used to make this card can be purchased in my ONLINE STORE.  Items marked with a * will be available starting September 6, 2023.  

  Thanks for looking!  Did you stamp today?

Stamps: Wishes All Around*, Merry & Bright*

Ink: Versamark, Mossy Meadow, Pretty Peacock, Pool Party, Sweet Sorbet, Flirty Flamingo, Daffodil Delight, Lemon Lolly

Paper: Basic Black, Basic White

Accessories: Snowflake Sky embossing folder*, Wishes All Around dies*, Iridescent-backed Discs*, Stylish Shapes dies, white embossing powder, Sweet Sorbet baker's twine, dimensionals


Thursday, August 24, 2023

Merry Tree Wreath - Stampin' Up! Wishes All Around

   You can't go wrong with a wreath stamp set especially for Christmas cards.  I really liked the look of the Wishes All Around stamp set and especially the coordinating dies for having 3 different shaped wreaths to choose from.  I paired it up with the Color Throwdown challenge which has us using aqua, green and gray.  I translated those colors to Stampin' Up!'s Pool Party, Garden Green and Smoky Slate.


  I started this one with a Pool Party base, then embossed a piece of Smoky Slate with the new Snowflake Sky embossing folder.  Then I lightly drug my Whisper White craft ink pad over the raised parts to have them stand out a bit more.

  Next I stamped the tree wreath in Garden Green and cut it out with the matching die as well as another one in Garden Green ink.  I layered them with the Garden Green one in the back and offset and popped it up on dimensionals.

  I stamped the sentiment from the Wishes All Around set in Smoky Slate onto Pool Party then cut it out with a Stylish Shapes circle die.  I added a length of the new white iridescent ribbon behind it and also popped it on dimensionals.  

  Using the individual snowflake dies from the set I cut 3 out of Textured Shimmer paper and added them to the card front with a retired Pool Party gem in the center.

  All of the current product used to make this card can be purchased in my ONLINE STORE.  Items below marked with a * will be available for purchase on September 6, 2023.

  Thanks for looking!  Did you stamp today?

Stamps: Wishes All Around*

Ink: Craft white, Garden Green, Smoky Slate

Paper: Pool Party, Smoky Slate, Garden Green, Basic White, Textured Shimmer paper

Accessories: Wishes All Around dies*, Stylish Shapes dies, dimensionals, White Iridescent ribbon*, Pool Party gems (retired)


Tuesday, August 22, 2023

Falling Leaves Thanks - Stampin' Up! Autumn Leaves Bundle

   I found some fantastic inspiration for my card today over at Global Design Project with their "CASE the Designer" theme.  We're to case the card shown which was made by Emma Goddard.  Her card is an adorable floral card in a straightforward layout.  I took the larger, popped up letters for the sentiment as well as the images behind the sentiment for my inspiration but made it a fall card.


  I went with a little bit of a non-traditional fall color combo but I think it works!  I started with a Very Vanilla thick card base then topped it with a panel of Petal Pink.  

  Using the smaller leaf dies from the Autumn Leaves die set I cut a variety in different papers and shapes.  I used Calypso Coral, Old Olive, Very Vanilla and Oxidized Copper Specialty paper.  I adhered them to the background panel similar to the inspiration card and then trimmed off any overhang.  The smaller sizes of some of the leaves in this die set are great to have on hand for accents on lots of fall projects.  The Oxidized Copper Specialty paper is just gorgeous and on a more simple looking card like this the pop of metallic is a perfect accent.

  The letters are made with Basic Black cardstock layered onto a foam adhesive sheet and the Alphabet a la Mode dies.  I took my time lining them up on the card front before finally adhering them and I think I got them mostly even!

  The final bit to this card is the smaller sentiment from the Autumn Leaves stamp set stamped on Very Vanilla in Memento Black and popped on dimensionals.

  All of the current items used to make this card can be purchased in my ONLINE STORE. Items marked with * are available for purchase starting September 6, 2023.

  Thanks for looking!  Did you stamp today?

Stamps: Autumn Leaves*

Ink: Memento Black

Paper: Very Vanilla thick, Petal Pink, Calypso Coral, Old Olive, Very Vanilla, Oxidized Copper Specialty paper*

Accessories: Autumn Leaves dies, foam adhesive sheets, Alphabet a la Mode dies, dimensionals


Monday, August 21, 2023

Festive Giraffe - Stampin' Up! Festive & Fun

   Christmas stamping might not be in full swing just yet but I am definitely getting more than just my toes wet!  The Christmas products that I ordered in the demonstrator pre-order have been really fun to create with and the Festive & Fun stamp set is no exception.  The adorable animal images are perfect for those light and fun Christmas card designs.


  I used a now closed Christmas Challenge from 52 Christmas Card Throwdown for the layout inspiration.  This is a fantastic challenge site that gets you stamping all year round for Christmas so (theoretically) you don't have a mad scramble in December.  The long skinny panel on the righthand side was perfect for the tall giraffe!

  I started this one with a classic Real Red base, then I added 3 panels of Textured Shimmer paper in Shaded Spruce for a nice subtle effect.

  Next the giraffe is stamped in Memento black and then colored in with Blends markers and some accents of gold with a Wink of Stella.

  The sentiment is stamped in Real Red and cut into a skinny banner.  A bit of retired gold twine is added to one side before popping the banner on dimensionals.  A few gold sequins are added to complete the details.

  All of the current products used to make this card can be purchased in my ONLINE STORE. Items below marked with a * will be available for ordering on September 6.

  Thanks for looking!  Did you stamp today?

Stamps: Festive & Fun*

Ink: Memento Black, Real Red

Blends: Daffosil Delight light & dark, Bronze, Pecan Pie light, Old Olive light & dark, Real Red dark, Shaded Spruce light & dark, Crumb Cake light

Paper: Real Red, Textured Shimmer paper, Basic White

Accessories: Wink of Stella gold, gold sequins, dimensionals, gold twine (retired)