Friday, March 31, 2023

Blended Ink Note - Stampin' Up! Conversation Bubbles

   When I was designing for my last class I wanted to show off the Conversation Bubbles bundle but I wanted to make a card that didn't just use it as an add on to another stamp set by using the just one or 2 parts of the bundle.  After trying a few ideas this is the card my stampers ended up making.


  I love the colors that I landed on for this design!  Coastal Cabana, Polished Pink and Daffodil Delight.  Such happy colors and in the places where they overlap you get a little bit of a rainbow effect.  The colors reminded me of cotton candy or fun unicorn graphics I've seen.

  This is such an easy card to make and ends up so cute.  First it starts with a Coastal Cabana card base, then a layer of Basic White on which we blended our three colors with Blending Brushes making sure to not make the spots of color too big so that all the colors could show.

  Using another panel of Basic White the same dimensions as the blended panel the conversation bubbles were die cut.  I created a template for my stampers to use so they just needed to place the dies in the template openings.  This was a benefit because they didn't have to fuss around to figure out the best placement and the template also helped hold the dies in place so they didn't get pulled out of position with the magnetic base plate we were using.  I would definitely suggest using a template if you're going to be making multiples of the same design; it really makes the process so much quicker.  You'll end up with a lot of word bubbles that aren't needed for this design but save them to use on another project.

  Once the panel is die cut lay it over your blended panel (without adhering it!) to stamp the sentiment for perfect placement.  Next, a conversation bubble is then cut from a bit of Polished Pink.  Turn the cut out panel to the back side, add the Polished Pink bubble into the opening so the back side is up also.  Now add some dimensionals all around the Polished Pink bubble to hold it in place.  Add more dimensionals to the rest of the panel and adhere to the blended panel.

  A few embellishments in the way of Coastal Cabana twine, Iridescent Rhinestones and a heart and star die cut add the finishing touches.

  To purchase the supplies to make this card you can visit my ONLINE STORE

  Thanks for looking! Did you stamp today?

Stamps: Conversation Bubbles

Ink: Coastal Cabana, Polished Pink, Daffodil Delight, Memento Black

Paper: Basic White, Coastal Cabana, Polished Pink, Daffodil Delight 

Accessories: Conversation Bubbles dies, dimensionals, Three Twine combo pack, Iridescent Rhinestones

Thursday, March 30, 2023

Pop & Flip Turtle - Stampin' Up! Playing in the Rain **VIDEO TUTORIAL**

 My card today is a really fun card that my stampers made at class this week.  I'm always on the lookout for fun folds or fancy folds that are not overly complicated.  When you're in a class setting with multiple people working on the same project you've got to balance time, supplies, reproducibility and cuteness (of course!).  This one hits all the marks.  It's called the Pop & Flip card but there might be other names for it as well.


  We used the great Regency Park DSP and the Playing in the Rain turtle to bring this one together.  See how the circle folds in when you open the card!  It's so cute!


  I've made a quick video showing how to put this card together including all the measurements for the pop & flip mechanism which is really easy!  Watch the video and see for yourself.


   Some quick measurements if you want to make the card along with the video:

Card base: standard A2 (8.5" x 5.5")  folded in the center

DSP: 4" x 5.25"

Insert: 3" x 5.25"

Pop & Flip Piece 1: 3" x 4" - score at 1", 2" and 3"

Pop & Flip Piece 2: 3/4" x 2.25" - score at 1"

Turtle Circle - scrap piece of basic white about 3" x 3" & Stylish Shape circle die (2nd largest)

   I hope you have fun learning how to make this card!  My stampers certainly did!

  If you'd like to purchase supplies to make this card visit my ONLINE STORE.

  Thanks for looking!  Did you stamp today?

Stamps: Playing in the Rain

Ink: Memento Black

Blends: Shaded Spruce light & dark, Daffodil Delight light & dark, Petal Pink light & dark

Paper: Night of Navy, Basic White, Regency Park DSP

Accessories: Stylish Shapes dies, Tear & Tape adhesive, Adhesive-backed Milky Dots, Night of Navy Bordered ribbon


Wednesday, March 29, 2023

I Love You Hearts - Stampin' Up! Country Bouquet

   The Country Bouquet punch has been out of stock for quite a while but it's back in the online store now!  The bundle is great for all your heart stamping needs!  They aren't just for Valentine's day people.  You can add hearts to cards all year round.

  I made this card a while back and I think I will be using it for my husband for our anniversary this year.  I like the soft understated colors and the gold embossing bring a nice bit shine.


  The card base is Basic White thick, then a layer of Basic White embossed with the retired Pinewood Planks embossing folder.

  I used Blushing Bride, Basic White and Pool Party to emboss gold hearts and then punched them out with the Country Bouquet punch.  I arranged them in a cascade down the front of the card with a few getting popped with dimensionals.

  I stamped and embossed the sentiments then used the Stylish Shapes dies to cut the banner shapes.  Those are then popped on dimensionals as well.

  The final embellishment is a Blushing Bride baker's twine bow right above the "I love you".

  All of the current products used on this card can be purchased in my ONLINE STORE.

  Thanks for looking!  Did you stamp today?

Stamps: Country Bouquet

Ink: Versamark

Paper: Basic White thick, Basic White, Blushing Bride, Pool Party

Accessories: Country Bouquet punch, gold embossing powder, Stylish Shapes dies, dimensionals, baker's twine, Pinewood Planks embossing folder (retired)

Monday, March 27, 2023

Garden Butterflies - Stampin' Up! Butterfly Brilliance

   I spent most of my weekend stamping time designing and prepping for a class on Tuesday (you'll get to see those projects later in the week!) but before I jumped into all that I used the Seize the Birthday challenge to make a card.  Their theme this week is "Things in a Garden".  After scanning my stamp sets I had a lot of flowers I could have used but decided to go with butterflies as I hadn't used the Butterfly Brilliance set in a really long time.


  I started this card with a gold embossed butterfly Night of Navy panel as the background for nice wow factor.  Next I stamped a few of the smaller butterflies in Night Navy ink and colored them in with a variety of Blends markers.  Then they were die cut and I adhered them with dimensionals around an elegant birthday sentiment from the Go To Greeting stamp set.  I added a few Iridescent Rhinestones around the sentiment.

 All supplies are available in my ONLINE Store if you'd like to re-create this card.

  Thanks for looking!  Did you stamp today?

Stamps: Butterfly Brilliance, Go To Greetings

Ink: Versamark, Night of Navy

Blends: Calypso Coral light, Petal Pink light & dark, Daffodil Delight light & dark, Melon mambo light, Pumpkin Pie light

Paper: Night of Navy, Basic White, Petal Pink

Accessories: gold embossing powder, Brilliant Wings dies, dimensionals, Iridescent Rhinestones


Friday, March 24, 2023

Mountain Camping - Stampin' Up! Greatest Journey Dies

 It's time to go camping!!  No, not really....I'm not a big fan of camping.  I love the outdoors and hiking and being in the woods but the whole logistics of packing everything and planning for food etc. is too much trouble when you can just rent a cabin and get to do all the fun outdoors stuff and still have running water and a refrigerator right there.  So all you campers go crazy but after doing it a number of times I just don't think it's for me!  

  But I'll make a camping card for sure!  I'm using The Color Hues challenge for my palette.  They got us using Blue and Turquoise.  I choose to use Night of Navy and Bermuda Bay and Coastal Cabana to create this scene.


  I started with a Night of Navy base then added a piece of Enjoy the Journey DSP in a fun night sky pattern.  The color listed for this is Starry Sky but Night of Navy definitely matches better.  Using the mountain/hill die in the Greatest Journey die set I cut a mountain peak in Night of Navy and then blended some of the same color ink onto the edge to darken it even more.  I colored the edge with Clear Wink of Stella for some nighttime sparkle.

  I positioned the mountain inside a Basic White frame made with the Stitched Rectangle dies.  I added a Basic White moon also colored with Wink of Stella.

  For the hiker I cut 2, one each in Bermuda Bay and Coastal Cabana and then trimmed the backpack and lantern from the Coastal Cabana hiker and glued them to the Bermuda Bay hiker.  I also added a tiny piece of Basic White on the backside of the lantern so it appears lit.  The lantern has more Wink of Stella. Both the tent and hiker are popped on dimensionals.

  I left a sentiment off the card front as I didn't want to cover up any of the elements and I liked the balance and didn't want to throw that off.  I added a happy birthday sentiment on the inside.

  All of the items used for this card can be found in my ONLINE STORE.

  Thanks for looking!  Did you stamp today?

Stamps: none

Ink: Night of Navy

Paper: Night of Navy, Basic White, Coastal Cabana, Bermuda Bay, Enjoy the Journey DSP

Accessories: Enjoy the Journey dies, Stitched Rectangle dies, Wink of Stella, dimensionals


Thursday, March 23, 2023

Pastel Park - Stampin' Up! Sentimental Park

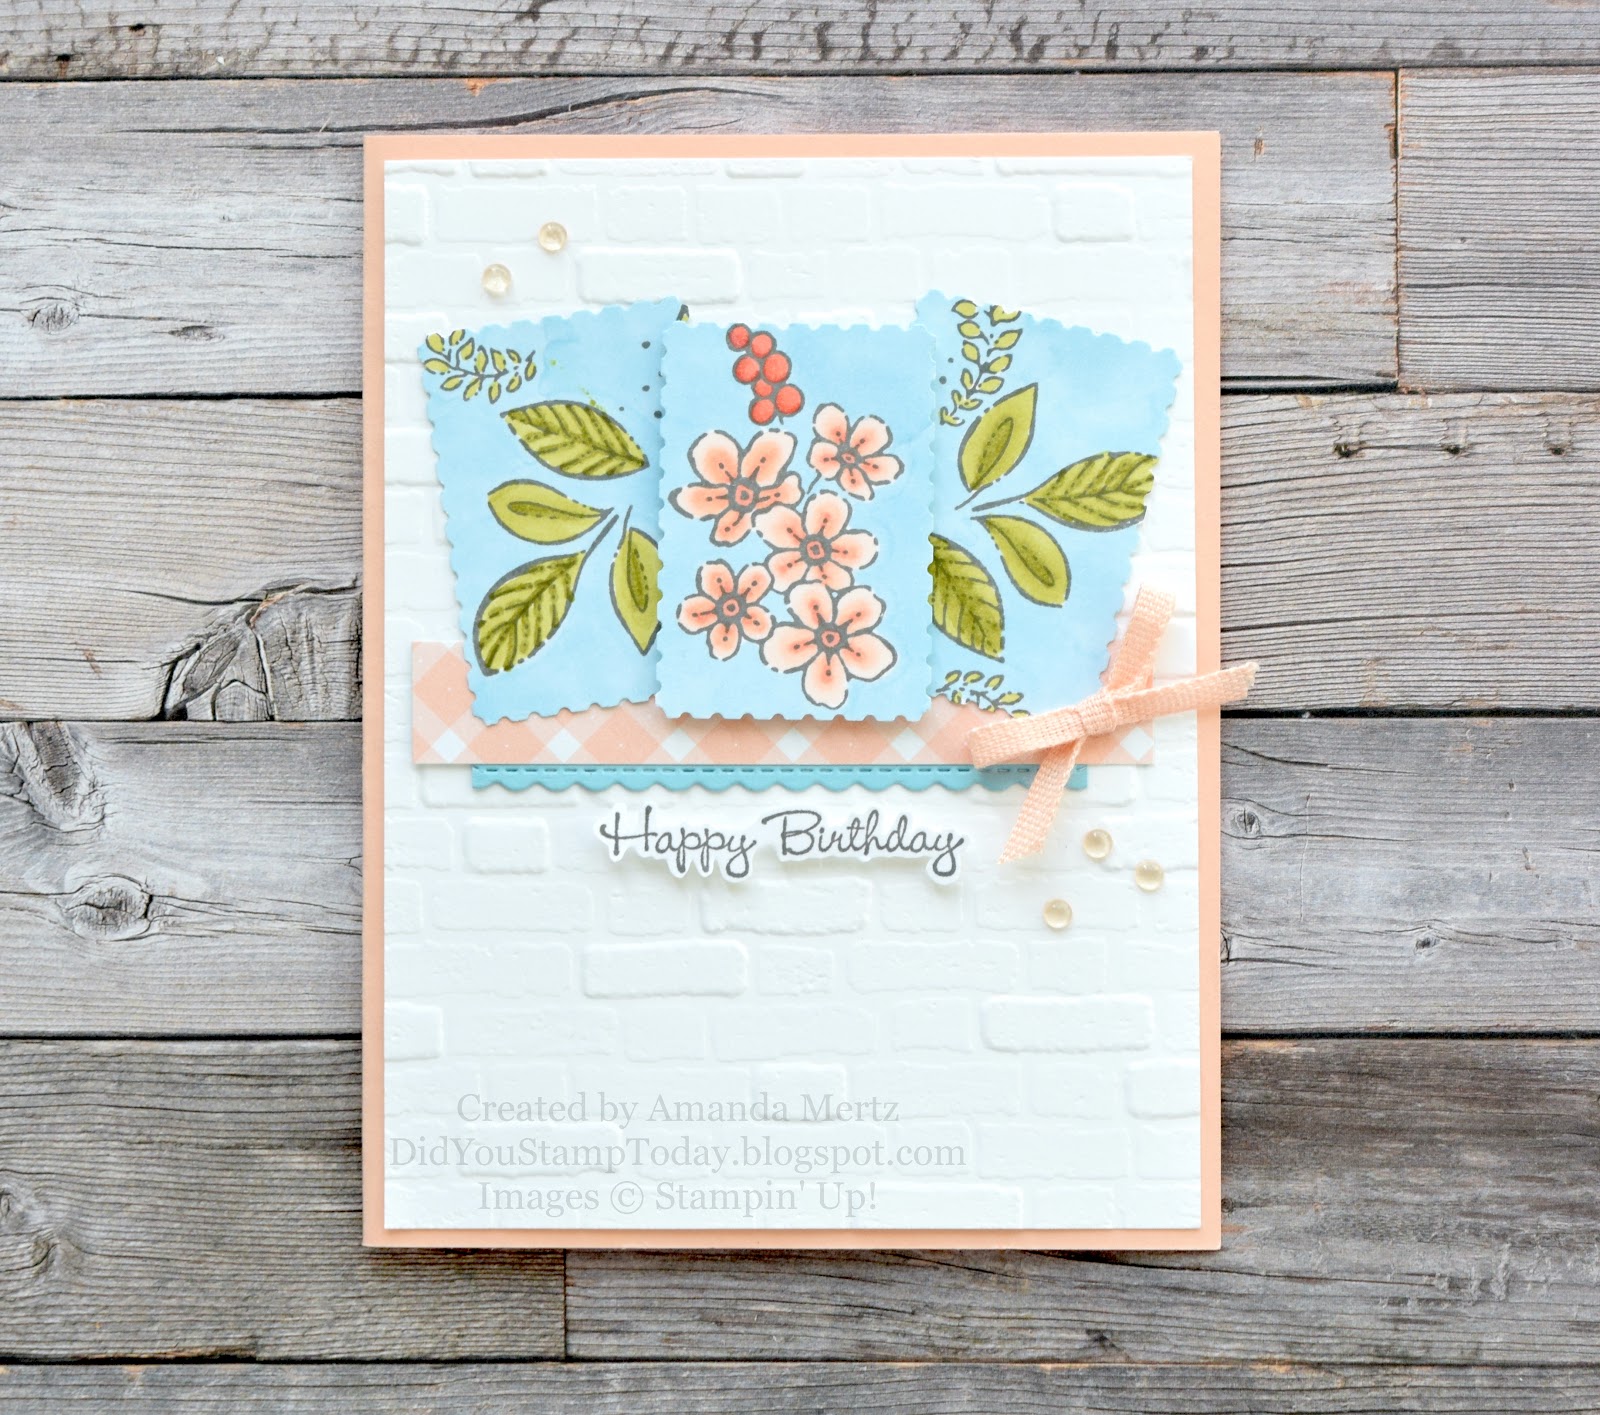
   I just keep finding different ways to use the Regency park suite.  For my card today I took inspiration from the Global Design Project layout and paired it with the Sentimental Park stamp set.  I just used a few of the images to make the stamped panels but I think it turned out so cute!


  I started with a Petal Pink card base then topped it with a piece of Basic White embossed with the Brick & Mortar embossing folder which I had in my orphaned card parts basket.  

  Next, I stamped the leaves and flower images on Basic White with Basic Gray ink and then punched them out with the Rectangular Postage punch. I used Blends markers to color the images including filling in the open space around them with Balmy Blue light.

  I arranged the flowers and leaves over a strip of Country Gingham DSP and little strip of scalloped edging made with the Basic Borders dies.  The flower panel is popped up on dimensionals in the center.

  Happy Birthday from Go To Greetings is stamped in Basic Gray then fussy cut and added under the images to follow the sketch.  A narrow grosgrain bow in Petal Pink as well as some Polished Dots complete the look.

  If you'd like to recreate this card the supplies are listed below and current items can be purchased in my ONLINE STORE

  Thanks for looking!  Did you stamp today?

Stamps: Sentimental Park, Go To Greetings 

Ink: Basic Gray

Blends: Balmy Blue light, Old Olive light & dark, Petal Pink light & dark, Calypso Coral light & dark

Paper: Petal Pink, Basic White, Country Gingham DSP, Balmy Blue

Accessories: Brick & Mortar embossing folder, Basic Borders dies, Rectangular Postage punch, dimensionals, Polished Dots, Petal Pink ribbon (retired)


Wednesday, March 22, 2023

Spring Rain - Stampin' Up! Playing in the Rain

   I've a "spring is on the way" card today!  The Playing in the Rain bundle is just so cute with the adorable animals and all the "accessories" dies to create sweet scenes.  I ended up not using any of the dies on this card and just focused on the fox taking his little walk in a spring rain storm.


  I love these colors as a change from spring pastels; these are bright colors but the white keeps them from overpowering the image.

  The card starts first with a panel of Basic White embossed with the Raindrops embossing folder.  then I used my Balmy Blue light Blends marker to color each raindrop. Be careful here as the paper absorbs the ink very quickly and can easily spread further than than the embossed bit.  I just lightly touched the brush tip to the embossing and that's all that I needed to get them colored.

  After adhering the embossed panel to the the card front I die cut some Stylish Shapes circles in Daffodil Delight, Sweet Sorbet and Balmy Blue and added them to opposite corners.

  Next I stamped the fox in Memento black on Basic White and colored him with Blends markers then cut him out with a larger Stylish Shapes circle die.  The big circle is popped on dimensionals in the center of the card overlapping the smaller circles slightly.

  The sentiment is stamped and fussy cut and popped up in the corner.  I highlighted it with a single Sweet Sorbet Matte Decorative Dot to continue to draw the eye all the way down the card on the diagonal.

  Definitely check out the Playing in the Rain bundle if you're in the mood for some cute animal scenes for your spring cards!  If you're looking for a Stampin' Up! demonstrator I'm happy to help you out!  To shop my online store click on the shopping bag in my sidebar or HERE

  Thanks for looking!  Did you stamp today?

Stamps: Playing in the Rain

Ink: Memento Black

Blends: Balmy Blue light, Sweet Sorbet light & dark, Daffodil Delight light & dark, Cajun Craze light & dark

Paper: Basic White, Sweet Sorbet, Balmy Blue, Daffodil Delight

Accessories: Raindrops embossing folder, Stylish Shapes dies, dimensionals, Matte Decorative Dots

Tuesday, March 21, 2023

Birthday Stripes - Stampin' Up! Greatest Journey

   For this week's Testosterone Tuesday card (aka A Guy Card!) I've got a really easy design that can be adapted to lots of color combos and themes depending on the guy you're designing for.  For my colors I was inspired by the mood board over at Just Us Girls Challenge.  I loved the photo with the green and yellow crayons laid out in a striped pattern and used that in paper form to make the background of my card.


  I pulled out all of my greens and a few yellows and played around for a few minutes to see which ones played nicely together.  I put away a few greens that just didn't jive and then got to work.  I dug through my scraps of each color and pulled out 1/2" wide pieces and then just began tearing them at different lengths and then adhering them to the card front repeating the pattern until I covered the whole edge. So not only do you end up with a cool guy card but you can feel virtuous by using up some smaller scraps!

  This color grouping made me think of summer with all the trees and other plants being green so I stamped a set of trees from Greatest Journey in Garden Green and then added them to a Stylish Shapes circle embossed with the birthday greeting from Best Day stamp set.  A quick change of sentiment and this would make a great Father's Day card as well. Both pieces are popped on dimensionals onto the card front.

  I added a few retired candy dots and a bakers twine bow to finish up the details.  I think this will be a great birthday card for the summer months for a guy who loves the outdoors.  And after finishing this design it really made me think of a vintage 70s t-shirt; you know the ones with the stripes across the chest?  Anyway.....it was a fun challenge and now my guy birthday card stash is plus one!

  Thanks for looking!  Did you stamp today?

Stamps: Best Day, Greatest Journey

Ink: Versamark, Garden Green

Paper: Basic White thick, Basic White, Mossy Meadow, Old Olive, Pear Pizzazz, Granny Apple Green, Garden Green, Crushed Curry, Daffodil Delight

Accessories: Stylish Shapes dies, Greatest Journey dies, dimensionals, Black embossing powder, candy dots (retired), baker's twine (retired)