Thursday, December 30, 2010

Christmas Shadow Box Class - The finished projects

  About a week and a half before Christmas I held my Christmas Shadow Box class.  Here is the sample that I made to show my stamping ladies.  I had 3 ladies sign up for the class and it was so nice to get to sit and chat with them while they made their shadow boxes.  This is a pretty easy project and would make a great gift for next year---it's never too early to start planning for next Christmas is it??  I've already told myself that I'm going to make 10 Christmas cards each month starting in January so I'll be all ready once December rolls around.  We'll see if I can stick to it---you guys will have to keep me accountable!

  Anyway, back to the boxes...2 of my stamping ladies hadn't worked with Decor Elements before so they were a bit wary but they did fantastic and their frames looked great.  I took a photo of each completed project and it was so fun to see how different they all were depending on the paper and ribbon they choose.  I apologize for the poor photo quality...the dim lighting and the glass made for a tough setting.  It's hard to see but on the Very Vanilla cardstock there are a bunch of snowflakes punched out and adhered making it look almost embossed.
  
Liz & her frame
Beth & her frame    
Camera shy Sheila's frame
  I'm looking forward to stamping in 2011 with all of my stamping ladies.  I have 2 hostess club spots still available so if you're in the Richmond area and are interested in joining our group and earning hostess benefits just let me know and I'll give you all the details.

  Happy Stamping & Happy New Year!

Stamps: none

Ink: None


Paper: Assorted Jolly Holiday DSP, Textured Very Vanilla, Old Olive, Very Vanilla


Accessories:  Satin ribbon, tinsel trim, Snowflake punch, Perfect Polka Dot embossing folder, seam binding ribbon, Decor Elements, 12x12 shadow box frame (non-SU), bells (non-SU)
 

Thursday, December 23, 2010

Serene Clean & Simple

  Just a quick post today, I've got my parents and brother arriving for Christmas so I won't have much time to get on the computer after today.  Hopefully everyone has a wonderful Christmas.  Here is a card I did at a little mini workshop over Thanksgiving weekend.  My sister-in-law to be (someday!) was interested in learning more about stamping so I brought down a few projects to teach her the basics.  We also talked my husbands step-mother into joining us.  I think she was skeptical at first but she really seemed to enjoy herself.

  I wanted to keep it simple since they had never stamped before.  Boy was that hard....I kept wanting to add stuff and do techniques etc.  I did have to hold back on bringing the Dazzling Diamonds since I didn't think my in-laws would appreciate the sparkle all over their house after we left! I think this card came out cute even if there isn't a lot of "stuff" going on.


   I hope you all have an awesome Christmas!!


Stamps: Serene Snowflakes, Four the Holidays

Ink: Baja Breeze


Paper: Whisper White, Real Red


Accessories: paper piercer, piercing mat, rhinestone jewel

Friday, December 17, 2010

Card Display Garland

  Last year as I was taking down my Christmas card holder (just a wire form in the shape of an angel) I felt that there had to be a better way to display the hand stamped cards that I had received throughout Christmas.  They were all tucked into the wire angel with the other greeting & photo cards and no one could see them well enough to appreciated the time and talent that went into making them.  They kind of got lost in the Christmas greeting mess that is my card holder.  Since I send out a good number of hand stamped cards every Christmas I know that it takes time to design, stamp, write out and mail all those cards.  I wanted a way to showcase those little works of art that stamping friends have taken the time to make and mail to me.  So last January I ordered a roll of the wide striped Old Olive grosgrain ribbon and a pack of the library clips (they retired in July but you can still buy them from the Clearance Rack) to see what I could come up with for a better card display.  They have been sitting in my stamp room waiting to be called into action ever since.


  I finally found time this afternoon to put my plan into action!  This old leaded glass frame is in my front entry way above an old church pew.  See the Decor Element behind it?  Anyway I decided to make a card display garland so all the beautiful hand stamped cards are on display for all to enjoy.  It is also up high enough that I think my grubby handed little boys won't mess with it.  Aren't these cards great?  I've got great stamping friends!  I get a big smile on my face every time I walk through the entry way to get to the stairs!

  All I did was use thumbtacks to hold my ribbon in place and draped it across the frame.  I have a tack on each corner and then one in the middle.  Then I got out my EZ bow maker (non-Stampin' Up) to make the bow in the center.  I used floral wire to hold the bow together and to wrap around the center tack to keep it in place.

  So now onto to the clips to hold the cards on the garland.  I pulled out all the white clips (I still have a lot of Old Olive & Chocolate Chip clips if I end up needing more) and my Cherry Cobbler seam binding.  I thought some cute little fork bows would do the trick.  See my Fork Bow tutorial for a how to!  It took no time at all to make 8 bows.
  Now I had to adhere the the bow to the clip.  This is where I ran into a little bump....At first I thought a glue dot would do the trick...Nope.  The glue dot would not stick to the clip.  Then I decided to try a little piece of Sticky Strip....Nope.  The Sticky Strip wouldn't stick either.  Huh.  Sticky Strip always sticks to everything, even things you don't want it to stick to. 

  On to the big guns...Glue Gun that is!  That didn't work either if you can believe it!  I finally decided that the clips had such a smooth finish the adhesives had nothing to grip to.  Out to the garage for some sandpaper.  I roughed up the finish a little and the glue gun worked perfectly after that.

  All in all, even with the adhesive problems this project only took me about 30 minuted to complete.  I'm thinking that this would look really cute around a wide doorway (if you didn't have grubby handed little boys like me!)--maybe someday I can shoot for that!

  Thanks for looking!  Happy Decorating!

Supplies: Old Olive 1 1/4" Striped Grosgrain ribbon,  1/2" Library Clips (still available on the Clearance Rack!), Cherry Cobbler seam binding ribbon, glue gun, thumb tacks

Sunday, December 12, 2010

I've been stamping---I promise!!

  It has just been so busy around here with getting ready for Christmas that I haven't had much time to post here on Did You Stamp Today?  But I have been stamping; I just finished addressing about 80 hand stamped Christmas cards that will go out in the mail tomorrow.  I have 4 cards left to make for teacher gifts and then I think I can stamp for fun again...Though my husband decided that now is a great time to work on my stamp room.  Yesterday he painted it and today he put up crown molding.  Next on his list is to build a custom desk and bookshelf for me.  He has grand plans that it will all be finished in time for Christmas since this is my Christmas present (awesome isn't it??!! I can't wait!!).  I have my doubts about that but for right now my entire stamp room is boxed up, piled up and in total disarray in the spare room.   Regardless, it will all have to be moved back even if the desk and bookshelf aren't finished yet because that is where my in-laws will be sleeping when they come visit the day after Christmas.  I doubt they want to cuddle in bed with my paper trimmer & Big Shot!

  Anyway, on to a card I made a few weeks ago using Color Challenge 298 at Splitcoaststampers.


 The challenge was to use Chocolate Chip, Cherry Cobbler and Crumb Cake (formerly Kraft).  What a yummy combo isn't it?  Makes me think of digging into some tasty dessert!  I stamped the tall pine tree from the classic set Lovely As A Tree in Chocolate Chip onto Very Vanilla.  I layered Cherry Cobbler and Chocolate Chip cardstock behind it.  You can't really see it but there is some sparkle on the pine tree.  I used my Versamarker to highlight the branches and then I embossed with Iridescent Ice embossing powder.  It looks cool like snow or ice....and it stays put.  On the corner of the tree panel I threaded some Chery Cobbler seam binding through a large button and wrapped it around the corner adhering the ends of the seam binding to the back.

  For the base I used Crumb Cake cardstock and stamped the largest snowflake from Serene Snowflakes in Crumb Cake ink.  The "Peace on Earth" sentiment is stamped right over the top of the snowflake in Chocolate Chip ink.

  Thanks for looking!  Happy Stamping!

Stamps: Lovely As A Tree, Serene Snowflakes, Four the Holidays

Ink: Chocolate Chip, Crumb Cake


Paper: Crumb Cake, Chocolate Chip, Cherry Cobbler, Very Vanilla

Accessories: Versamarker,  Iridescent Ice embossing powder, button, seam binding

Wednesday, December 1, 2010

Stamping Two Days in a Row! Yellow Dog Thanks!

  This morning before leaving the house to take my oldest to school I checked out the sketch challenge on Splitcoastampers so that I could mull it over throughout the day and if I had time to get in the stamp room I would have a head start on some ideas.  I actually did make it into the stamp room though I was accompanied by my 4 year old so any design I wanted to get started on took quite a bit longer than if I was working alone.  Ryan loves being in the stamp room with me since he gets to play with some of my tools (I did have to draw the line at letting him use the Big Shot today---I just couldn't bring myself to go that far!).  He has a cardboard box that my Stampin' Up orders arrive in and he's got stickers, markers, a gluestick, ribbon scraps and construction paper and he goes to town decorating it.  He loves my punches and had a grand time with the Decorative Label punch today.  He's also quite the master with the crimper! 

  Anyway back to the challenge card for today.  I had gotten the D is for Dog stamp set as one of my Sale-A-Bration freebies last year and believe it or not I didn't even have it mounted yet!  High time to get this set inked up wouldn't you say??  I also still have some of the Sale-A-Bration Welcome Neighbor DSP and I'm trying very hard not to hoard so that came out to play as well.

   The base is Very Vanilla and on top of that is a panel of Cajun Craze that is embossed with the Perfect Polka Dots embossing folder (kind of hard to see in the photo).  The tilted panels on this sketch kind of threw me off for a bit.  I'm a pretty straight, even, and balanced kind of stamper but the whole point of doing challenges is to step out of your comfort zone so I went to work on the "tilts". 

  The Welcome Neighbor DSP panel is distressed on the edges and crumpled a few times...in real life it looks really cool believe me!  For the yellow dog (shout out to all those yellow lab owners!) I stamped him in More Mustard pulling the color from the DSP stripes.  I gave him a bit of shadow around his feet so he wouldn't look like he was levitating.  Can you picture a goofy drooly lab hovering around your house?  Ha!  Anyway, I used my blender pen and the Sahara Sand Watercolor Wonder crayons, again pulling colors from the stripes.  I also sponged the edges with Sahara Sand.  I added some hardware with the vintage silver brads in each corner.  The whole dog panel is popped on dimensionals.

  Since I can't have too many Thank You cards on hand I decided to use the Thank You Kindly set and just inked up the "Thanks" with my Pacific Point marker.  It's hard to see but there is also a faint dog bone on the Thanks panel.  I inked up the bone with Sahara Sand, stamped off once, then stamped it right over the sentiment.  I punched the Thanks with the small oval punch and then layered the larger oval in Pacific Point behind it.  The sentiment is also popped up on dimensionals.  I thought this would be a great color combination for a masculine birthday card as well.

  Thanks for looking!  Happy Stamping!

Stamps: D is for Dog, Thank You Kindly

Ink: More Mustard, Sahara Sand, Pacific Point

Paper: Very Vanilla, Cajun Craze, Pacific Point, Welcome Neighbor DSP (retired- SAB)


Accessories: Perfect Polka Dot embossing folder, brads, oval punches, blender pen, Sahara Sand Watercolor crayon

Tuesday, November 30, 2010

Love this Christmas Truck & a Color Challenge

  I hardly every get to do a challenge on the same day it was issued but today I got lucky....the boys are at school for the morning....the errands I have to do aren't urgent (at least in my mind!)....and the laundry is under control so it was time to head to the stamp room.  I checked out the challenge for today over on Splitcoaststampers and it's a Color Challenge using Real Red, Old Olive & River Rock.  Of course Real Red & Old Olive are great Christmas colors and River Rock adds a bit of non-traditional into the mix. 

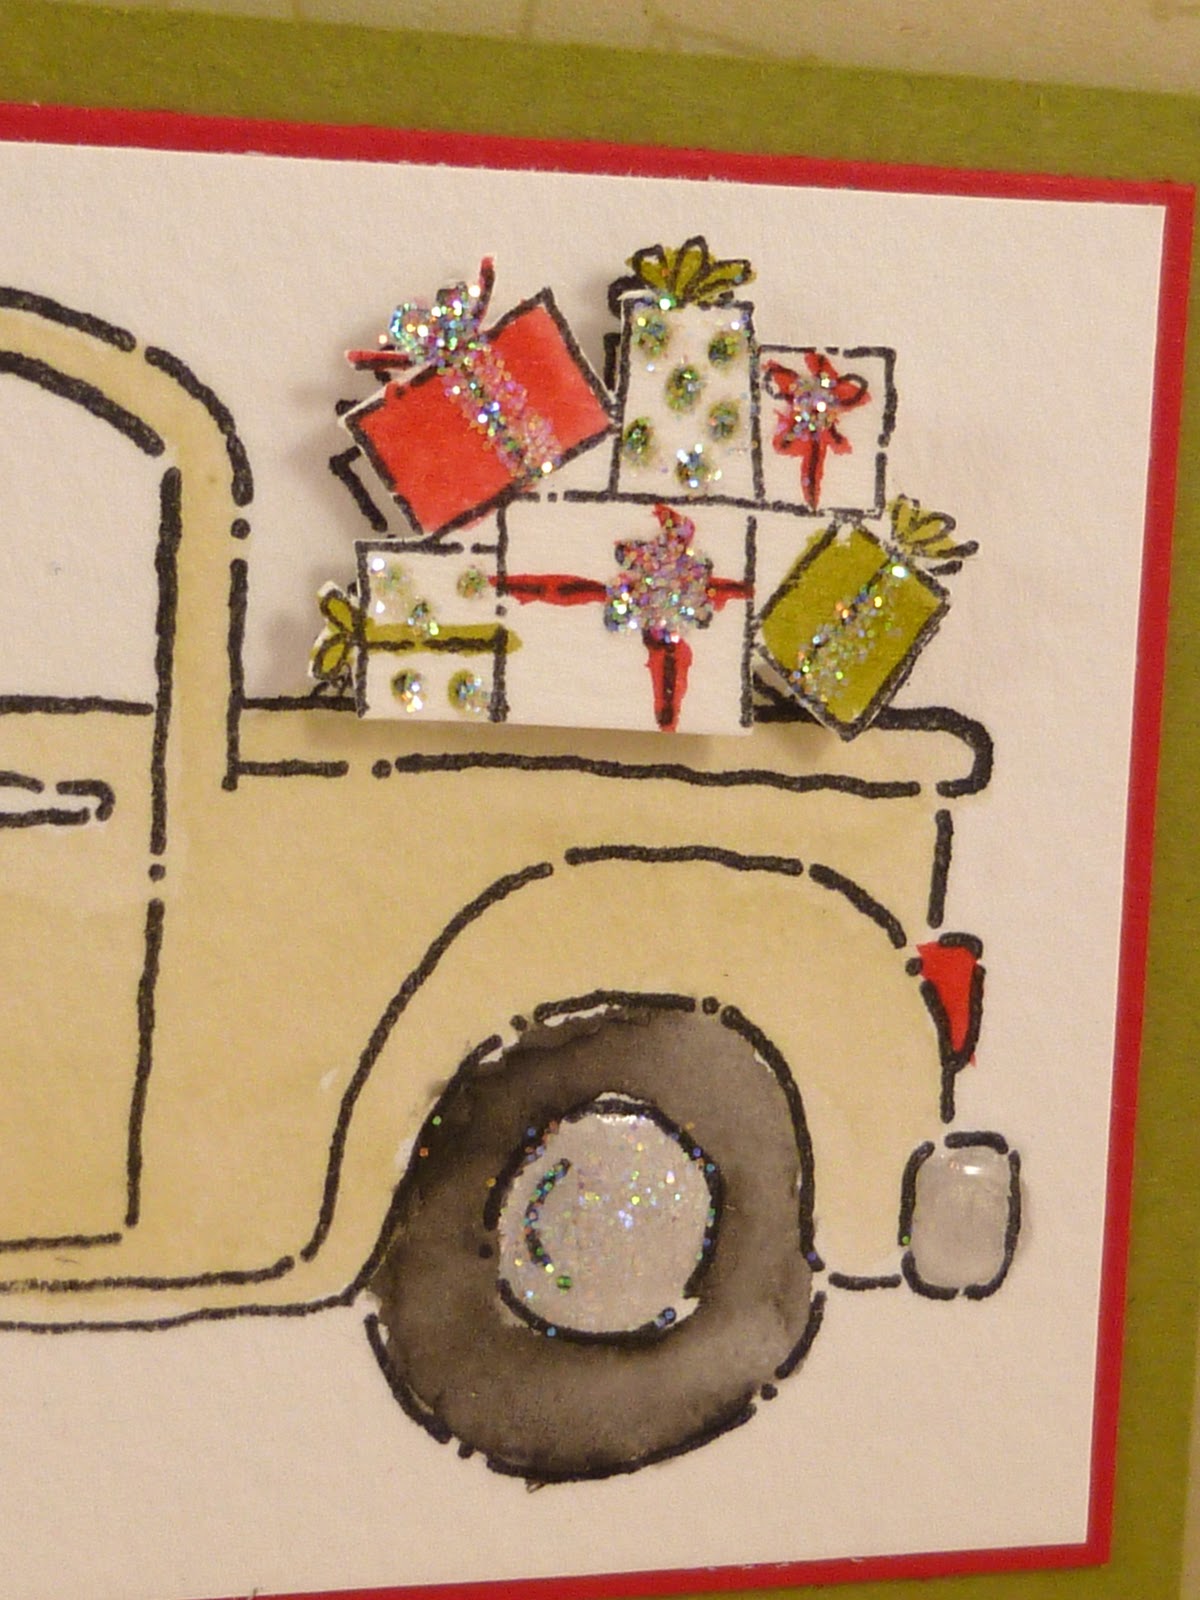
  I know this truck has been around forever but it's still super cute and fun to watercolor.  I watercolored the truck & gifts using my Aquapainter and ink pads with the ink smooshed onto the lid.  For the tires, rims & bumpers I used the Aquapainter and my black & gray Watercolor Wonder crayons.  (Side note: Stampin' Up! just announced that the Watercolor Wonder crayons with the new Color Renovation colors are available to order!!)  I cut out the gifts and used my 2 way glue pen to highlight parts of them and covered them with Dazzling Diamonds.  I used some Crystal Effects on the hubcaps and bumpers and also added a sprinkling of Dazzling Diamonds to the hubcaps.  Gotta add some bling for Christmas right? 

  I popped the gifts as well as the main image panel up with dimensionals.  I also had one of the little tiny library binder clips so I tied a bow with linen thread around it and added more sparkle with a rhinestone.

  For the card base I stamped some Simple Snowflakes in River Rock, added a leftover strip of Old Olive Sweet Pea DSP, a little bit of Real Red scallops and a length of Very Vanilla grosgrain.

  Head on over to Splitcoaststampers and play along with this color challenge.  I'd love to see what you all come up with!  I'm off to cut some cardstock in preparation to make my Christmas cards....I've got the design all set now I just need to get busy and stamp!

  Thanks for looking!  Happy Stamping!
 

Stamps: Loads of Love, Loads of Love Accessories, Simple Snowflake

Ink: Stazon, River Rock, Real Red, Old Olive

Paper: River Rock, Real Red, Old Olive, Sweet Pea DSP, watercolor paper


Accessories: Aquapainter, Watercolor Wonder crayons, Dazzling Diamonds, Crystal Effects, Scallop border punch, library clip, linen thread, rhinestone jewel, Very Vanilla grosgrain ribbon

Monday, November 29, 2010

Two Tags Thanksgiving Treat

  I just wanted to share a quick project that I did for Thanksgiving.  I made these super cute (if I do say so myself) and super fast place setting treat holders to bring to Thanksgiving dinner at my in-laws house.  Everyone seemed to like them---the kids cared more about the mini Hershey bars inside than the design though!


  I ran the Early Espresso cardstock through the Big Shot using the Two Tags die.  Then I used the Vintage Wallpaper embossing folder on the tag.  Since the embossing kind of hides the score line from the die I just made my own fold to fit the Hershey bar.  I added some Very Vanilla 5/8" satin ribbon---don't mind the More Mustard ink stain on the ribbon---lesson learned to close the ink pad after stamping or to clean off my stamping table so I can have more room!!

  For the name panel I punched some ovals using the 2" x 1 3/8" Extra Large oval punch.  I sponged the edges with Early Espresso.  I used one of the small flower/leaf stamps from Day of Gratitude for the image.  I thought the More Mustard was kind of dark on the first attempt so I decided to stamp off once before stamping on my oval for a more muted look.  I added the names with my Early Espresso Stampin' Write marker.  Done deal! 

  A few reminders:  The Online Extravaganza is ending tomorrow.  Check out all the great deals (some 50% off!!) at my online store (link on my sidebar).  Don't forget orders over $150 get free shipping.  Now is the time to tell your husband what you want for Christmas!

  Also, if you've ever thought about becoming a Stampin' Up demonstrator now is the time to sign up!  The AWESOME starter kit is only $87.50 ---half off the normal price.  You get a ton of great stamping products as well as the support of the whole Stampin' Up family!  No obligation to hold classes or workshops either--you can sign up just for the kit!  Contact me ASAP for more details.  This great deal also ends tomorrow (Nov. 30)

Stamps: Day of Gratitude

Ink: Early Espresso, More Mustard


Paper: Early Espresso, Very Vanilla

Accessories: Very Vanilla 5/8" Satin Ribbon, Two Tags die, Vintage Wallpaper embossing folder, Early Espresso Stampin' Write marker, mini Hershey bars

Saturday, November 27, 2010

Sweet Treat Snowman Ornament

  I hope everyone had a great Thanksgiving!  I know I ate more than I should have but it was all so yummy I couldn't say no!  I'm feeling a bit chubby like the little guy below! 

  Since my boys were born I like to make an ornament for them every Christmas so then when they are on their own they will have a small collection of ornaments for their own trees.  I decided to do double duty and create a project that my stamp club could make that could also be the ornament for my boys.  I also think it would be nice accent on a bottle of wine for a hostess gift for all those Christmas parties you go to.  You'll be sure to get the "You MADE this???" question! 


  It's kind of hard to see in the photo but the treat cup is filled with fake snow.  Some of my Stampin' Ladies added a bit of Dazzling Diamonds to the fake snow for some extra pop.  His scarf is made from Cherry Cobbler seam binding and his hat has a strip of champagne glass glitter.  The loop for hanging is just a bit of white embroidery floss.  The rosy cheeks are made with Regal Rose Watercolor  Wonder crayon & blender pen.

  Here are the instructions for putting this snowman together.  It's easier to do a visual than to type it up.  I have on the instructions that you need 2 of all the pieces because one set is for the backside so you have a nice neat & clean finished product. 

 
  Have fun making this Frosty, or Henry, as my friend named her Sweet Treat snowman!

Thanks for looking!  Happy Stamping!
Stamps: None

Ink: None

Paper: Basic Black, Whisper White, Pumpkin Pie, Soft Suede

Accessories: Circles #2 Big Shot die, 1 3/4" circle punch, Sweet Treat cup, snowflake punch, small star punch, owl punch, word window punch, small tag punch, watercolor wonder crayon, blender pen, white gel pen, seam binding ribbon, sticky strip, glass glitter, embroidery floss (non-SU)