Friday, February 26, 2010

Good Neighbors Magnetic Memo Clip - February Stamp Club


Here is yet another project using the Sweet Pea Designer Series paper--are you sick of me showing this yet?? =) This one is really easy and fun. I've seen similar flowers to this one on several blogs and in several different galleries but the one I loved most was from Becky Roberts' blog Inking Idaho. See her post here. She is super talented and I always LOVE everything she makes.

I had a whole package of clothespins that I bought for who knows what project (that never got made!) so I thought these clips would be fun to make into a fridge magnet to hold coupons or scrap paper for shopping lists and whatnot. I go through a lot of this type of paper since if I don't have it written down I don't remember it!

We punched out 6 scalloped circles from the Sweet Pea DSP pack and then crumpled and folded--Yes! Crumple and fold that paper all up! And then unfold and smooth it out and crumple again. Do this as many times as you want to get the soft worn look. For this sample I only crumpled once but the more you crumple the softer the edges of the paper become. Then stack your scalloped circles on top of each other and punch a hole in the centers either with the Crop-a-dile or a small hand held circle punch. Attach a jeweled brad through the hole to hold your circles together. Then crumple the top circle up around the brad and continue to do that to the other 5 layers until they fluff up how you'd like them to be.

The front of the clothespin is covered in a small scrap of DSP. This one is about 3/8" wide and
3 1/3" long. It is adhered using SNAIL. The flower is attached to the clothespin using a few glue dots. The magnets are small pieces snipped from a larger roll. There is already adhesive on the magnets so they are just pressed to the back of the clothespin.

For the memo paper I just cut strips of regular old copy paper because we all know that we're not going to waste good cardstock to write down the grocery list! This inferior (!) paper was stamped with the new Sale-A-Bration set Good Neighbors to match the colors in the DSP. I apologize for my photographs....the glare from the fridge, the 1.5 year old tugging on my leg while taking the picture and my camera were all working against me getting a decent shot of the whole memo clip & paper. But I'm sure you get the idea!


I thought that not only would this make a cool project to keep for oneself but would be a nice "Welcome to the Neighborhood" gift for a new neighbor. You could include your phone number, the local take out food places, and any other numbers that a new neighbor might need when they join a neighborhood.

Stamps: Good Neighbor

Ink: So Saffron, Old Olive, Taken With Teal

Paper: Sweet Pea Designer Series Paper pack, copier paper

Accessories: circle scallop punch, jeweled brad, clothespin, glue dots, self-adhesive magnet strip

Wednesday, February 24, 2010

Vintage Vogue Easel Card - February Stamp Club


I've been seeing a lot of these cards over on Splitcoaststampers and decided I wanted to learn how to make them so I could teach my stamp club this month. This type of card is so much easier than it looks. Just a few score lines and some adhesive and there you have it. Check out the great tutorial for Easel Cards here on Splitcoaststampers.

Once I figured out how to make the base for the Easel Card it was time to play and get something that was "display worthy" for the front of the card. This is a great technique for cards that have cute scenes or gorgeous watercoloring that you want to show off on your desk or on a shelf. Easel cards would be awesome for that person who saves every card you send them and displays them around the house....they can have these cuties propped up everywhere. I think my stamp club was pleasantly surprised also by how easy it was to make.

I chose to use the new Vintage Vogue set (Ocassions Mini) for this one since I thought the images would go well with the spring feel of the colors. I stamped the long border stamp around each of the 4 sides of my Whisper White cardstock (this piece of cardstock is 3.75" x 3.75") in Perfect Plum ink. I also did the "Friends" in Perfect Plum. I accented with the vine stamp in Pale Plum and then added a few flowers stamped in Barely Banana. One of the flowers on the front is popped up on a dimensional and then one is popped up on the base. The Pale Plum base/stand is accented with the new Scallop Trim border punch (Free Sale-A-Bration item) and more vines stamped in Pale Plum.

The final card measures 4.25" x 4.25" and fits into a regular A2 sized envelope when folded down. No need for a special square envie or extra postage.

Stamps: Vintage Vogue (Mini)

Ink: Perfect Plum, Pale Plum, Barely Banana

Cardstock: Whisper White, Perfect Plum, Pale Plum, Barely Banana

Accessories: ticket corner punch, Scallop Trim border punch (SAB), dimensionals

Monday, February 22, 2010

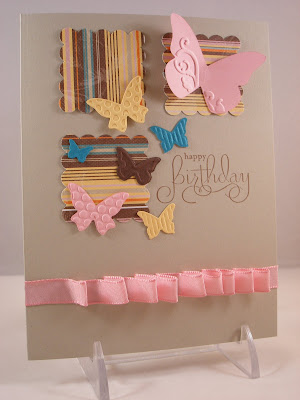
Beautiful Wings Happy Birthday


I'm having more fun with the new goodies from the Occasions Mini. I can't say enough good things about the Sweet Pea Designer Series Paper Pack....I've done a lot of projects using various designs and I still have so many left. I'm going to be sad when this one is gone but I hope Stampin' Up continues to do these large packs of paper in the future; there is certainly less hoarding when you know you have 48 sheets to use!

This card is fairly simple as far as layout and stamping but it has a lot of embellishments to make it pop. First I punched out 3 scalloped squares from the Sweet Pea DSP and alternated the stripes from horizontal & vertical. I stamped "Happy Birthday" from the Well Scripted set (Mini) in Chocolate Chip.

Then I had fun running some scraps of paper through my Big Shot using the Beautiful Wings Embosslits Die (Mini) to get all of my butterflies.

For the ribbon I ran a strip of SNAIL adhesive across the card front then took my length of taffeta ribbon (I used 3 times the width of the card and had a small amount leftover) and pressed it into the SNAIL while making small loops all the way across.

Stamps: Well Scripted

Ink: Chocolate Chip

Paper: Sweet Pea DSP, Sahara Sand, Pretty in Pink, Chocolate Chip, Taken With Teal, So Saffron

Accessories: Beautiful Wings Embosslits die, Pretty in Pink taffeta ribbon, scalloped square punch

Tuesday, February 16, 2010

Guy Valentine (or Birthday or Anniversary!)


Wow! It's been 2 weeks since I've posted a new project. 2 weeks worth of snow and school cancellations here in Virginia really played havoc with my fine tuned schedule! Ha! I really just got back into my stamp room over the weekend and it was to whip out 3 Valentine's Day cards for my husband & 2 boys. I kept thinking I needed to get going on those Valentine's but it just didn't happen until Saturday afternoon. Nothing like waiting until the last minute.

My DH is a pretty handy guy around the house and has any number of tools and gadgets that I'm not quite sure what they are used for (he would probably say the same about my stamp room!) so I wanted to use Totally Tool for his Valentine. Anyway...I decided to use some of the Sweet Pea Designer Series Paper from the Occasions Mini as my jumping off point for colors (LOVE this paper!). I was trying to go for something other than the "red-pink-all over hearts" look that we've been seeing a lot of the past month. Besides this would be a good birthday card or anniversary card as well....let's not limit ourselves to just V-day right?

The card base is Old Olive textured cardstock. I layered a strip of Sweet Pea DSP and then my panel with the tape measure. The image is stamped in Basic Gray and colored in with Watercolor Wonder Crayons and a blender pen. The small strips are just some scraps and I have a lot of those so it's always nice to use them up when I can. The Taken With Teal piece is paper pierced and the So Saffron piece is roughed up on the edges. Simple but sweet!

Stamps: Totally Tool

Ink: Basic Gray

Paper: Old Olive textured, Sweet Pea DSP, Whisper White, So Saffron, Taken With Teal,

Accessories: Watercolor Wonder Crayons, blender pen, paper piercer

Sunday, January 31, 2010

January Stamping Projects


My group of stamping ladies got together earlier this past week to make card organizers to get us organized for the start of 2010. We all had a blast and I think everyone enjoyed learning how to make these simple pocketed books and the cards that went along with it.

Thanks to my father in law we were able to bind our books right away and not have to take them to an office supply store for that part. He recently closed down his business and I was the proud inheritor (is that a word??) of some really cool office equipment and other supplies. Among my treasure was a binding machine! Very cool!! I did get a lot of binding spines from my FIL but there weren't any 1 inch white spines in the stash so I just ordered a box of those from a local paper supply company. Now I can make about 90 more card organizers if I want to!


We used the Sweet Pea Designer Series Paper Pack found in the Occasions Mini to make our pocketed pages. The ladies had a great time picking out the papers and even had a hard time choosing because all the designs are so pretty in this pack. We embellished the front covers with the coordinating Sweet Pea Stitched Felt pieces. This really made the cover pop and added a lot of interest.


For the 2 cards we made to go along with our organizers we used some new goodies from the Occasions Mini & the Sale-A-Bration as well as my new Big Shot. The first one I choose to do a masculine birthday card as that seems to always be the hardest kind of card for me to make. I can do girlie and little kid with the best of them but guys cards can be hard.

We ran a quarter sheet of Very Vanilla through the Big Shot using the Top Note Die. Then the stack of gifts from the Happy Moments Sale-A-Bration set (FREE!) was stamped with Stazon and water colored with an aquapainter. The "happy birthday" sentiment is only inked once and then stamped 3 times to get the fading color. 2 brads dress up the edges of the Top Note. A few drops of Crystal Effects on the Polka Dot gift finishes this card off. Sweet & Simple for that birthday guy!


Stamps: Happy Moments

Cardstock: Dusty Durango, Not Quite Navy, Very Vanilla

Ink: Stazon, Not Quite Navy, Bermuda Bay, Dusty Durango

Accessories: Big Shot, Top Note die, brads, Crystal Effects, aquapainter


Since Valentine's Day is right around the corner we had to make a card with the new I {Heart} Hearts set in the Occasions Mini. We also used the new Scallop Trim Border punch (FREE during Sale-A-Bration) along the bottom edge.
The sentiment from Well Scripted (Occasions Mini) was stamped in Close to Cocoa on textured Pretty in Pink cardstock and then punched out with the heart punch and popped up on dimensionals.
A Valentine wouldn't be complete with out some Rose Red ribbon.

Stamps: I {Heart} Hearts, Well Scripted

Cardstock: Kraft, Pretty in Pink (textured), Whisper White

Ink: Close to Cocoa, Rose Red

Accessories: Rose Red grosgrain ribbon, dimensionals, Scallop Trim Border Punch

Monday, January 18, 2010

Sweet Cupcake Tags


Last fall I did a craft fair at my son's preschool. It was a bust as far as sales and contacts go but I had fun chatting with the other vendors I was sitting near. One of the ladies I was sitting next to had her own custom cupcake business. She saw a card that I had for sale using the cupcake in the Party Heart set. She asked me to make her a set of tags using the cupcake and the the colors she uses in her business brochures. She wanted to use them on her packaging for her holiday treats.

I colored the cupcake using the Chocolate Chip & Pink Passion markers and then stamped on Whisper White. I used the 11/4" circle punch to punch out the cupcake layer. Then I stamped the frosting again in Pink Passion and cut it out using my paper snips. I added some dazzling diamonds to the frosting and then popped it up on dimensionals. I layered the cupcake on a 13/8" Tempting Turquoise circle and then on top of a Chocolate Chip scalloped circle. A little bit of green embroidery floss and we have a cupcake tag!

Stamps: Party Hearty

Ink: Chocolate Chip, Pink Passion

Paper: Whisper White, Chocolate Chip, Tempting Turquoise

Accessories: 11/4", 13/8" circle punches, scalloped circle punch, dimensionals, markers, dazzling diamonds

Sunday, January 10, 2010

12 Pocket Card Organizer Class - January 26


For my January class I will be teaching how to make this 12 pocket card organizer(colors will be different for the class). Each month has a pocket and a perpetual calendar to keep track of birthdays, anniversaries and other special dates. You won't misplace that special card or forget a birthday once you have this organizer!

For the class we will be making it using the new Sweet Pea Designer Series paper in the new Occasions Mini (pg.33) as well as making 2 cards to go along with the organizer(also using new products!). The cover was designed using My Digital Studio and I will adjust it to match the colors in the Sweet Pea DSP for the class.

I am waiting (very impatiently) for my big box of new goodies from Sale-A-Bration & the mini to arrive so I can play!

The cost of this class will be $15 or FREE with a $50 merchandise order (before tax & shipping). Please contact me if you're interested in attending.

Stamps: None

Ink: None

Paper: Tea Party Designer Series Paper

Accessories: My Digital Studio, binding comb & machine

Wednesday, January 6, 2010

Merry Christmas---A Little Late!


So I know Christmas is long gone and everyone is looking forward to Valentine's Day & Easter but I just had to put up a quick post of my Christmas card from 2009. I had decided to use Loads of Love way back in July. I just love that cute little truck and had break it out for a Christmas card. I ended up making 100 of these cards so I wanted it to be something fairly easy with few layers.

I stamped the truck in Stazon on watercolor paper then masked the truck and stamped the presents in the back. I colored the presents in with markers and used a reinker and aquapainter for the truck. Then I sat on the couch watching TV (for several nights!) and cut out what seemed like an endless number of little purple trucks! Thanks goodness for my trusty paper snips!

The trees were stamped in Old Olive several times without reinking to get the faded background look. That was done several times to get the forest. Then the trees were spritzed with shimmer mist made from Shimmer Paint and rubbing alcohol.

The trees were layered on a Rich Razzleberry panel. The truck was adhered in front of the trees and popped up on dimensionals.

Stamps: Loads of Love, Loads of Love Accessories

Ink: Stazon, Old Olive, Rich Razzleberry (reinker)

Paper: Rich Razzleberry, Whisper White, watercolor paper

Accessories: aquapainter, markers, paper snips, dimensionals, Shimmer Paint