With the release of the November Online Exclusives and continuing on to the upcoming mini all of Stampin' Up!@ stamp sets and dies will now be coming in the new packaging (older products will be changed out as the old packaging sells out). I'm really liking the new style as it makes it even easier for me to store more sets in the same amount of space as well as being able to keep the stamps and die sets together. Before with the different sizes and style of packaging it didn't work well for me to keep them together.
But there is one drawback to the new envelopes....we don't have the stamp images printed on the inside of the insert so it makes it a bit tricky to keep track of how the stamps fit on the plastic sheet and if you have all the stamps accounted for when you're cleaning up! I definitely need some help when it comes to keeping my sets intact!
I've made a quick video showing how I'm modifying the paper insert to keep myself organized! Hope it helps you as well!
I'm sharing a fun card with a great technique today. I used the partial die cut technique on this Christmas card and it's such a great way to show off a die cut such as the bear in the Jolly Delivery stamp set.
I used the North Pole Delivery DSP for the background and kept to a classic red and green Christmas color combo.
Check out the video and learn how to do partial die cutting and give your own Christmas cards that wow! factor!
Thanks for looking! Did you stamp today?
All of the current supplies used to create this card can be purchased in my ONLINE STORE.
Stamps: Jolly Delivery
Ink: Memento Black
Blends: Poppy Parade light & dark, Granny Apple Green dark, Shaded Spruce dark, Pecan Pie dark, Medium Neutrals
Paper: Very Vanilla, North Pole Delivery DSP, Poppy Parade, Garden Green
Accessories: Jolly Delivery dies, Stylish Shapes dies, dimensionals, Garden Green baker's twine (retired), Traditional Sparkling Sequins
The fabulous New at SU! blog hop is back today and we're sharing fun "Treat" ideas so you'll see great inspiration for treat packaging/gifting for all different occasions throughout the year. We are sharing ideas from across the world so be sure to hop all the way around with us and say hi (links at the bottom of this post).
I used the Jolly Delivery dies to make a fun little treat pouch for my project. I'm calling this "Halloween-ish" due to the colors and the chocolate packaging but I didn't really have a stamp set that was Halloween so I'm using the Fluffy Squirrel bundle. This fluffy friend seemed like a cute addition and he is holding a jack-o-lantern after all! This pouch can work for all occasions; just swap out the colors and stamps to make it unique for your event.
These cute little Ghirardelli Halloween chocolates fit nicely as will the regular Ghirardelli chocolate squares. I didn't have any Reese's peanut butter cups but I think a regular sized one would fit as well.
I stamped and punched out the sentiment for the top flap and used the colors of the chocolate wrappers for the backing of the sentiment.
The squirrel and pumpkin are stamped and fussy cut and added to the front of the treat pouch with dimensionals. See the video below to see how to put it together.
Thanks for looking! Did you stamp today?
All of the supplies used to make this project can be purchased in my ONLINE STORE.
Stamps: Fluffy Squirrel, Choose Happy
Ink: Memento Black, Basic Gray, Smoky Slate, Pumpkin Pie
Blends: Pumpkin Pie light & dark
Paper: Basic Black, Basic White, Granny Apple Green, Blueberry Bushel
I'm getting a little Christmas-y with my card today! I made this one yesterday on my Facebook Live and you can watch on replay below on YouTube. The Jolly Delivery bundle is really cute and I always love a good critter card.
Aren't they cuties? I have lots of layering and a bit of coloring with Stampin' Blends to create this design. See how it all comes together.
Thanks for looking! Did you stamp today?
All of the supplies used to make this card can be purchased in my ONLINE STORE.
Stamps: Jolly Delivery
Ink: Memento Black, Shaded Spruce, Real Red
Blends: Shaded Spruce light & dark, Pool Party light, Real Red light & dark, Pecan Pie light & dark, Timid Tiger light & dark, Basic Black light
Paper: Real Red, Basic White, Shaded Spruce, North Pole Delivery DSP
The temperature is creeping back up here in central Virginia but I am sticking to my seasonal cardmaking for now! I made this fall themed thank you card yesterday on my Facebook Live. Nothing crazy but a good looking card inspired by a layout on page 21 in the Stampin' Up!® September-December 2025 Mini catalog. The colors are courtesy of the Global Design Project. I've linked the video below so you can watch on replay.
Most of the supplies used on this card are in the Gathering Together Suite Collection. The gold accents on the Gathering Together Specialty DSP is especially gorgeous. You can view all the suite products in the Online Exclusive section of the Stampin' Up! store.
The new Traditional Labels dies are fast becoming a favorite for highlighting sentiments lately. I also pulled in some white and gold bakers twine from the Modern Christmas Suite as well because you can't go wrong with more gold right?
Check out the replay on my YouTube channel. Like and subscribe so you can catch what I make each week on my Let's Stamp Today! live session.
Thanks for looking! Did you stamp today?
All of the supplies used to make this card can be purchased in my ONLINE STORE.
I got on Facebook this morning and did a live stamping session with the new Gathering Moments stamp set. I showed how to make this easy distressed background with a fun angled cut. You can find this bundle (and more coordinating products) in the Online Exclusives. The layout is one that I gave my customers as a challenge so I wanted to get a sample made to show it in use.
Even though Stampin' Up! has a ton of beautiful DSP to work with sometimes it's just fun to make our own which is what I did with this panel. I pulled out a few colors with a bit of a fall feel and just got to stamping.
I did a few different things to get some distressing on this panel and I love how the distressed texture and layers add so much more interest than just having a flat panel. And the angled cuts add even more interest.
Check out the video to see how this card comes together:
Thanks for looking! Did you stamp today?
All of the supplies used to make this card can be purchased in my ONLINE STORE.
Today's card is one that I made this morning on my Facebook Live which I'm calling 'Let's Stamp Today!' Catchy right? lol! I'm going to try really hard to do a live every Wednesday at 11am and make a project to show how I put a card together and offer some tips and tricks. So follow me on Facebook to watch or catch the replay later also on Facebook or on my YouTube channel. Like, follow or subscribe on those sites to not miss an episode! Anyway... today's card is a fun fold that is really easy using the Party Banners Dies.
Does it look kind of familiar? I did a card with the same fold last week HERE but with a Christmas theme. It's so easy once you know what to do that I thought a video showing the "how-to" would be a good idea. I used the Wildflower Birthday Specialty DSP and the Birthday Celebrations stamp set which is currently on the Last Chance List at a discount (the dies and DSP are not Last Chance at the moment).
I enjoyed using some of the die cut shapes that are included in the Specialty DSP. I used 3 of the Party Banners dies, the 2nd smallest and the 5th & 6th smallest. You can do this same style of fun fold with other die sets that have nested sizes. The Everyday Arches dies and Textured Notes dies are good examples.
Get all the details by watching the video:
Thanks for looking! Did you stamp today?
All of the current supplies used to make this card can be purchased in my ONLINE STORE.
I have such a fun card to share with you today including a video tutorial! My stampers made this one at class last week and I think they were really surprised with how easy it was. We made a fun pop up card using the Poppin' By bundle. It's an adorable popcorn themed bundle so it was the perfect set to use to teach this technique!
The front of the card looks just like a regular hello card that you might send to a friend to brighten their day. I chose to use Cloud Cover card stock for the card base and then used Lost Lagoon and a circle of Florals in Bloom DSP for accents. The Textured Notes dies gave some nice detail to the two rectangles.
And now the fun part! When you open the card you have a fun pop up element with more pieces of popcorn! My video below walks you through making the inside pop up panel and gives you all the measurement as well tips and tricks to putting this card together. It's easier than it looks and the cutting measurements can be used again and again for all different kinds of pop up cards! Think flowers, bees, birds, trees, snowflakes....really anything you want can be popped up!
Here are the measurements written out but definitely follow along with the video to see step by step!
Insert measures 5 ¼” x 8 ¼” - fold in half like a card base
Cut from folded side down (or up depending on how you align the paper trimmer)
Line up at 1” mark and cut down stopping at 1”
Line up at 1 ½” and cut down stopping at 1”
Line up at 2 ¼” and cut down stopping at 1 ½”
Line up at 3” and cut down stopping at 1 ½”
Line up at 3 ¾” and cut down to 1”
Line up at 4 ¼” and cut down to 1”
Push the 3 tabs to the inside of the folded insert and adhere to inside of card base
Thanks for looking! Did you stamp today?
All of the supplies used to make this card can be purchased in my ONLINE STORE.
Stamps: Poppin' By (Online Exclusive)
Ink: Memento Black, Lemon Lolly
Paper: Cloud Cover, Lost Lagoon, Basic White, Florals in Bloom DSP
Accessories: Poppin' By dies (Online Exclusive), paper trimmer, dimensionals, Textured Notes Dies (Online Exclusive), Cloud Cover Faux Linen ribbon, 2025-2027 In Color Flat Pearls
Using the beautiful Delightful Wishes bundle and coordinating Floral Delight DSP (which are all carryover products) I designed this card for my last class to show how to make a Fault Line card. Once you know the measurements and where to tear, this is a fantastic design to show off your Designer Series Papers.
I'll start with the measurements:
Card base- 4 1/4" x 9 1/2" - scored at 5 1/2"
Old Olive cardstock - 4 1/4" x 3 1/2"
Designer Series Paper - 4 1/4" x 5 1/2"
First fold the short flap of your card base and tear across the flap on an angle. I tore mine from the right side of the card to the left but if you go the other way your 'fault line' will just be angled the other way. Save the torn off piece for later.
Next tear the Old Olive piece the same way on an angle. Match up one of the Old Olive piece on the back of the card base torn edge with just a little of the green sticking out and adhere it. Using a bone folder or your finger roll back the torn edges on both pieces giving some dimension.
Using the saved torn Basic White edge stamp your sentiment and add the other torn Old Olive piece lining up the edge just sticking out like with the first piece. Roll back the edges again. Set aside.
Decide which side of the DSP you want to show through the fault line and then adhere your DSP panel to the back of the the top flap. Add adhesive to the back of the cardstock flap and not your DSP so as not to get glue where it will show (or on the back of the DSP where it will glue your card shut!). After adhering you may need to trim off a sliver of the DSP so it lines up with the bottom edge of the card.
Next add adhesive to the back of the stamped cardstock piece and line it up with the bottom edge of the DSP. If any of the cardstock or DSP edges stick out beyond the card base just trim them off to get everything lined up.
Embellish as desired and finish the card. This design uses some of the flower dies in the Delightful Wishes die set to add a blossom and a little Tiny Bee Trinket for an understated accent.
Thanks for looking! Did you stamp today?
All of the supplies used to make this card can be purchased in my ONLINE STORE.
Stamps: Delightful Wishes
Ink: Old Olive
Paper: Basic White thick, Old Olive, Floral Delight DSP, Lemon Lolly, Peach Pie, Pecan Pie
I'm always on the lookout for fun things to teach my stampers and I came across this fun way to use DSP to make a little folded pouch for your card. I have no idea what the name of this fold is called and where I saw it on Karen Titus' website she didn't have a name for it either so if you know please leave a comment so I can update.
My stampers made this at my last class pairing up the Wildflower Designs stamp set and Wildly Flowering DSP. Now if you have 6x6 DSP this card will be even quicker to make if you don't have to cut down a 12x12 piece.
This is the card front with the DSP pouch closed. I love how you get to see both patterns on the DSP with the folded flaps showing the inside pattern even while closed.
This is the card front with the pouch opened and a pretty allium stamped on the inside. You can change the inside up however you'd like and make it as elaborate or as simple as you want.
Check out this super quick video on my YouTube channel showing how to create this fun fold.
We used some other supplies on this card to pull it all together. The Dashing Designs embossing folder give a nice texture to the Moody Mauve card front. The inside die cut circle is made with the Spotlight on Nature dies and fits perfectly in this space.
The embellishments used on this card are a few Adhesive-Backed Textured Dots and some retired In Color ribbon.
All of the current supplies used to make this card can be purchased in my ONLINE STORE.
Thanks for looking! Did you stamp today?
Stamps: Wildly Flowering
Ink: Early Espresso, Moody Mauve, Mossy Meadow
Paper: Moody Mauve, Early Espresso, Basic White, Wildly Flowering DSP
The Hooray for Surprises bundle is one you might overlook in the Stampin' Up! Jan.-April mini catalog but take a closer look at it on page 13. The dies have a fun surprise that makes it easy to create an interactive card with a pull away tab to reveal a hidden message or image.
I used it to create this cheerful happy birthday card!
The colors were inspired by a recent Stampin' Up! creative challenge (#SUCreativeChallenge) and are perfect for a spring or summer birthday! Parakeet Party, Tahitian Tide, Highland Heather and Fresh Freesia just give those celebratory vibes (as the kids say!!) don't they?
I created a video showing an easy way to use these dies to get perfect placement for your hidden message behind the pull tab. You'll have to watch the video to see what it looks like behind the tab because I couldn't bring myself to tear it away because I wouldn't be able to send the card out then!!
All of the products used to make this card can be purchased in my ONLINE STORE.
Thanks for looking! Did you stamp today?
Stamps: Hooray for Surprises
Ink: Tahitian Tide, Highland Heather
Paper: Parakeet Party, Basic White, copy paper (watch the video to find out why!), Fresh Freesia, Parakeet Party
Accessories: Hooray for Surprises dies, dimensionals, Tahitian Tide baker's twine, Purple Fine Shimmer Gems
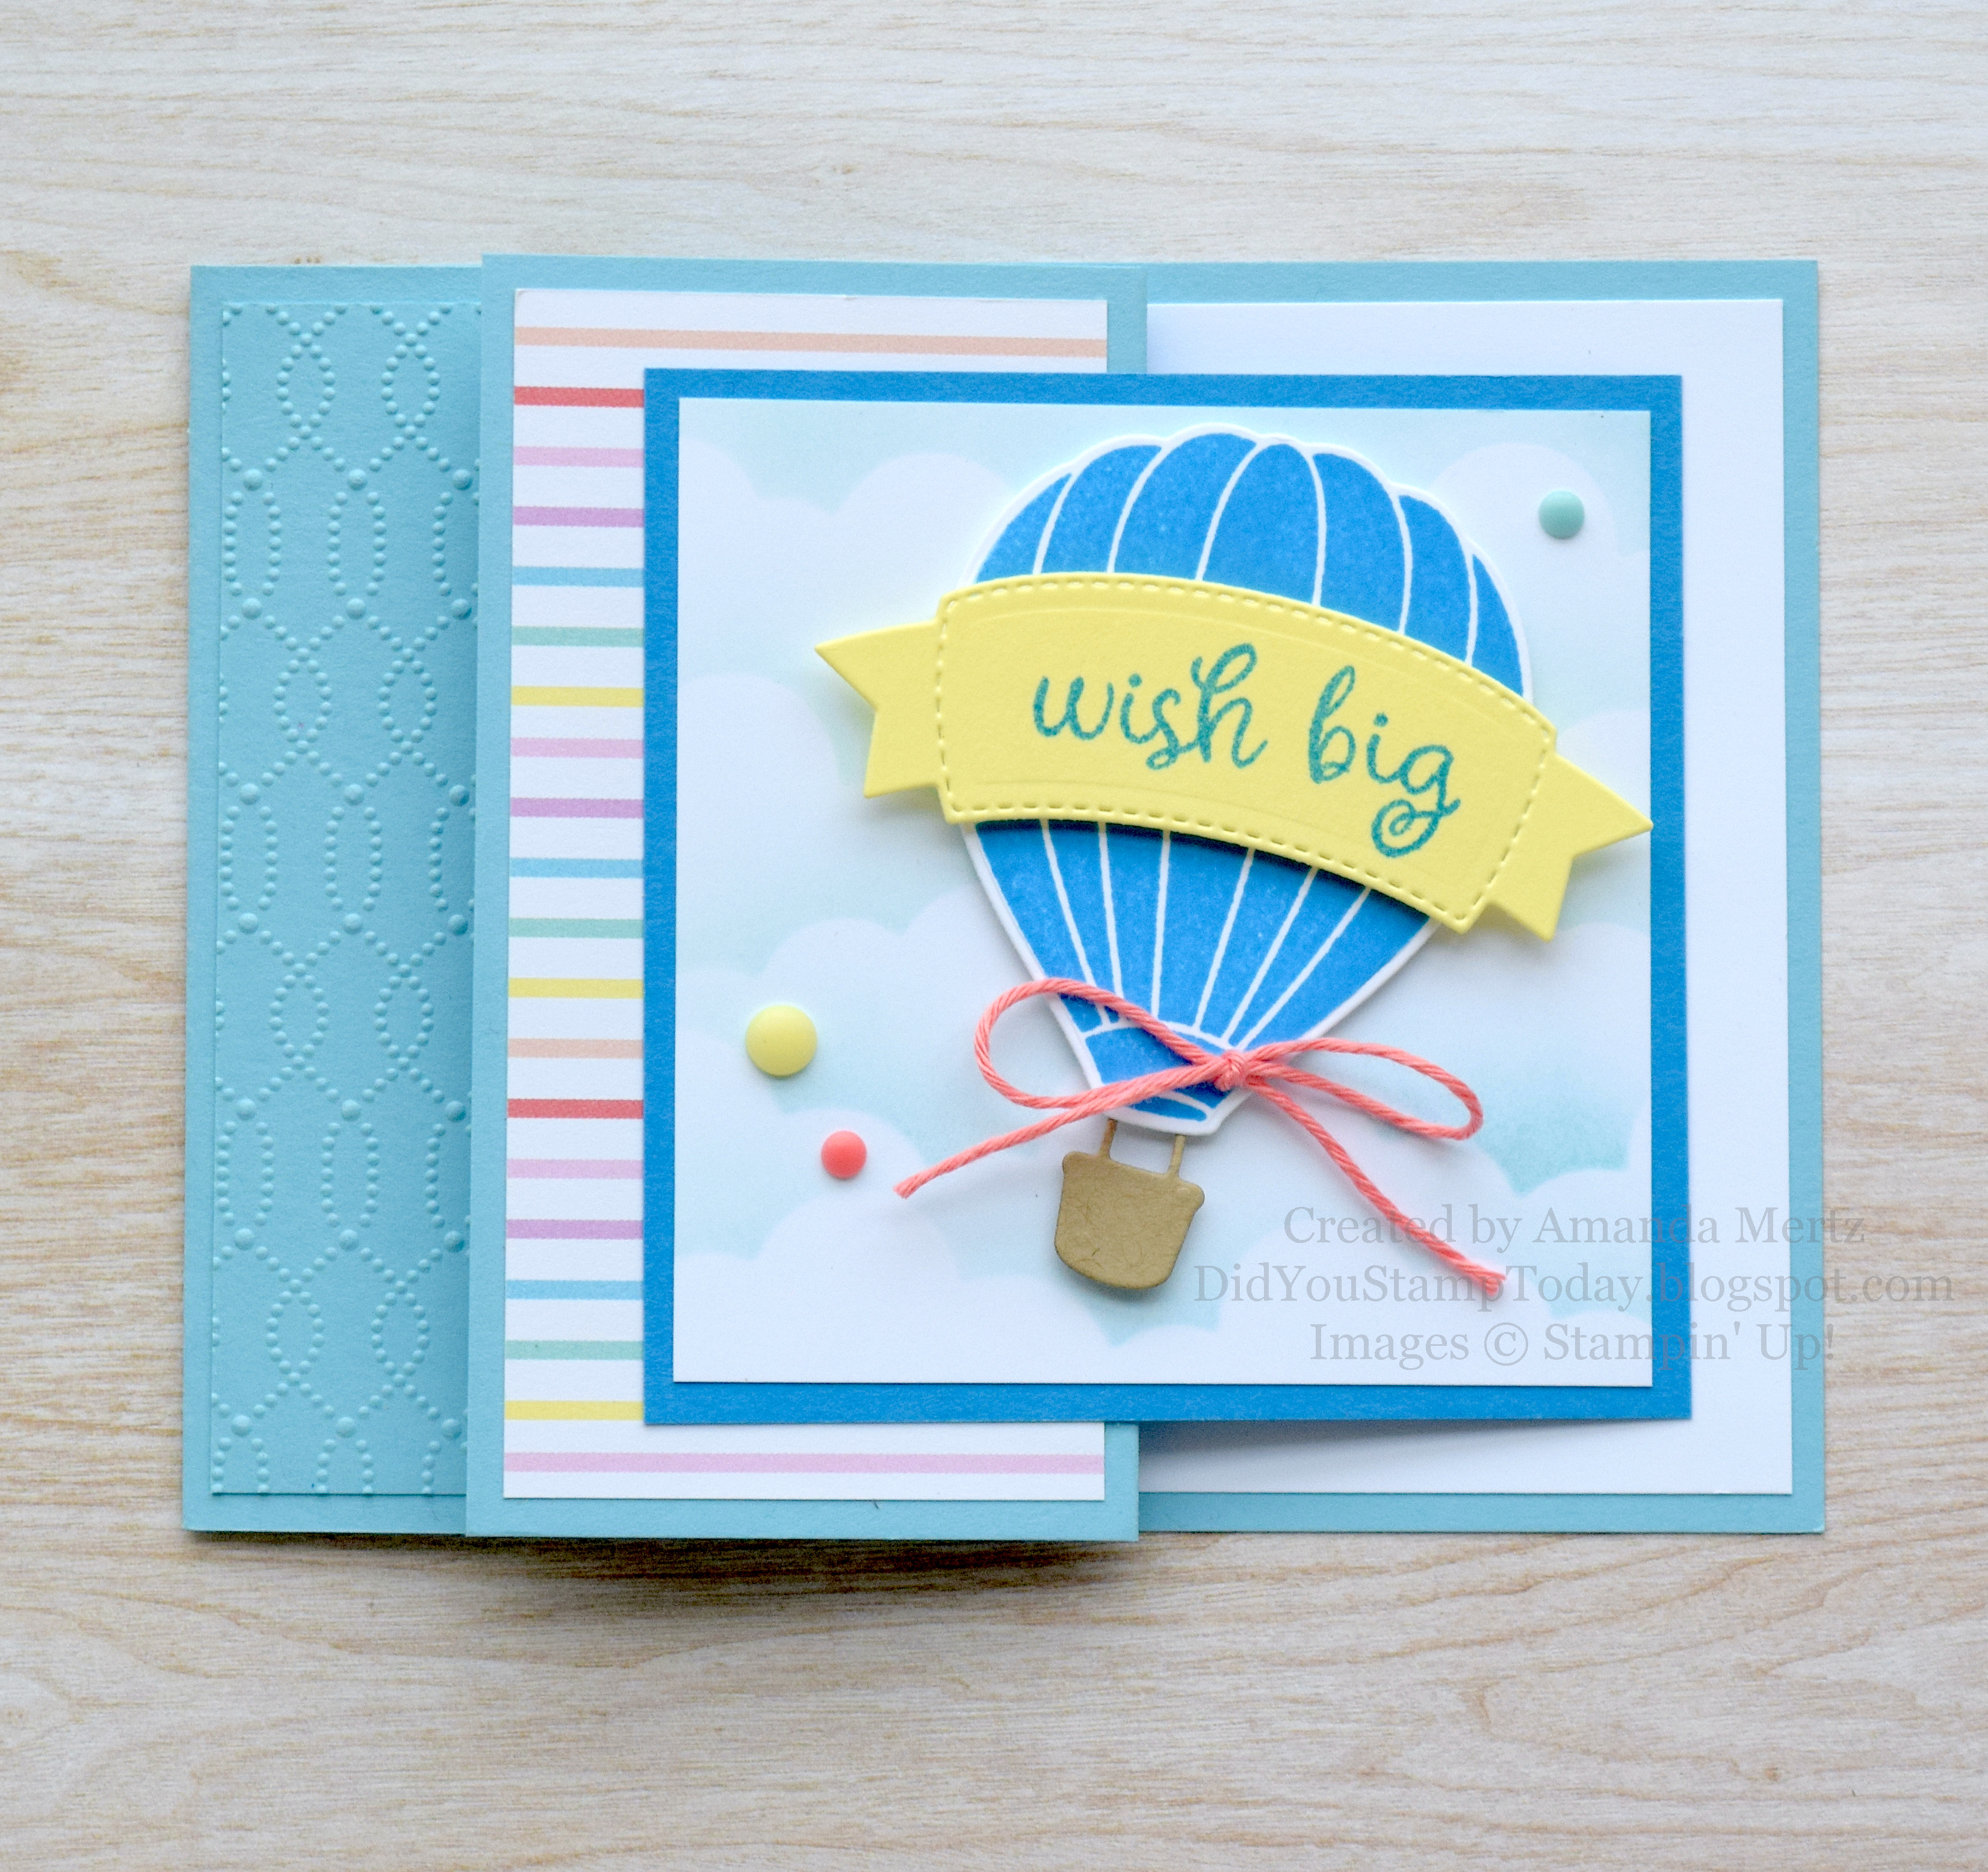
We made this adorable design last week in my class and everyone loved the really easy Z-fold layout. It is only 2 score lines and has lots of panels to show off different papers and embossed pieces. So many possibilities to use with a variety colors and Designer Series Papers.
I filmed a quick video showing how it all comes together so you can check it out and make a design of your own. All the measurements and scoring details are in the video.
My stampers especially liked learning how to make their own cloud background using a die cut and blending brush!
All of the current products used to make this card can be purchased in my ONLINE STORE.
Paper: Balmy Blue, Basic White, Azure Afternoon, Lemon Lolly, Crumb Cake, Light Than Air DSP
Accessories: Hot Air Balloon dies, dimensionals, Baker's Twine Three color pack, Rainbow adhesive-backed dots, Softly Sophisticated embossing folder (retired-SAB), blending brush, Basic Borders dies
I'm back today with another fun fold card that we made at my classes last week. This one uses the Autumn Leaves bundle and other products from the All About Autumn suite. My downline in Texas Kimberly Hile (scattersomejoy on Instagram) sent me a fun card using the Earthen Elegance suite and this diamond fold and I took inspiration from it to create my version with the Autumn Leaves products. Check out the video tutorial below for all the details.
This fold is really easy and just takes 2 scores and 2 cuts to make the base. Your base card stock is cut at 4 1/4" x 11" and you score at 2 1/8" and 5 1/2" inches. Mark the short end by the 2 1/8" score at 2 1/8" (halfway mark on that edge). Next line up the score line and the 2 1/8" mark along your cutting challenge and cut off the corner, repeat on the other side to form the point.
Then decorate the front and other panels however you'd like. This is a great fold to show off different DSPs. I used the All About Autumn DSP for the front 3" x 4" panel and then a piece of the Oxidized Copper specialty paper on the inside 3" x 4" panel.
I show how I put the whole card together in the video tutorial below.
All of the items used to make this card can be purchased in my ONLINE STORE.
Thanks for looking! Did you stamp today?
Stamps: Autumn Leaves, Go To Greetings
Ink: Pretty Peacock, Mossy Meadow, Copper Clay
Paper: Pretty Peacock, Very Vanilla, Early Espresso, All About Autumn DSP, Oxidized Copper Specialty paper
Today's card is the last of the projects my local stampers made this past week at class. It's a super easy take on the Faux Shutter cards that are going around. After researching several different ways one can go about making this style of card I decided that the one shown by demonstrator Colleen Magness was the way to go especially for a class setting. I made a quick video tutorial below to show all of the steps so my local customers could refer to it when they wanted to make another one at home.
I used the fun Zany Zoo stamp set to create my version the Faux Shutter card. I love that this technique really shows off a smaller image. The way the small turtle is framed out by the Basic Black strips really makes it pop.
Check out my tutorial on YouTube and learn how to make this fun card.
All of the products used to make this card can be purchased in my ONLINE STORE.
I'm always on the lookout for fun folds to teach at my monthly classes and I came across a fishing vest card that I tweaked a bit and made it my own to use in class this month. The Gone Fishing bundle has been fun to use and making this card is no exception!
And I was so happy to find a use for Wild Wheat! It's not my favorite In Color but definitely works for this outdoorsy fishing vest look! And the plaid pockets!!? I'm just waiting for LL Bean or Orvis to want to use this card as inspiration for a line of gear!
Check out the video tutorial for all the details and watch me make the card, bumbles, goofs and all! It's real life stamping for sure!
Here are the step by step instructions as well if you prefer.
Score 8 ½” x 5 ½” card base at 2 ⅛” & 6 ⅜”
Fold score lines in to make 2 flaps
With flaps closed - At the bottom corner of the card measure in ¾” from the corner and up from the corner ¾”, mark with a pencil
Repeat with the other bottom corner
Line up pencil marks in paper trimmer and trim off bottom corners
At the top of the card measure from the opening over 1” onto the flap and mark with a pencil
Repeat with on the other side
At the opening, measure down the flap 1 ½” and mark with a pencil
Repeat on the other side
Open flaps and line up the pencil marks in the paper trimmer and trim of corner of the flap. Repeat on other side
Use Arm Hole template to trace half circles onto your card front
Use scissors to trim armhole openings
Thanks for looking! Did you stamp today?
Stamps: Gone Fishing
Ink: Wild Wheat, Pebbled Path, Boho Blue
Paper: Wild Wheat, Very Vanilla, Let's Go Fishing DSP, Boho Blue, Mossy Meadow, Pebbled Path
My card today is a really fun card that my stampers made at class this week. I'm always on the lookout for fun folds or fancy folds that are not overly complicated. When you're in a class setting with multiple people working on the same project you've got to balance time, supplies, reproducibility and cuteness (of course!). This one hits all the marks. It's called the Pop & Flip card but there might be other names for it as well.
We used the great Regency Park DSP and the Playing in the Rain turtle to bring this one together. See how the circle folds in when you open the card! It's so cute!
I've made a quick video showing how to put this card together including all the measurements for the pop & flip mechanism which is really easy! Watch the video and see for yourself.
Some quick measurements if you want to make the card along with the video:
Card base: standard A2 (8.5" x 5.5") folded in the center
DSP: 4" x 5.25"
Insert: 3" x 5.25"
Pop & Flip Piece 1: 3" x 4" - score at 1", 2" and 3"
Pop & Flip Piece 2: 3/4" x 2.25" - score at 1"
Turtle Circle - scrap piece of basic white about 3" x 3" & Stylish Shape circle die (2nd largest)
I hope you have fun learning how to make this card! My stampers certainly did!
If you'd like to purchase supplies to make this card visit my ONLINE STORE.
Today's card is another one that we made at my last class. This is a really easy fun fold that looks way harder than it is! My stampers had a good time learning how to make this card and I did a video for them to refer to for measurements and I hope you enjoy it too bloopers and all! See the YouTube link below and stamp along with me!
I used the Country Bouquet bundle and Country Floral Lane DSP. I'm going to list the measurements for the paper and the scores and then all of the supplies at the end like usual. The measurements are also listed in the video. To see details on how to put the card together definitely check out the video.
Paper:
Basic White thick base - 4.25" x 11"
Sweet Sorbet - 4" x 10.25"
Large piece of DSP - 3.75" x 5
Small piece of DSP - 2.25" x 3.75"
Score Measurements:
Basic White thick - score at 5.5"
Sweet Sorbet - score at 2.5" & 5"
Thanks for looking! Did you stamp today?
Stamps: Country Bouquet
Ink: Sweet Sorbet, Mint Macaron
Paper: Basic White thick, Sweet Sorbet, Mint Macaron, Basic White, Country Floral Lane DSP
Accessories: Country Bouquet Builder punch, Stylish Shapes dies, dimensionals, Real Red & Burlap ribbon combo
I taught my stampers how to make this adorable fun fold pop-up card the other day at class. The mini gift bag is the perfect size to hold a gift card so it is great design for this time of year. Think of all the teacher gifts you need to have ready to go in just a few weeks! I've created a step by step video showing how to make the mini gift bag and how to get it to pop up inside your card.
front of card
Inside of card
Check out the video to see how to make your own mini gift bag pop-up card! The measurements and step by step instructions are also below.
For the mini gift bag you'll need:
1 piece of Designer Series Paper cut 4" x 9.5"
Tear and Tape
paper snips
Simply Scored or scoring tool
2 - 5" length of coordinating ribbon
a finished coordinating card
Instructions:
Score down the long sides at 1/2” & 3”
Turn cardstock 90° to score the short side
Score at 1/2”, 1”, 4.5”, 5”, 5.5” and 9”
Snip out the scored tabs (see sample) where the narrow score marks intersect to make assembling the bag easier
Pre-fold score lines to make the gussets for the sides of the bag
Leave the top 1” flaps up and then punch the holes for the ribbon handles through both layers at once.The holes should be about 1 inch from the gusset sides of the bag
Thread ribbon through the holes and tape down with Tear & Tape on the inside of the bag.Peel off the backing paper and fold down the top flaps to cover the ribbon ends.
Add Tear & Tape to the small flaps at the bottom of the bag on the outside pattern***DO NOT PEEL OFF BACKING PAPER YET!!****
Add Tear & Tape to the small flap on the side of the bag on the outside pattern
Fold bag lining up the gusseted ends. Peel off the backing paper and adhere the flaps to complete the gusset
Once your card is made, center the mini gift bag along the center fold and peel off ONE backing of the Tear Tape, press down to secure.Peel off the second backing of Tear Tape and close card to adhere the last flap.
I hope you have fun making this card on your own!
Thanks for looking! Did you stamp today?
Stamps: Christmas Season, Sweet Candy Canes
Paper: Garden Green, Basic White, Peaceful Prints DSP (retired, SAB) **in the video I use Sweetest Christmas DSP**
The holidays are fast approaching as is the time for having your gift giving plans in place. I usually have 6-10 people that I end up getting gift cards for but I always want to present the gift cards in something better than that little sleeve that comes with it. Most of the time a hand stamped card is perfect and other times you want something just a little more substantial. Today's tutorial and video give you just the thing to make a gift card a bit more of a 'wow' gift.
Using a mini Paper Pumpkin box you can create this easy gift card holder! You can find the mini Paper Pumpkin boxes in the annual catalog on page 137. You get 10 boxes for $7.50 which I think is a bargain.
All the credit for the inside of the box scoring measurements goes to Ruth's Stamping Spot. When I decided to do a project like this I knew that someone much smarter than me had already figured out the scoring and I was right so I used Ruth's scoring measurement and expanded the project to include the belly band and other embellishments using the Gingerbread & Peppermint Suite.
Watch the video to see the gift card holder come together step by step. I've listed the measurements throughout the video but see below for all the cutting and scoring measurements as well as a list of all the supplies used to make this project.
Cardstock -
Box Insert - 8 1/2" x 5 1/2"
Belly Band - 11" x 1 3/4"
Long Sides - 5 3/8" x 3/4"
Plus various pieces for die cutting and stamping to decorate the box
Designer Series Paper -
Inside - 5 1/2" x 1 3/4"
Box Top - 5 1/4" x 3 1/2"
Short Sides - 3 1/2" x 3/4"
Ribbon -
12" inches
Watching the video will help show how the scoring and small cut for the gift card are done but here are the measurements. Use a gift card to pencil in a mark where you want the slit to be cut.
Box Insert Scoring - score on the 8 1/2" side at 3 1/4" , 4 1/4" and 5 1/4"
Belly Band Scoring - score on the 11" side at 2 5/8", 3 3/4", 7 5/8" and 8 3/4"
Leave a comment and let me know what you think or if you have any questions!
Thanks for looking! Did you stamp today?
Stamps: Frosted Gingerbread
Ink: Real Red, Old Olive
Paper: Real Red, Old Olive, Basic White, Gingerbread & Peppermint 6x6 DSP
Accessories: Mini Paper Pumpkin box, scoreboard, Gingerbread dies, Stitched So Sweetly dies, dimensionals, Elegant Faceted gems, tear tape, Real Red mini ruffled ribbon
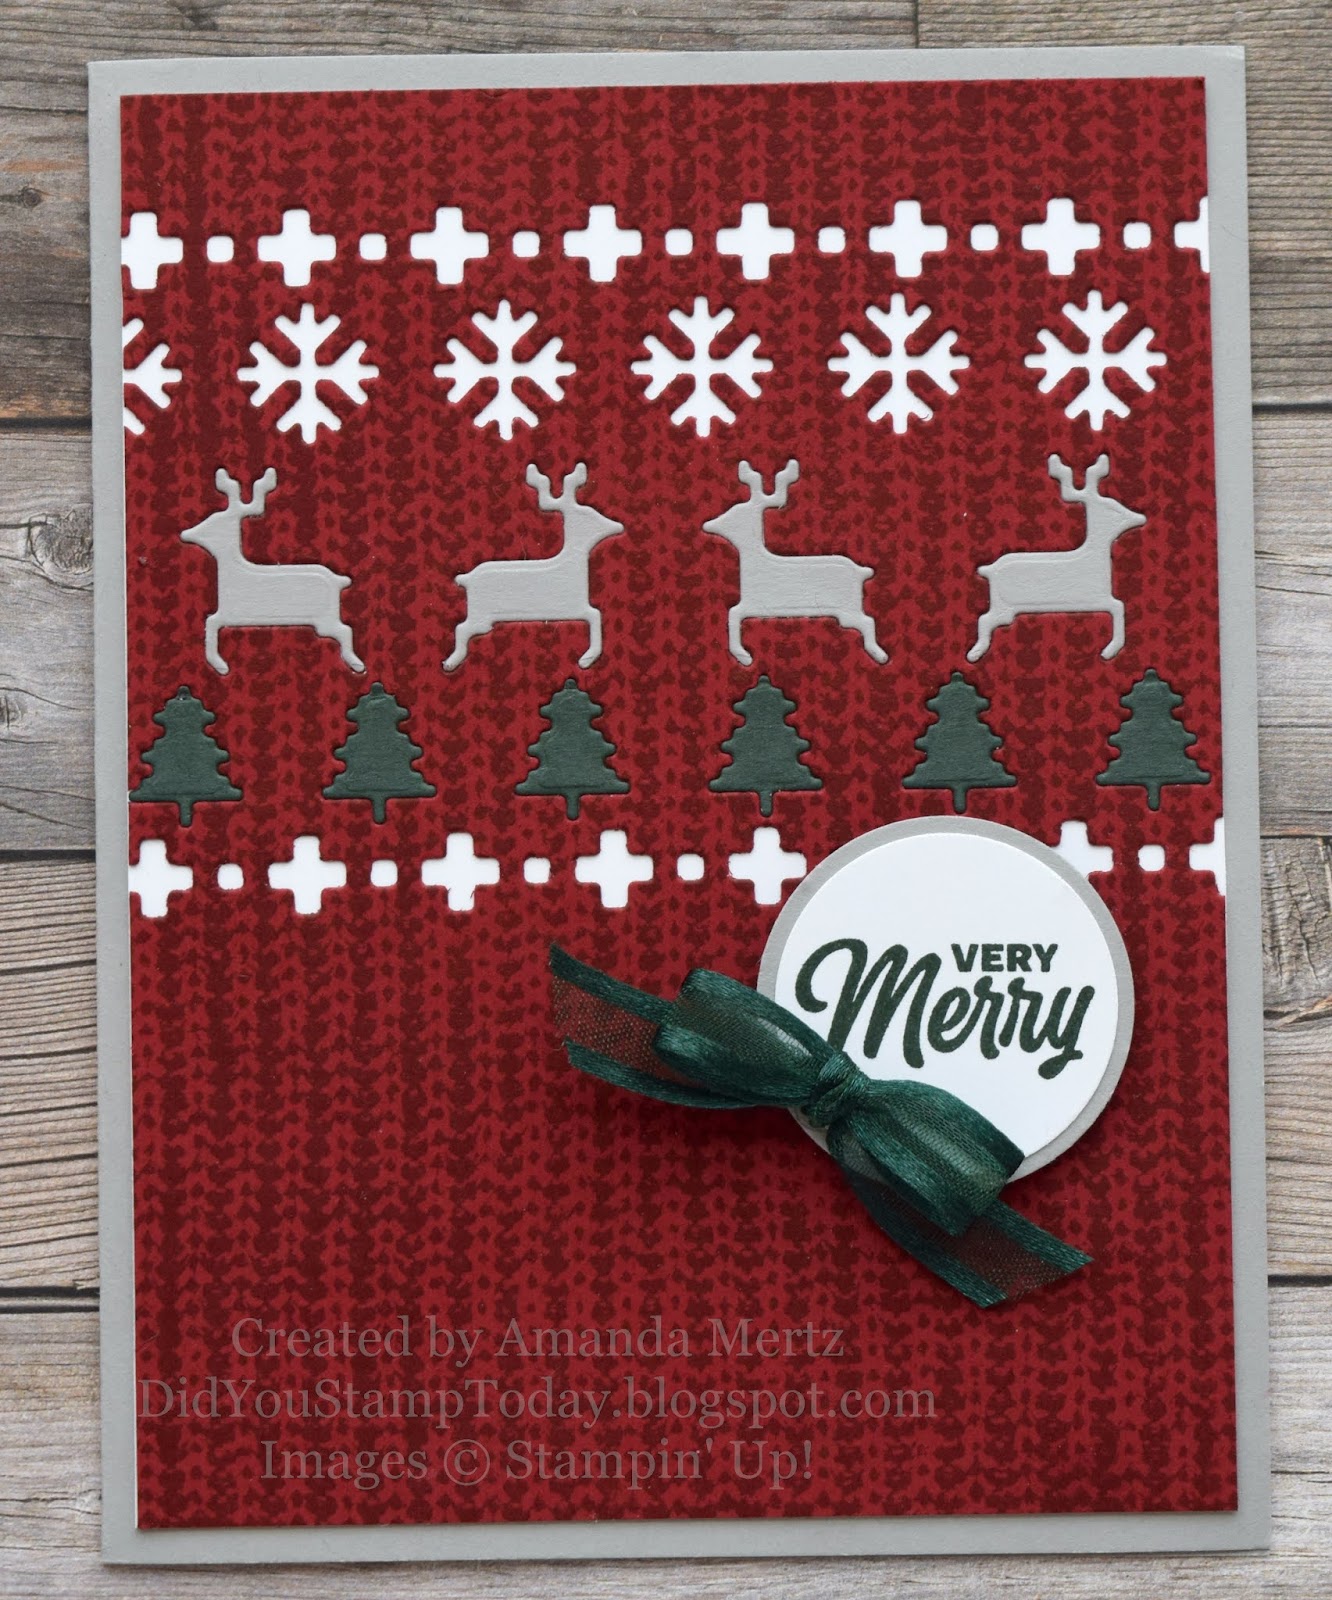
There are a lot of fun perks about being a Stampin' Up! demonstrator but one of my favorites is teaching cool little tricks and tips to other stampers who get just as excited as I do. I had a class this week for my local stampers (if you're in the Richmond, VA area and would like to get on my email list just leave a comment or send me an email!) and we made this adorable Christmas card using the Knit Together bundle. Not only did they get hands on time with this fun stamp and die set but I was able to (re)teach them how to make a fork bow. A 'what' you ask? Yup, it's a bow made with a fork. I promise it's super easy and super cute. Check it out on the card we made!
And now here's a quick video showing How to Make a Fork Bow. If this is a new tip for you I bet a fork will find it's way into your stamping supplies!
The card is a fun one to put together and the Knit Sweater dies offer endless mix and match opportunities for patterns and colors. The card we made in class starts with a Smoky Slate base. Then we stamped a layer of Cherry Cobbler (a must have color for fall and Christmas card making!) with Cherry Cobbler ink and the Knit Together background stamp. I mounted the stamp on the Stamp-a-ratus for even inking and stamping.
After the stamping we used the Knit Sweater dies to cut the pattern in the Cherry Cobbler layer. We added a layer of Basic White behind the die cut layer so the patterns would pop. To add even more fun details we cut a piece of Evening Evergreen with the tree die and a piece of Smoky Slate with the deer die and then added the shapes back into the negative space on the Cherry Cobbler piece. If you don't like messing with glue you can use some of our adhesive sheets and the cardstock to make little stickers for ease of application. It's a great product to use for fine detailed die cuts that are hard to apply adhesive to.
When the deer and trees were finished being added back in the sentiment from Sweet Little Stockings was stamped in Evening Evergreen on Basic White then cut out and backed with a Smoky Slate circle. It's then popped on dimensionals and then we added our sweet little Evening Evergreen fork bow as the final touch.
I hope you have fun making your own fork bows now that you know how easy it is!