Friday, April 28, 2017

Colorful Seasons Branch - Stampin' Up! Colorful Seasons - Fab Friday 111

  It seems that the week of my monthly stamp class I can't get my act together enough to prepare for class, have the class and then also blog.  I guess there is just too much going on during that week and something has to give!

  But I've been a having fun with some new stamping supplies that I was able to purchase from the soon to be released 2017-2018 Annual Stampin' Up! catalog!  As an added bonus for attending the On Stage event in Richmond all attendees were able to order some of the products which are in the new catalog!  How fun...except that the ordering window is very short so it's a bit hard to decide what you might want and really, I wanted almost all of the products!! But I decided on a few that I knew I could have some fun with until I could order everything!

  I used a new set, Colorful Seasons, for my Fab Friday challenge card today!  Here's the sketch we're working with this time around....so much you can do with this one!


 I thought the fun branch and flower combo would be perfect for those long skinny panels.  The Colorful Seasons set has a coordinating thinlet set, Seasonal Layers, so it's a breeze to cut out the branch and flowers (and lots of other shapes too)!


  This card is loaded with new items!  The card base is the new In Color Berry Burst.  I think it's kind of in between Melon Mambo and Rich Razzleberry.  The DSP is from a new pack that is called Wood Textures and is a 6x6 stack with 48 sheets and 12 double designs!  I chose one of the lighter patterns with the roughed up painted wood look.  It's a great background for the bright flowers and leaves.

  The thinlet set comes with a large scalloped edge die so I cut a little short piece to mount my branch on.  The branch is cut with Early Espresso cardstock and then I stamped (and stamped off) 2 of the flowers and cut them out as well.  I used 2 other flower shapes to cut out Lemon Lime Twist (another new In Color!!) flowers which I layered behind the Berry Burst ones to stand in for leaves.  I added the blossoms to the branch with a few popped up on dimensionals.

  I used a thank you greeting from another new set, Daisy Delight, and embossed it in white onto a vellum flag.  I added some linen thread and 2 more flowers around the greeting.  The 2 flowers help conceal the adhesive holding down the vellum.

  As the final touch, I added small rhinestones to the centers of the flowers.

  I'm really looking forward to stamping many more cards with this set.  I see it being a wonderful seasonal go to stamp set for all occasions.  

  Head on over to see what the rest of the Fab Friday Design Team has done with this fun sketch!

  Thanks for looking!  Did you stamp today?

Stamps: Colorful Seasons*, Daisy Delight*

Ink: Berry Burst*, Versamark

Paper: Berry Burst*, Lemon Lime Twist*, Wood Textures DSP stack*, vellum, Early Espresso, Whisper White

Accessories: Seasonal Layers Thinlets*, white embossing powder, linen thread, rhinestones

*these products will be available in the upcoming 2017-2018 Stampin' Up! annual catalog

Friday, April 21, 2017

Bright Butterfly - Stampin' Up! Watercolor Wings

  Better late than never today!  Here is a nice Easter card a little bit late!  And with just a quick change of sentiment it can be for a birthday or thinking of you card.  And I know you all have those kind of sentiments in your stamp set stash!

  I help out with the 2 year old Sunday school class at my church and the main teacher is a super awesome lady who is still rocking it at 89.  Yes, at 89 she still teaches Sunday School...the 2 year olds no less!  #lifegoals  Every year she hosts an Easter party (and Christmas party) for our class at her house and I make the invitations because well, I make cards and it's fun to do invitations for this occasion.  This is the design for this year's party.


  The card base is Whisper White thick and then a slightly smaller layer embossed with the Elegant Dots embossing folder.

  The sentiment is from the long retired Well Scripted set and is stamped with Smoky Slate and cut with the oval layering framelits.  A Stitched Shapes oval backs the sentiment panel.

 The butterfly is a 3 step process for the wings starting with the lightest color So Saffron, then Peekabook Peach stamped off once.  Then full strength Peekaboo Peach stamped along the wing edges.  After cuting out the wings with the Butterflies framelits then I stamped the body in Smoky Slate.  It's easier to line up the body in the white space after die cutting.  If you stamp the body first and then cut you might not have it lined up well and your butterfly could have its head chopped off.

  I added a bit of Peekaboo Peach ruched ribbon behind the ovals and then popped the butterfly with dimensionals.

  Thanks for looking!  Did you stamp today?

Stamps: Watercolor Wings, Well Scripted (retired)

Ink: So Saffron, Peekaboo Peach, Smoky Slate

Paper: Whisper White thick, Whisper White, Smoky Slate

Accessories: Butterflies framelits, Stitched Shapes Framelits, Layering Ovals framelits, Elegant Dots e.f., ruched ribbon, dimensionals


Thursday, April 20, 2017

Simple Blossom Sympathy - Stampin' Up! You've Got This

 While I only purchase and stamp with Stampin' Up! products I do enjoy seeing what other companies are designing from time to time.  And if I want to,  I can usually recreate a design using my Stampin' Up! supplies.  Pinterest is a great place to just browse designs without having to slog through 20 different company websites.  I pinned this card quite a while ago.  I think the simplicity of the large white flower really drew my attention.  So when I needed a sympathy card recently, I pulled up my "ideas" board and looked around and decided to use one of my Stampin' Up! sets to make a similar card.


  The card starts with a Basic Black card base, then a layer of Sahara Sand.  On the Sahara Sand layer I stamped the big peony (??) blossom from You've Got This in black twice.

  Then I stamped the flower again on Whisper White and fussy cut it out.  I also stamped some of the leaves twice so I could layer them behind after they were colored.

  The flower is colored in with clear Wink of Stella (which you can't see at all in the photo) and the center is colored with the Daffodil Delight colored pencil.  The leavs are lightly colored with the Old Olive colored pencil and then the some highlights added with the Old Olive marker.

  The flower and one set of leaves are popped on a dimensional over the top of the background flowers.  The sentiment is stamped in black.

  Thanks for looking!  Did you stamp today?

Stamps: You've Got This, Thoughts and Prayers

Ink: Basic Black  Colored Pencils: Daffodil Delight, Old Olive  Marker: Old Olive

Paper: Basic Black, Sahara Sand, Whisper White

Accessories: Clear Wink of Stella, dimensionals

Wednesday, April 19, 2017

Stamped Off Flowers Birthday - Stampin' Up! Avant Garden

 After today's card I think I am all caught up with sharing class projects.  Even though you can no longer get Avant Garden through Stampin' Up! if you've missed out on this great Sale-a-Bration set you can probably find it somewhere.  But this technique would work well with other solid image flower stamps.


  We stamped the flower panel with Island Indigo and alternated around the side with full strength ink and stamped off ink (just ink up your stamp, then stamp it onto scrap paper before stamping on your cardstock) to give a nice little layered look with some depth.  When I was explaining this project to my stampers I told them that this is a technique that has been around forever but we might forget about it because there are so many new tools and fancy dies that are available these days.  Stamping off is also a great way for new stampers to make their inks work a bit more because you can get a light and a dark version of the same color...you don't always have to have every single color right away.  

  After stamping the flowers the leaves are stamped in Mint Macaron (retiring In Color) and repeated the stamping off.  Next the centers of the flowers are stamped in Smoky Slate.

  The sentiment is also stamped in Smoky Slate and a sprinkling of adhesive rhinestones brings attention to that corner.  Some Vanilla and silver ribbon was wrapped around the flower panel.

  The other items that is a subtle details but brings a lot to the card is the embossing with the Elegant Dots embossing folder (retiring).  Several of my stampers fell in love with this one and had to order it.  And I'm so glad they did as it's now on the retiring list.  I just checked and it seems that it's still available so if you have this on your wish list don't wait!

  Thanks for looking!  Did you stamp today?

Stamps: Avant Garden

Ink: Island Indigo, Mint Macaron (retiring), Smoky Slate

Paper: Very Vanilla, Island Indigo

Accessories: Elegant Dots e.f. (retiring), rhinestones, Vanilla silver stripped ribbon, dimensionals


Tuesday, April 18, 2017

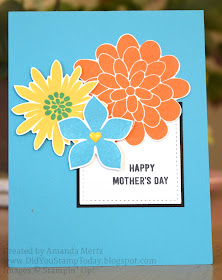
Bright Flowers Mother's Day - Stampin' Up! Flower Patch

  With all the attention I've been giving to Father's Day lately I don't want anyone to think that I've forgotten about Mother's Day.  We made this card at my March class and my stampers had the choice of the sentiment they wanted to use.  The Thoughtful Banners set is so versatile for changing sentiments to fit whatever occasion you have.  And a nice flower card is always handy to have tucked in the card box.


  Now when I designed this card using the Flower Patch stamp set I didn't know that it would be retiring.  I'm glad I got a few cards made with it but as I usually feel when a stamp set retires that I didn't use it nearly as much as I could have.  All the cards that could have been....lol!  

  For this card I used a bright, bold color combination.  Not all moms out there are into frills, pastels and lace so it's nice to have some colors that might reflect more of their personality.  The card base is Tempting Turquoise.  The flowers are stamped in Pumpkin Pie, Daffodil Delight and Tempting Turquoise.  The flower center of the Daffodil Delight flower is stamped in Tempting Turquoise.

  The coordinating Flower Fair framelits (also retiring) were used to cut out the flowers.  They are arranged around the sentiment panel which is a Whisper White square cut with the Stitched Shapes framelits backed with a Basic Black panel.  A trick to making sure that you have enough room on your sentiment panel for the phrase is to start with the bottom words first and then work your way up.    Then you can make sure your flowers don't cover anything up and there is room for all you want to say.

  Using the Brights collection of enamel shapes my stampers could choose any of the colors/shapes that they wanted to add a bit of detail to the smallest flower center.

  Thanks for looking!  Did you stamp today?

Stamps: Flower Patch (retiring), Thoughtful Banners

Ink: Pumpkin Pie, Daffodil Delight, Tempting Turquoise, black

Paper: Tempting Turquoise, Basic Black, Whisper White

Accessories: Flower Fair framelits, Stitched Shapes framelits, enamel shapes, dimensionals


Monday, April 17, 2017

Spring Birthday Rose - Stampin' Up! Rose Wonder

 It's back to the grind today after spring break and Easter.  I think waking up at 6:15 was a bit shocking to the boys this morning but they rallied and we even got out of the house in a reasonable amount of time!  Small victories right?

  I still have lots of cards to share even though I wasn't home last week to stamp.  Today's card is one that we made at my March stamp club.  We did a bit of embossing, a bit of water spritzing and a bit of watercoloring to make this beauty.


 The card base is Cucumber Crush a soon to be retired In Color.  Hopefully you all have placed you orders for inks, papers and embellishments in the retiring colors.  They aren't lasting long and some items have already sold out.  Cucumber Crush is a nice fresh green for spring.

  Next the sentiment is stamped in black onto a Whisper White panel and a bit of white organza ribbon (also retiring) goes across the side.  This is a great design to just switch out the sentiment for a thank you, or thinking of you or we even did some Easter greetings in class.

  To make the rose we stamped it in Versamark onto Shimmery White card stock and embossed it with white embossing powder.  Next, we spritzed the image with water so that we had little pools of water in each of the petals and leaves.  Then we took an Aquapainter and reinkers and dabbed, swirled and painted our colors on the image.  There is no wrong way to apply the ink for this card.  From the center out, we used Peekaboo Peach, Flirty Flamingo and Watermelon Wonder (also retiring).  The Cucumber Crush ink was used on the leaves.  Using the heat gun again, dry the image and then cut it out.  The rose image comes with another little leaf attached but we cut that one off and just used the bigger leaf but cut it off and repositioned it.  The rose is popped up with dimensionals.

  Just like I told my stampers....way easier than it first looks!

  Thanks for looking!  Did you stamp today?

  Stamps: Rose Wonder

  Ink: Versamark, Cucumber Crush, Peekaboo Peach, Flirty Flamingo, Watermelon Wonder

  Paper: Cucumber Crush, Whisper White, Shimmer White

  Accessories: organza ribbon, white embossing powder, dimensionals


Friday, April 14, 2017

Dapper Dad Collage - Fab Friday 110 - Stampin' Up! Swirly Bird

  I'm a few hours late getting my Fab Friday Design Team card shared but better late than never right?  I had originally let Mindy know that I wouldn't be able to have a card ready for this week's challenge because we were heading out of town for spring break.  I didn't even see the new set of color combos and sketches we would be working with for the next few months until the day before we were leaving.  It turned out we didn't leave as early as I thought we would but we were all packed so I had a few minutes to quickly put a card together with our challenge colors.  Woo-Hoo!  How proud I was to actually not have to be a flake this time around.  I packed the card up and planned to photograph it, edit it and do the blog post while on vacation.  Best laid plans right?  Well, we got up to the house we were renting in the mountains of Virginia and realized there was no internet.  So I had a card but no way to send it to Mindy for the challenge blog or to write my own blog post for it.

  It was a fabulous vacation with lots of outdoor time and quiet relaxing at the charming mountain farmhouse.  There was even a horse, donkey and sweet barn cat...just no internet!!  So that's why I'm several hours late sharing today.  But I'm home with internet service and a few minutes before dinner.


  I looked at the Fab Friday Challenge and had to laugh about the goof up with the colors...I was thinking it would have been easier if I had seen the grouping with the Calypso Coral instead of the Perfect Plum....The Perfect Plum stumped me!  So I guess use whatever set of colors speaks to you!


  And now for my card....when in doubt with a color challenge go with a lot of white space and the collage look!


  As you can see I used very little of the Perfect Plum....It just wasn't working for me so I just used it on the dapper Dad's bowtie and one of the hearts.  And speaking of those hearts and the "you're wonderful"...those a stamps from an upcoming Annual Catalog set that I received at the Stampin' Up! On Stage event last weekend.  It's called Tabs for Everything.  I think it will be a great go to set for fun sentiments!  I'll be all set with my Father's Day cards before too long with the way I've been stamping lately!

  The other images are from Swirly Bird.  I put everything together on Whisper White stitched shapes squares, added some DSP and embellishments and popped it all with dimensionals on a thick Whisper White base.

  I hope you'll join in on our Fab Friday color challenge this time...pick one palette or do a card for each!

  Thanks for looking!  Did you stamp today?

Stamps: Swirly Bird, Tabs for Everything (coming in the 2017/18 Annual Catalog)

Ink: Night of Navy, Pool Party, Old Olive, Peekaboo Peach, Perfect Plum, Crumb Cake

Paper: Whisper White, Whisper White thick, Floral Boutique DSP, Serene Scenery DSP stack

Accessories: Stitched Shapes framelits, corner rounder punch, Night of Navy baker's twine, linen thread, star shapes from Christmas Tag kit (retired), owl punch 9to punch out hearts), dimensionals

Monday, April 10, 2017

Fishy Father's Day - Stampin' Up! Seaside Shore

  Sometimes I sit down to stamp and the card just comes together right away and other times I have to really work on it to get the parts to look right or play around with just the right color combination.  And other days it just takes that "A-Ha!" moment and the right inspiration for it all to come together.

  For today's card I had a picture from a catalog of a shower curtain with different fish in shades of blue as my starting point.  The fish were a bit more whimsical than the fish in Seaside Shore but I figured that I could get something to work.  I started with a Whisper White panel and began sponging with my lightest color; Pool Party, then went onto Pacific Point and finally the darkest blue; Dapper Denim.

  Next, I moved on to stamping my fish.  I did one in each of the background colors and then fussy cut them out.  We get spoiled by so many sets having coordinating framelits but don't let the lack of a framelit set or punch keep you from getting a set that you like.  Fussy cutting isn't hard it just takes a bit of patience and the more you do it the better you become at it.

  Then I sat and I sat and I sat with these pieces, moving them around, trying to imagine what some seaweed at the bottom would look like....maybe some bubbles going to the surface.  Several different colors of ribbon were pulled out...  But nothing was looking right to me.  So I left all the pieces on my desk and moved on to something else.  Then along came the Freshly Made Sketches challenge (see below for the sketch) and the lightbulb went off and the card came together quickly after adding in the squares!  It just takes that one little bit of inspiration some times!


  I cut out 3 small squares with the Stitched Shapes framelits and adhered my fish to them with dimensionals and the arranged them like the sketch.  The sentiment is embossed in white using the Thoughtful Banners stamp set.  And I added a little Pool Party baker's twine bow as the final touch. 

   So I guess the moral of the blog post is to not give up on a card even if at first it doesn't seem to be coming together.  Save the pieces and take a break and I bet after some time you'll find the right inspiration to finish it off!

  Thanks for looking!  Did you stamp today?

Stamps: Seaside Shore, Thoughtful Banners

Ink: Pool Party, Pacific Point, Dapper Denim, Versamark

Paper: Dapper Denim, Whisper White

Accessories: Stitched Shapes framelits, dimensionals, white embossing powder, Pool Party Baker's twine (retired)


Sunday, April 9, 2017

Happy Birthday Sunshine - Stampin' Up! Swirly Bird

  I don't usually blog on the weekends but with our spring break this week I know I'll be too busy to sit down and be at the computer and I don't want to get more behind than I already am!  It won't be very quiet either with the boys off of school!  Who can concentrate on drinking coffee and blogging about a card with the chaos that an 8 and 10 year old bring to the house?  Not me!  So I better get a few things posted now while they are quietly doing other things!

  My downline Julie and I had a blast yesterday at the Stampin' Up! On Stage event here in Richmond.  I wish all 4 of my downline could have attended but maybe we had enough fun for everyone.  Demos gathered around the country (and the world) for some good times with Stampin' Up!  We had fun with ladies from New Jersey, Ohio and Pennsylvania at our table and then I met up with another group for dinner after the event.  Lots of laughs and even some business sharing at dinner.  Stampin' Up! certainly brings great people together!

  And the best thing of the day is that we got to see new products that are coming out in the annual catalog and bring home our very own catalog!!  It's so fun to begin making my wish list and planning projects and classes with all the new products that will be available soon.  But for now all I can tell you is that you will love it!  If you are really curious to know all these exciting demo-only details ahead of time you'll have join Stampin' Up!

  Now on to the card for today:


  I used 2 challenges to get the ball rolling for this card; The Color Throwdown Challenge and the CAS(e) This Sketch challenge.

  It was kind of fun to come up with a design using these bright challenge colors but still keep to the clean and simple sketch.

  The colors are Daffodil Delight, Real Red, Soft Sky, Garden Green and I threw in some black to make it all pop.

  The flowers and leaves are stamped with the Swirly Bird set, cut out and are popped up under the sentiment. The sentiment is stamped in black with the Sunshine Sayings set and paired with the coordinating Sunshine Wishes thinlets.  I cut the "sunshine" out twice.  Once in Soft Sky and then again in black and just layered the black one behind the Soft Sky one slightly off set to help make it stand out better against the white background.

  The Whisper White background is stamped with the Writing Notes background in Soft Sky.  I adhered it to the Daffodil Delight panel and the black cardfront before punching out the little circles that I was intending to punch.  Oh well!  The last detail is the little Daffodil Delight candy dot above the "i".

  Thanks for looking!  Did you stamp today?

Stamps: Swirly Bird, Sunshine Sayings, Writing Notes

Ink: Soft Sky, Garden Green, Real Red, Daffodil Delight, black

Paper: Basic Black, Daffodil Delight, Soft Sky, Whisper White

Accessories: Sunshine Wishes thinlets, dimensionals, candy dot (retired)


SaveSave

Friday, April 7, 2017

Jar of Birthday Flowers - Stampin' Up! Jar of Love

  I'm super excited that it's Friday and not just for the regular reasons of the weekend starting but because tomorrow, hundreds of Stampin' Up! demonstrators will be here in Richmond to participate in Stampin' Up!'s On Stage demo event!  It's an exclusive demo-only event where we get to visit, stamp, see new products and get fired up for the upcoming new annual catalog.  Oh, and we get to take home some fun new products!  It's always a great time to be around others who are as excited about stamping as me!  If you're interested in learning more about becoming a demonstrator please reach out to me!

  I've gotten in a lot of stamping time during the past week and the challenges out there are really inspiring.  The current challenge over at Hand Stamped Sentiments was a really easy one to get started on.  They have the colors Pool Party, Calypso Coral and Smoky Slate this time which just happen to be the colors in the A Little Foxy DSP stack.

  I pulled the paper out and paired it up with Jar of Love.  That sweet little jar is too cute and adding some flowers sets it up as a great birthday card!


  The card base is Calypso Coral and then a layer of A Little Foxy DSP with the corners rounded.  I embossed a strip of Smoky Slate with the Large Polka Dot embossing folder.  I feel like I've neglected my embossing folders lately so it's felt nice to give this one a little love!

 Notice the little bit of Pool Party scallop edging?  I made that with the largest scalloped Layering Square framelit.  I cut the edge twice and then layered the strips under the Smoky Slate layer making sure to have the seam fall under where I was going to place the jar.  It's a fun little detail and easy to do with narrow pieces of scrap cardstock.

  The jar is stamped in Smoky Slate and cut out. The flowers are stamped off once in Calypso Coral and the centers stamped again in full strength.  A few are stamped right inside the jar and the rest are stamped and cut out along with 2 little leaf branches.  Some of the flowers are popped up with dimensionals.  I put a little Pool Party bakers twine bow in the flower cluster.

  I had a hard time finding a small happy birthday sentiment that would fit in the space where I wanted to put it.  I was hoping for one that was a bit more swirly but I settled on the one from Barnyard Babies because it fit the best.

  Get some stamping time in this weekend so you have those birthday cards ready to mail out on Monday!

  Thanks for looking!  Did you stamp today?

Stamps: Jar of Love, Barnyard Babies

Ink: Smoky Slate, Calypso Coral, Pool Party

Paper: Smoky Slate, Calypso Coral, Pool Party, Whisper White, A Little Foxy DSP

Accessories: Large Polka Dot embossing folder, Everyday Jars framelits, Layering Squares framelits, Pool Party baker's twine (retired), dimensionals


Thursday, April 6, 2017

Peachy Birthday - Stampin' Up! Swirly Bird

I'm joining in over at the Global Design Project today.  They have a fun color challenge using Whisper White, Night of Navy and one other color.  


  I am always in need of birthday cards so I decided to make this card for a birthday.  I used Peekaboo Peach as my choice of the additional color.  I thought some big flowers clustered beside a sentiment would make for a fun look.


  I used Swirly Bird for the flowers and varied the shade of the Peekaboo Peach by stamping off.  I hand cut the flowers and then layered them over the top of the stamped sentiment from Rose Wonder. The smallest flower is popped on dimensionals and has little pearls clustered in the center.

  The DSP is from the Floral Boutique pack and is the perfect choice for this Night of Navy challenge.

  Thanks for looking!  Did you stamp today?

Stamps: Swirly Bird, Rose Wonder

Ink: Night of Navy, Peekaboo Peach

Paper: Whisper White, Floral Boutique DSP

Accessories: corner rounder, pearls, dimensionals

Wednesday, April 5, 2017

Sweet Little Bunny - Stampin' Up! Punches

   I've been able to join in a few challenges lately and it's been fun to stretch my supplies and imagination.  The Mojo Monday challenge is the layout and the theme for the Paper Players is "Easter Bunny".  Super fun to put these 2 challenges together and see what I could come up with.

  I don't have any bunny stamps so the bunny challenge was a real challenge for sure.  Punch art to the rescue. I searched Pinterest to get a feel for any punch art designs with rabbits and then I got to work!


  I used 3 different punches to create my bunny; Festive Flower, Fox Builder, and Tree Builder.  It was fun to pull different shapes in to make this little sweetie.

  Festive Flower- inner and outer ears, carrot tops and bottoms
  Fox Builder- head, body
  Tree Builder- tail, neck fluff

  The bunny is punched in Crumb Cake and Whisper White.  I used the Melon Mambo watercolor pencil and a blender pen to make the bit of pink in the ear.  I stamped the bunny face with the Foxy Friends stamp set in black.  After I had everything adhered I realized I should have sponged the edges of the bunny...live and learn.  The teeth are just hand cut out of a scrap of Whisper White.

  The carrots are Peekaboo Peach with a little sponging and the Peekaboo Peach marker was used to make little detail lines.  The carrot tops are punched out in Emerald Envy cardstock.

  The punch art is mounted onto a stitched shape circle and is layered over the top of a piece of Flirty Flamingo embossed with the Elegant Dots embossing folder.

  The DSP is a piece of the retired It's My Party DSP.  I added a strip of burlap ribbon to put the sentiment on.  The sentiment is from the retired And Many More set and is punched out with the also retired Word Window punch.  Some retired items I just can't give up!

  The final detail is the sprinkling of Frosted Sequins (also retired).  Even though some of the items I used on this card are retired, all the punches used to make the bunny are current so you can easily recreate this punch art bunny!

  The Easter Bunny has come early to our house!  We've named this little guy Peter and he happily hops around our yard and even has a little hidey hole among some of our plants.  Isn't he cute?


  Thanks for looking!  Did you stamp today?

Stamps: Foxy Friends, And Many More (retired)

Ink: Basic Black, Peekaboo Peach

Paper: Whisper White thick, Whisper White, Crumb Cake, Flirty Flamingo, Peekaboo Peach, Emerald Envy, It's My Party DSP (retired)

Accessories: Festive Flower punch, Fox Builder punch, Tree Builder punch, Stitched Shapes framelits, dimensionals, watercolor pencils, Elegant Dots embossing folder, burlap ribbon, Word Window punch (retired), Frosted Sequins (retired), dimensionals


Tuesday, April 4, 2017

Special Hello - Stampin' Up! Special Reason

 Here in central Virginia we've reached that special season of the year that is part of spring and hopefully won't last long...Pine Pollen season.  It rained last night so all the pollen is caked up on the edge of the road, once it dries it will be blowing around leaving the yellow mess everywhere.  My house smells like bacon from our BLT dinner last night but I don't dare open the windows or I'll have my work cut out for me and the feather duster.  If you're coming to Richmond this weekend for the Stampin' Up! On Stage and you're susceptible to spring allergies you might want to bring your allergy medicine!  

  On to a flower card with no pollen!


  This is another one we made at my February class.  I'm still loving the Special Reason stamp set and coordinating framelits set.  For this card we stamped the 2 flowers with Pink Pirouette with the edges sponged a bit with Flirty Flamingo.  We cut out the die cut flower in Flirty Flamingo cardstock.

  The Stitched Shapes framelits make a nice base for the large flower and the sentiment.

  The 2 leaves were mounted on one clear block and then stamped in Sahara Sand on Sahara Sand cardstock.

  Thanks for looking!  Did you stamp today?

Stamps: Special Reason

Ink: Flirty Flamingo, Pink Pirouette, Sahara Sand, Night of Navy

Paper: Night of Navy, Sahara Sand, Whisper White, Flirty Flamingo

Accessories: Stitched Shapes framelits, Stylish Stems framelits, dimensionals, Night of Navy bakers twine

Monday, April 3, 2017

Butterfly Friend - Stampin' Up! Watercolor Wings

 It seems that I am forever behind in sharing cards.  I just wrapped up my March stamp club last Tuesday but I haven't even shared the projects from February!  I clearly need to get more organized.

  Today's card is a fun spring card and with just a change of sentiment can be used for a lot of different occasions..spring birthday, sympathy, hello, thinking of you, get well....


   The card base is Whisper White thick, then a smaller layer of Whisper White with the butterfly stamped on it.  The butterfly is a 3 step layered image from Watercolor Wings stamp set.  We started with the So Saffron, then the lighter layer of Peekaboo Peach stamped off once, then the outer edge with Peekaboo Peach in full strength.  The body and antennae are embossed with copper embossing powder.

  To do the sentiment layer we used a long strip of vellum and embossed the sentiment from Suite Sentiments.  Make sure to use the embossing buddy for all your embossing...the specks of copper really show up on the vellum and Whisper White cardstock.  Since you can see adhesive through vellum we wrapped the ends of the vellum strip behind the Whisper White panel and adhered in the back so we didn't need any adhesive on the front.

  There isn't any other embellishment on this card but I think the simple look works really well with the vibrant butterfly and little pop of shine with the embossing.

  Thanks for looking!  Did you stamp today?

Stamps: Watercolor Wings, Suite Sentiments

Ink: So Saffron, Peekaboo Peach, versamark

Paper: Whisper White, Whisper White thick, vellum

Accessories: corner rounder, copper embossing powder