Friday, September 25, 2015

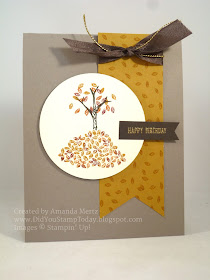
Autumn Leaf Pile - Stampin' Up! Sprinkles of Life

  I haven't seen any leaves changing in our area yet but I am getting ready for fall.  I put out my fall and Halloween decorations and our windows have been open more often than not lately to let the cool air inside.

  I'm also getting ready by having a stash of seasonal cards on hand just in case.  The Sprinkles of Life set has been my go to lately for all kinds of cards.  Once I started designing for my Sprinkles of Life class at the beginning of the month I couldn't stop!

  It looks great in fall colors with a hint of gold too!


  A little work with my markers, some masking and a gold embossed greeting and this one came together quickly.

  Check out that new gold cord from the Holiday catalog that I added in with the Early Espresso seam binding ribbon.  You know you want some for your fall cards and then use more for Christmas cards!

  The leaf pile was stamped first.  I inked up using Delightful Dijon ink then randomly colored parts of it with the Tangelo Twist and Cherry Cobbler markers.  That gave a nice multi-hued pile of leaves. Then I made a mask using a sticky note to cover my leaf pile while stamping the tree in Early Espresso.  I added some more leaves in the same colors to the tree.


  Don't forget that Stampin' Up! donates $3 to Ronald McDonald House charities for every Sprinkles of Life stamp set sold.  Get the set and matching Tree Builder punch and not only make super cute cards but help out a wonderful charity at the same time!  Win Win!

  Still not convinced you need this set?  Maybe you missed some of these cards that I've made with the Sprinkles of Life set... Spooky Halloween, Sweet Little Bird, and Basket of Apples.  

  Thanks for looking!  Did you stamp today?

Stamps: Sprinkles of Life

Ink: Early Espresso, Delightful Dijon, Tangelo Twist, Cherry Cobbler, Versamark

Paper: Tip Top Taupe, Delightful Dijon, Very Vanilla, Early Espresso

Accessories: Circles framelits, Early Espresso seam binding ribbon, gold cord, gold embossing powder, dimensionals


Built for Free Using: My Stampin Blog

Thursday, September 24, 2015

Celebrate - Stampin' Up! Celebrate Today

 There is always something to celebrate; a new baby, a job promotion, a great score on a test, a dreaded task completed... the reasons to celebrate are endless! Whether it is a big or small thing why hold back from celebrating!  Send that someone a card and celebrate along with them!

  I made this card just because I had the time to stamp the other day (yay!) and now I need to find someone to send it too!

  My inspiration for the layout was for a probably now closed challenge but I can't even figure out which one....my blog reader is out of whack ever since they decided to "make it better" and now I can't find stuff on it.  And they keep adding in advertisements for fashion and jewelry...HELLO!!  Nothing in my feed or my life would ever make anyone think I would be interested in a makeup blog or a jewelry blog....  If it's not paper crafting related it doesn't need to be in my feed! Come on man!

  Anyway on to the card!


  I had some fun with the Cherry on Top DSP and the Celebrate Today stamp set.  They are a great match!  Don't forget that the stamp set and coordinating framelits are available as a bundle for 15% off.  

  I pulled my colors right from this fun banner pattern.  For the pennants on the balloon I stamped the full line in each color then just cut them out individually and glued them down to the die cut.  I tried coloring them with markers and then stamping but the colors weren't looking vibrant enough for my liking.

  I added some faux stitching around the larger Bermuda Bay banner.  Other than that this is pretty straightforward.

  Find something to celebrate today!  

  Thanks for looking!  Did you stamp today?

Stamps: Celebrate Today

Ink: Crushed Curry, Versamark, Watermelon Wonder, Bermuda Bay, Pool Party

Paper: Pool Party, Cherry on Top DSP, Bermuda Bay, Whisper White

Accessories: white baker's twine, Balloon framelits,  Pool Party cotton ribbon, dimensionals, small banner punch, white embossing powder


Built for Free Using: My Stampin Blog

Tuesday, September 22, 2015

Simple Sympathy - Stampin' Up! Thoughts & Prayers

 Just a quick post this morning to share a card I made last year and never got around to sharing.  The Thoughts & Prayers set has been around for what seems like forever but it must still sell well enough that Stampin' Up! keeps it in the annual catalog.  It does make nice get well and sympathy cards so I'm glad to still have it in my current stamp set collection!


 This was a color combination that was suggested by the now retired Color Coach.  Basic Gray, Hello Honey and Pool Party.

  The card base is Basic Gray, then a layer of Pool Party.  The tree and sentiment were stamped in Basic Gray onto Whisper White.

  I used a retired flower punch to punch out a few in Pool Party and then one in Hello Honey.  The flower punch in the Itty Bitty Accents punch pack would be a good current punch to use for this design if you'd like to make it.

  I added the flowers and then put a small pearl on each flower.  The final accessory is the Hello Honey stitched satin ribbon.

  Thanks for looking!  Did you stamp today?

Stamps: Thoughts & Prayers

Ink: Basic Gray

Paper: Basic Gray, Pool Party, Hello Honey, Whisper White

Accessories: pearls, flower punch (retired), Hello Honey stitched satin ribbon (retired)

Monday, September 21, 2015

Spooky Halloween - Stampin' Up! Sprinkles of Life

  Walking to school on Friday the boys were talking about what they wanted to be for Halloween and they were throwing out all kinds of different ideas.  I don't take them too seriously until about 2 weeks before Halloween and then they have to make their final decision and we can get to gathering supplies and making them.  We've had quite the costumes in the past so I'm curious what they will end up with.

  I don't usually send out many Halloween cards but I still like to make a few during the season since it's fun to make some spooky creations!  I created this one when I was coming up with samples for my recent Sprinkles of Life class.  Using the Sprinkles of Life set with the coordinating Tree builder punch makes for a cute Halloween card!  There's not much this punch/stamp set combo can't do!


  The card base is Smoky Slate and to balance the 4 panels on the one side I put a black stitched satin ribbon on the other side.

  Each of the 4 panels has a vellum square as the base and I used the black Stampin' Write marker to do some faux stitching around each one.

  The cloud and moon panel is made by stamping the cloud in Versamark ink onto Basic Black cardstock and embossing it in white embossing powder and then punching it out with the Tree builder punch.  The moon is a small punched circle in So Saffron.  I used a sponge dauber to rub some So Saffron ink onto the vellum around the moon shape.  The moon is adhered behind the vellum and the cloud is popped up on dimensionals over the top of the vellum.   I hope it doesn't look too much like a sun.  I was going for the spooky moon peeking through the cloudy mist.

  The bat panel is made by punching out 2 birds with the Tree builder punch for each bat using the new Black Glimmer paper.  I trimmed the beak off of the top one for each bat and adhered them upside down with a glue dot and they are adhered right on top of the vellum.


  The Happy Halloween is from the And Many More set and is embossed in black and snipped into a banner.  I added a little rhinestone that I colored darker with a black alcohol marker to keep with the spookiness.

  The tree panel is made by stamping the tree in Versamark ink onto Basic Black cardstock and embossing it in white and then punching it out.  I used the punch again to make the pumpkin.  It's not just an apple or cherry folks!  It's a pumpkin too!  I used the Old Olive marker to color the stem of the pumpkin and then adhered them to the vellum.

  I hope I showed you something new to do with the Sprinkles of Life stamp set and Tree builder punch!

  Thanks for looking!  Did you stamp today?

Stamps: Sprinkles of Life, And Many More

Ink: Versamark, So Saffron

Paper: Smoky Slate, Vellum, Black Glimmer, Basic Black, So Saffron, Pumpkin Pie, Whisper White

Accessories: Tree Builder punch, white embossing powder, black embossing powder, rhinestone, stitched satin ribbon

 
Built for Free Using: My Stampin Blog

Friday, September 18, 2015

Through the Window Thank You - Stampin' Up! Among the Branches

Happy Happy Happy Friday!  And to make it even better it's a Fab Friday!  Do we have a great color combination for you this time around!

  Check this out!


  Rich Razzleberry, Old Olive and Soft Suede.  Oh the things you can do with these colors!  You might be seeing another card from me soon using these colors.  I think they would be great guy colors if you go light on the Razzleberry.

  I decided to go kind of nature-y with my Design Team sample.


 Using a combination of stamp sets I created a window view.  3 stamp sets worked together on this one.  The tree and leaves are from Among the Branches, the flowers are from Sheltering Tree and the sentiment is from One Big meaning.

  For the leaves on the tree I used a combination of full strength ink and stamped off once.  The leaves on the sentiment circle are all stamped off once and the leaves floating down are full strength and cut out and glued down to the card front.

  The window frame is cut out of Soft Suede with the new Hearth & Home Thinlets.  There are so many neat things you can do with this die and I'm home to try some more out soon!

  I hope you'll head over to Fab Friday to see the loveliness that the rest of the Design Team has today and then play along.  Remember our challenge lasts for 2 weeks so there's no excuse to not join in!

  Thanks for looking!  Did you stamp today?

Stamps:  Among the Branches, Sheltering Tree, One Big Meaning

Ink: Soft Suede, Old Olive, Rich Razzleberry

Paper: Soft Suede, Old Olive, Rich Razzleberry, Whisper White

Accessories: Hearth & Home Thinlets, Elegant Dots e.f., circle punch, dimensionals


Built for Free Using: My Stampin Blog

Thursday, September 17, 2015

Row of Flowers - Stampin' Up! Sprinkles of Life

  After the decidedly end of the year seasonal cards of the last few days I need to switch it up and show a bright, fun, summery card before I lose track of time and I'm sharing it in January!

  I kind of forget about the square card sometimes and I think this one came about because the Cucumber Crush card base was already cut to just the right size in my scrap bag.  Stamping fate I tell you!


  A square card is a good choice for images the size of these from the Sprinkles of Life set.  They are on the smaller side so a smaller canvas keeps them from getting lost.

  On top of the Cucumber Crush base is a piece of Cherry on Top DSP.  I added a strip of Watermelon Wonder dotted lace trim.

  Using the retired Scallop border die I cut across a piece of Whisper White and then stamped the flower stems in Cucumber Crush.  The flowers were added next in Crushed Curry and Watermelon Wonder.  I found it really easy to line them all up; got to love that benefit of using photopolymer!

  I stamped one cloud in Pool Party ink on the large panel and then stamped another onto scrap paper and punched it out with the Tree Builder punch.  I popped the punched cloud up with the dimensional.

  The sentiment was added in Memento black ink.  The final touch is the Watermelon Wonder "bow". 

  Now to decide which friend gets this one...maybe I should make a few more?

  Thanks for looking!  Did you stamp today?

Stamps: Sprinkles of Life

Ink: Cucumber Crush, Watermelon Wonder, Crushed Curry, Black

Paper: Cucumber Crush, Cherry on Top DSP, Whisper White

Accessories: Tree Builder punch, Dotted Lace Trim, dimensionals, Scallop Edge die (retired)
Built for Free Using: My Stampin Blog

Wednesday, September 16, 2015

Super Simple Christmas Tree - Stampin' Up! Festival of Trees

  If you're like me you are already starting to plan (maybe just in your head) for the upcoming Christmas season.  I'm making mental notes, pinning certain projects on Pinterest and generally just keeping aware of the calendar so time doesn't get away from me.  Having a few super simple Christmas card designs up my sleeve is essential.  While we send out about 60-70 family Christmas cards I always find myself needing about 20 more to go along with teacher, staff, Sunday school teacher and other small gifts that we give to various people at Christmas.  I like having a few designs that I can whip up without a lot of fuss and supplies.

  I think this card fits the bill.  And to make it even better.....you can use the same layout and just switch out the paper designs to mix and match.  I used the Merry Moments DSP pack from the Holiday catalog that has 4 designs on 48 double sided sheets.


  The card base is Crumb Cake with a piece of the Merry Moments DSP next.  I embossed the sentiment in gold.  The words are part of the Holly Jolly Greetings stamp set with also has endless mix and match possibilities!

  I had a scrap of retired Old Olive Coredinations textured cardstock laying around so that went on next.  You can also just stamp a piece of Old Olive cardstock or emboss with an embossing folder if you want a bit of interest for this part.  Next comes another smaller piece of Merry Moments DSP.

  I stamped the solid tree image from Festival of Trees (Annual catalog) in Old Olive ink and punched it out with the Tree punch.

  I small punched star in Gold Glimmer paper and some gold thread was added behind the tree.  The tree is popped up on dimensionals.

  I used the Just Add Ink challenge layout but flipped it on it's side.  I will be making more of these for sure!

  Thanks for looking!  Did you stamp today?


Stamps: Festival of Trees, Holly Jolly Greetings

Ink: Versamark, Old Olive

Paper: Crumb Cake, Merry Moments DSP, Whisper White, Old Olive, Gold Glimmer

Accessories: gold thread, tree punch, star punch, gold embossing powder, dimensionals
Built for Free Using: My Stampin Blog

Tuesday, September 15, 2015

Autumn Maple - Stampin' Up! Vintage Leaves

  Since my card yesterday highlighted the beautiful oak leaves in the Vintage Leaves stamp set I didn't want the maple leaf to get jealous so today's card features this beauty.  I think the maples changing colors are my favorite in the fall and while the colors I used aren't truly autumn colors I like how this one turned out.


 I'm using the colors in the current Hand Stamped Sentiments challenge; Pool Party, Daffodil Delight and Tangerine Tango.

  The card base is Basic Gray and then a layer of Whisper White embossed with the Woodland embossing folder.  I lightly sponged the edges with Basic Gray ink.  The only piece of Daffodil Delight ribbon that I had was the retired seam binding ribbon and it was stuffed into my scrap bin and was in serious need of being ironed.  I joked that if someone asked if I ironed I could be truthful and say yes.  No one has to know I only iron ribbon for a card and not clothes!

  To make the maple leaf I watercolored the 3 colors onto watercolor paper with my Aquapainter.  I just put the colors down in random splotches and then dried it with my heat gun.  Once it was dry I inked up the maple leaf with Basic Gray ink and stamped onto the watercolor paper.  The leaf was then cut out with the Leaflets framelits.  Remember you can get the Vintage Leaves stamp set and Leaflets framelits in a bundle and save 15%!

  I mounted the leaf with dimensionals and then add the happy birthday banner and button tied with baker's twine.

  Thanks for looking!  Did you stamp today?


Stamps: Vintage Leaves, And Many More

Ink: Basic Gray, Pool Party, Daffodil Delight, Tangerine Tango

Paper: Basic Gray, Whisper White, watercolor paper

Accessories: Woodland e.f., Leaflets framelits, Daffodil Delight seam binding ribbon (retired), Sale-a-Bration button (retired), Basic Gray baker's twine (retired)


Built for Free Using: My Stampin Blog

Monday, September 14, 2015

Rich Autumn Colors - Stampin' Up! Vintage Leaves

  I'm trying to shore up my card supply box with some cards for the autumn season so my Vintage Leaves set has been out and seeing some ink lately.

  For today's card I did some sponging onto Very Vanilla cardstock layering 3 different colors randomly over the cardstock.  I used Crushed Curry, Cajun Craze and Cherry Cobbler for the fall color and then stamped the leaf in Tip Top Taupe right over the top.  The matching Leaflets framelits make quick work of cutting out a perfect oak leaf shape.


 I'm using the Freshly Made Sketches challenge for my layout and I'm not sure they feel about sponging but I had to get some gold going on this card.  I sponged gold ink around the edges of the leaves as well as the edge of the embossed panel (embossed with the Woodgrain folder).  It is so pretty and shimmery in real life.  My poor photography skills don't do it justice.


  I added the sentiment banner in keeping with the sketch.  The sentiments from Sheltering Tree were just the right size for a skinny banner across the middle.  A bit of gold cording at one end and a few gold sequins finish off the embellishments for this card.

  If you are digging the realistic leaves and ease of cutting them out with framelits you're in luck!  Vintage Leaves and the Leaflets framelits are offered in a bundle to save you 15%!  Want more of a casual leaf stamp set that still matched the framelits?  Check out page 44 in the Holiday catalog for the Lighthearted Leaves set.  Lots of choices for fall cards.  As always everything you need to make this card you can buy through my online store.  Just click the photo below of the product you want to order to get started.


  Thanks for looking!  Did you stamp today?

Stamps: Vintage Leaves, Sheltering Tree

Ink: Crushed Curry, Cajun Craze, Cherry Cobbler, Tip Top Taupe, gold

Paper: Tip Top Taupe, Very Vanilla

Accessories: Leaflets framelits, gold cording, gold sequins, Woodgrain e.f., corner rounder punch, dimensionals


Built for Free Using: My Stampin Blog

Sunday, September 13, 2015

Red Foil Ornament - Stampin' Up! Holly Jolly Greetings

  While the weather might not be quite crisp enough to make the average person think of Christmas the temps have dropped a bit lately and that's enough for this stamper to think she better get going on some Christmas card designs!

  It's fun to get new stamps and accessories and see how well they play with items already in my stash.  For this card I used the Colour Me challenge which is to use Real Red, Lost Lagoon and a neutral.

  I ordered the Holly Jolly Greetings stamp set and the Christmas Greetings thinlets as a bundle because I thought they would nicely compliment some Christmas sets that I had that carried over from last year.  I ended up not using any of those stamp sets this time around as the stamps and thinlets made a great card all on their own.


  The base of the card is Crumb Cake with a layer of Whisper White stamped with the large snowflake in Lost Lagoon. I alternated using full strength ink and stamping off once.  I topped that layer with a smaller panel of Whisper White embossed with the Softly Falling embossing folder (Holiday catalog pg. 24).  It doesn't show up well in this photo but it's a nice subtle texture perfect for winter cards.

  I used the Red Foil sheets to cut my ornament shape.  Do you recognize that ornament shape??  It's the Balloon framelit!  Makes a pretty good ornament if I do say so myself!  Make your stamping tools do the work for you my friends!


  To top off the ornament I cut "merry" from Silver Glimmer paper using the Christmas Greetings Thinlets.  I also used the new Precision Base Plate (Holiday catalog pg. 14) to get nice crisp cuts and easy release from the die.  This is going to be a great addition for all those who love the intricate dies but don't like messing with the bits of cardstock stuck in the design!

  I stamped and embossed in silver "Christmas" onto Lost Lagoon cardstock and flagged the ends.  To hang the ornament I used the Silver Cording trim (Holiday catalog pg. 24) and added a little bow with a glue dot.

  I've still got a ways to go to get close to the number of cards I need for Christmas but every one helps!  To don't wait to get started on your designs either....you don't want to be rushed or run out of time!


  Thanks for looking!  Did you stamp today?

Stamps: Holly Jolly Greetings

Ink: Lost Lagoon, Versamark

Paper: Whisper White, Crumb Cake, Red Foil, Silver Glimmer

Accessories: Balloon Framelits, Christmas Greetings Thinlets, silver embossing powder, Silver Cording Trim, Softly Falling e.f., dimensionals


Built for Free Using: My Stampin Blog

Friday, September 11, 2015

Sweet Little Bird - Stampin' Up! Sprinkles of Life


  I have a lot of cards ready to be shared and many of them are made with the Sprinkles of Life set since I was preparing for a class using the set and matching punch.  I made a ton of samples and came to realize how versatile this set can be.  I mean I knew it was cute when I made this Bird on a Branch card or this Mega Ice Cream Cone card but really the sky's the limit with a set like this with a coordinating punch.

  Many of the images in Sprinkles of Life can be used for a variety of card types.  This one today is a thank you but you could easily change it to happy birthday, thinking of you or leave it blank.


  The base is Thick Whisper White and then popped up on dimensionals is a piece of the Corrugated cardstock in kraft.  I added a silver brad and topped it with an Old Olive candy dot.

  Next I put a strip of English Garden DSP across the center of the card.  To make the focal panel I cut a circle from Whisper White and then punched a cloud/cupcake top/ice cream scoop and used it as a mask to sponge some light clouds with Marina Mist ink.


  The branch is Soft Suede card stock stamped with Soft Suede ink and punched out.  I used Old Olive and Mossy Meadow for the leaves and glued them down to the ends of the branches.  The bird nest was created by putting 2 glue dots onto the branch and then smashing (yes that's a legitimate paper crafting technique!) a length of linen thread into them creating a nest shape.  The bird is stamped in Marina Mist ink onto Marina Mist cardstock and then punched out.  The whole circle is popped onto dimensional.

  The sentiment is stamped in Mossy Meadow ink.

  The layout is from a Freshly Made Sketch challenge from a few weeks ago.  The circle was just the right size to show off the smaller images of Sprinkles of Life.

  Thanks for looking!  Did you stamp today?

Stamps: Sprinkles of Life

Ink: Marina Mist, Soft Suede, Mossy Meadow

Paper: Whisper White Thick, Corrugated paper, English Garden DSP, Soft Suede, Old Olive, Mossy Meadow, Marina Mist

Accessories: silver brad, candy dots, dimensionals, Tree Builder punch, linen thread

Built for Free Using: My Stampin Blog

Thursday, September 10, 2015

Basket of Apples Thank You - Stampin' Up! Sprinkles of Life

  Well we are deep into the first week back at school!  It's taking a bit of adjusting getting used to having to be up and out the door earlier and having homework to do in the afternoon but the boys seem to be doing ok.  I think by Friday night we will all be pooped and ready to relax!

  I saw the Stampin' Royalty challenge which is to make a back to school themed card so I went with it.  I like to show my appreciation to the boys teachers, past and present by giving them all a card at the start of every school year.  I hope to convey all my appreciation for taking such great care with the boys over the years and how they've created such a great foundation for learning.  I think you can never say thank you enough and that goes double for our teachers.

  I used the Sprinkles of Life stamp set and coordination Tree builder punch to make this card.  It's not a new idea but it's so cute and really shows the versatility of this set that I couldn't resist making my own apple card.  I'm sure teachers are over the whole apple/teacher thing but it's still a cute card right?


 The base is Garden Green and then a piece of the Schoolhouse DSP.  I created the basket using the bottom of the cupcake stamp and stamped it onto Crumb Cake cardstock in Soft Suede ink.  The basket handles are made with the candle stamp with the flame cut off.  I attached them to the basket with a mini silver brad.


  The apples are stamped in Real Red ink onto Real Red cardstock and punched out.  I used the chalk marker to give a little bit of highlighting to the sides.  The apples and basket are mounted onto a tag cut with the Tags & Labels framelits.  I used the heavy weight Whisper White for the tag to make it more substantial.  

  I used a bit of linen thread and some NEW (!) Striped Ribbon from the Holiday catalog to finish off this tag.

  Thanks for looking!  Did you stamp today?

Stamps: Sprinkles of Life

Ink: Soft Suede, Real Red

Paper: Garden Green, Schoolhouse DSP, Heavy Whisper White, Crumb Cake, Real Red

Accessories: mini silver brad, Tags & Labels framelits, linen thread, Striped ribbon (Holiday catalog)

Built for Free Using: My Stampin Blog

Friday, September 4, 2015

Winter Trees - Fab Friday 72 - Stampin' Up! Sleigh Ride Edgelits

  Happy Friday!  Is everyone looking forward to the long weekend?  We have a lot of stuff planned so there is no chance to be bored at all!  This is our last hurrah before school starts for the boys on Tuesday then the schedules become pretty hectic.  It was nice not being on much of a schedule this summer but it's back to reality now!

 We have a new challenge starting today over at Fab Friday!  I missed being able to play along last challenge as I was out of town on vacation.  Check out the fun sketch this time around! Our design team always rocks it!


  And here is my card:


  Do you ever make a card and then look back at it and wonder how it could have possibly taken you as long as it did to put together?  Well, that was this card for me.  I spent an embarrassingly long time working on this one.  I had one idea in my head with different colors, papers, stamp sets, and embellishments and I don't think I used a single one of those item in the final card!  My stamp table is piled a foot high with stuff tried out and then rejected!

  The base is Crumb Cake, then a layer of Soft Sky.  I embossed the Whisper White layer with the new Softly Falling embossing folder.  It's such a nice delicate texture and I love it for a look of snow in the background here.

  Next, I cut a circle of Silver Glimmer paper and then another smaller circle of Shimmery White cardstock using the Circles Framelits.

  I gave the Shimmery White a watercolor wash all over with Soft Sky ink and an Aquapainter.  I added just a touch of Island Indigo towards the top to make it look more like the darkening night sky.


  The new Sleigh Ride Edgelits were used to cut out some cute little trees out of Mossy Meadow cardstock.  I just trimmed them off the long strip with my paper snips.  I used the far edge of the tree edgelit to cut the snow bank out of Shimmery White and just layered it across the bottom of the color washed circle.

  Little silver stars are stamped on the sky panel using the Holly Jolly Greetings stamp set and then the trees were glued down.

  To keep with the sketch I added some embellishments in the way of punched and die cut stars, candy dots and rhinestones over to the left side of the card.

  One Christmas card down about 64 more to go!  It's a good thing I'm starting early right?

  I hope to see your card in our Fab Friday challenge gallery for this sketch.  I love seeing how people interpret a sketch and always get a lot of ideas too!

  Thanks for looking!  Did you stamp today?

Stamps: Holly Jolly Greetings

Ink: Soft Sky, Island Indigo, silver

Paper: Crumb Cake, Shimmery White, Mossy Meadow, Silver Glimmer, Soft Sky

Accessories: Sleigh Ride Edgelits, Circles framelits, Stars Framelits, Softly Falling e.f., candy dots, rhinestones, stitched satin ribbon


Built for Free Using: My Stampin Blog

Thursday, September 3, 2015

Get Well Blossom - Stampin' Up! Garden in Bloom

     I didn't need a Get Well card when I sat down to stamp but it's always good to have one handy to quickly pop in the mail or drop off to someone along with some food.

  These colors kind of made me think of the end of summer/beginning of fall for some reason.  I really like how the flowers in the Garden in Bloom set look so different depending on the color choices.  Here are a few past cards to check out to see the different looks; Thank You Garden, Garden of in Colors, Thank You.

This one is stamped in Delightful Dijon.  The larger part was stamped off once and the smaller detail stamp is in full strength.  The outline is Soft Suede as is the center which is stamped off once.


,

 The background is embossed with the Fluttering folder and then a strip of English Garden DSP.  I dug through my scrap folder and found an already punched piece of Crumb Cake so I pierced an oval in the center for some extra detail and then layered the sentiment banner across it.

  Thanks for looking!  Did you stamp today?

Stamps: Garden in Bloom, Thoughts & Prayers

Ink: Delightful Dijon, Soft Suede, Marina Mist

Paper: Soft Suede, Whisper White, Crumb Cake, English Garden DSP

Accessories: Fluttering e.f., Decorative Label punch, dimensionals, paper piercer


Built for Free Using: My Stampin Blog