Friday, December 20, 2013

Classic Ornament

  I'm trying to get through all of my Christmas projects so that I can start sharing some projects with new Occasions and Sale-a-bration goodies!  It's the last day of school before winter break so there is a lot going on today!  I'm hoping I don't forget anything!

  Here's a quick card using the Keepsake Ornaments and matching framelits.  You can crank out a bunch of these at once by using the different ornament stamps and running the stamped images through the Big Shot with the matching dies.  You can fit several of the shapes on the cutting plate at once so you can do 3-4 at a time.  With the magnetic platform it goes really quickly!


Doesn't the Midnight Muse look terrific paired with Whisper White on a clean and simple card?

  The ornament is "hung" using the silver 1/8" ribbon in the Holiday catalog and a bow is added with a glue dot.  For a little bit more sparkle a mini punched ornament is glued on top of a silver glimmer paper circle.  The ornament is of course popped up!

 Thanks for looking!  Did you stamp today?

Stamps: Keepsake Ornaments, More Merry Messages

Paper: Midnight Muse, Whisper White, Silver Glimmer paper

Ink: Midnight Muse

Accessories: ornament framelits, Snow Flurry e.f., silver ribbon, circle punch, Christmas mini punch pack, dimensionals

Thursday, December 19, 2013

Winter Wonderland

Here's a fun little card...maybe you've got a scene like this out your window now or are hoping for a scene like this in time for Christmas??  I wouldn't mind a bit of snow but it will be in the 70s in Richmond this weekend!  What??  I know it's December isn't it??  I'm thinking it won't be a white Christmas here.


  We did this one at my last stamp club of 2013.  It's a fun bit of emboss resist (heat emboss and then brayer ink over the image).

  I've been partial to using the Gorgeous Grunge splatter stamp as snow lately and here we have it again.  How cool does that look with the Lovely As A Tree trees?  We used a little sticky note circle for the moon before we brayered over the embossing.

  A simple fork bow and some roughed up edges finish this card off.

  Thanks for looking!  Did you stamp today?

Stamps: Gorgeous Grunge, Lovely as a Tree, Sweet Essentials

Ink: Versamark, Smoky Slate, Cherry Cobbler

Paper: Cherry Cobbler, Smoky Slate, Whisper White

Accessories: white embossing powder, distressing tool, cherry cobbler seam binding ribbon
 

Friday, December 13, 2013

Snowglobe Ornament - Fab Friday 33

 We've made it though another week...this time of year it's certainly an accomplishment in my book!  So to celebrate get yourself to your stamping room/table/corner/basement and get to working on the last challenge of 2013 at Fab Friday!

  Here's what we've got for you this time:


  So many possibilities right?  I know a few of you still need to make some Christmas cards so jump on in with Fab Friday!


    I used a mix of old, current and brand new supplies to pull my card together.  I've been trying to use up some really old DSP so I had this woodgrain pattern out on my desk and I can't even remember the name!  Frostwood Lodge???  The new item is the embossing folder; Decorative Dots!  Look for this baby during Sale-a-bration as one of your free gifts!  Woo-Hoo!  Doesn't it look awesome with the Core'dinations paper?  I just lightly sanded the embossed pattern...so cool!

  After stamping and cutting out the ornament I covered it with Iridescent Ice for some fun sparkle to go along with the faceted buttons.  It made me kind of think of a snow globe, hence the title of my post.


 Go check out the rest of the design team cards and play along!

  Thanks for looking!  Did you stamp today?

Stamps: Lovely as a Tree

Ink: Early Espresso, Versamark

Paper: Soft Sky, Early Espresso, Soft Sky Core'dinations, Frostwood Lodge DSP(?), Always Artichoke, Very Vanilla

Accessories: Apothecary Accents framelits, Decorative Labels framelits, Ornament framelits, piercing kit, Decorative Dots e.f., Always Artichoke seam binding ribbon, Iridescent Ice, pearls, faceted buttons, corner rounder

Sunday, December 8, 2013

Clean and Simple Snowflake Re-done

It's not that I haven't been stamping because I have; I just haven't had time to photograph and edit and blog.  One of these days I'll figure out some kind of schedule! Maybe that could be a New Year's resolution?  At the rate I've been going lately 2014 might be the next time I post!

For now though this card might be an inspiration to others out there who may be a tad bit behind on their Christmas cards.  It's a re-do of a card I made a while ago.  I re-designed it for a private stamp-a-stack I was asked to do.  The original HERE had paper piercing all around the top panel that just wasn't conducive for a stamp-a-stack.  I changed it to score lines instead but they are kind of hard to see in the photo.

Here's the re-do:


  Thanks for looking!  Did you stamp today?

Stamps: Gorgeous Grunge, Snowflake Soiree

Ink: Smoky Late, Perfect Plum, Black

Paper: Perfect Plum, Basic Black, Whisper White

Accessories: Simply Score board, rhinestone

Saturday, November 30, 2013

Christmas Chickadee

  Where has the time been going lately?  Almost everyday I have good intentions of sharing a project and the next thing I know it's 10pm and I'm ready for bed!  Well tonight I'm going to try to get it in before bedtime!

  I made this card weeks ago using Friday Mashup 134 challenge.  I must not have gotten it finished or photographed and edited in time to enter it.  Isn't this a sweet little bird?


  Not much stamping on this one but lots of Stampin' Up! supplies.  The bird is made using the bird punch and various extra layering and trimming.  Thanks to Ann Fitzgerald for her wonderful chickadee tutorial.  I did not do each step but it was a great help for me for figuring out how I needed to cut the layers.

  I used the branch portion of the bird punch for the green leaves which I was kind of wanting to look like mistletoe hence the little white berries I made using the smallest adhesive pearls.

  There are lots of layers on the banner shape along with some textures.  And a sweet fork bow made with Very Vanilla seam binding ribbon.  Click HERE for a fork bow tutorial.

  Thanks for looking!  Did you stamp today?

Stamps: More Merry Messages

Ink: Soft Suede

Paper: Very Vanilla,  Wild Wasabi,  Garden Green, 1st Ed. Specialty paper, Smoky Slate, Basic Black

Accessories: Perfect Polka Dot e.f., Bird punch, seam binding ribbon, pearls, Finishing Touches Edgelits

Friday, November 29, 2013

Fab Little Santa - Fab Friday 32

Now that we've got Thanksgiving under out belts it's time to fully focus on Christmas....at least at my house!  I have to take one holiday at a time or I get too overwhelmed!  I hope everyone had a great Thanksgiving!

  It's time for another Fab Friday challenge....and we've got some great Christmas colors to get you started (or finished) on your Christmas projects!  The colors can totally work for non-holiday projects too so I'm really excited to see what you all come up with!

  Check them out!


  I totally went with Christmas since that is what I need most this time of year.  Isn't that little Santa cute??


 I know my photo looks kind of funky but I can't seem to photograph the Real Red/Gumball Green combo very well...you get the idea though!

  Santa is stamped on Whisper White with black Stazon ink.  Then I used my Real Red, Pink Pirouette and Soft Suede markers to color him in.  He's mounted on a piece of Coastal Cabana with a little curly label tag sticking out from the bottom.  The "merry" is from the Pennant Parade set and fits perfectly with the little punch.  Santa also has an adhesive pearl as the ball on his cap.

  The base of the card is Gumball Green.  Then I cut a Real Red scallop strip with the Tasteful Trim die.  Then I embossed it with the Perfect Polka Dots embossing folder for a bit of texture.  A little baker's twine bow was added to the scallop trim before adhering it to the card base.  It's Cherry Cobble baker's twine but it matches pretty well.

  The Santa panel is popped up on dimensionals for added interest.

  I hope you'll join in on this fun color combination and share your project over at Fab Friday.  Check out all the other design team projects as well....they are Fab as usual!

  Thanks for looking!  Did you stamp today?

Stamps: Color Me Christmas, Pennant Parade

Ink: Stazon  Markers: Real Red, Pink Pirouette, Soft Suede

Paper: Gumball Green, Real Red, Coastal Cabana, Whisper White

Accessories: adhesive pearls, small curly label punch, baker's twine, Perfect Polka Dot e.f., Tasteful Trim die, dimensionals


Friday, November 15, 2013

Fab Birthday Toast

How did another Friday come around so quickly??  I haven't posted in a week!  I guess time really does fly when you're having fun!  Come have some fun with us at the Fab Friday challenge!  Remember it lasts for 2 weeks so you can have even more fun!

Check out this sketch that Mindy has for us this week!  That tag shape has lots of possibilities doesn't it??


 Don't forget to check out the Fab Friday challenge site to see the design team projects as well as the other participants cards!  Like I said, fun!!

  Here is my contribution to the samples...  It's a birthday card for my father in law.  There are always plenty of adult beverages when we get together so I thought that using the Happy Hour set would be appropriate.


  Masculine right?  I inked up the glasses with my Basic Gray marker and then cut them out.  Then I stamped the "wine" using So Saffron and Cherry Cobbler, cut them out and glued them to the inside of the glasses.  Then glued the glasses to my tag.

  The sentiment was also inked up using markers.  The white twine was leftover from a previous Paper Pumpkin kit I think...the eyelet was retired a few years back but I still love to use them when I can.  First, because I get to use my Crop-a-dile to set them but also because they are a pretty cool element for a masculine card.  The Basic Gray taffeta ribbon finishes off the details.

  I hope you'll play along with us at Fab Friday!

  Thanks for looking!  Did you stamp today?

Stamps: Happy Hour

Ink: Basic Gray, So Saffron, Cherry Cobbler

Paper: Basic Gray, Very Vanilla, Howlstooth & Scarringbone DSP (retired)

Accessories: bakers twine, large eyelet (retired), taffeta ribbon, dimensionals

Thursday, November 7, 2013

Stitched Rudolph

A super quick post today; I've got some paper to cut for a private stamp-a-stack tomorrow evening and I feel like I'm running behind!

Here is the 2nd card we made at my regular stamp-a-stack last week.  How fun is this guy?  I love the fun bright Christmas colors on this one.  And who can resist a red glimmer paper nose on Rudolph?


  Some fun details to note on this card--

  …. the stitching on the Gumball Green strip is made with the chalk marker from the Holiday catalog and just free handed along the edges.  Doesn't it remind you of the wide stitched ribbon we had a long time ago?  I like the chalk marker because it seems a bit more reliable than the white gel pens…my gel pens always seem dried up or clogged whenever I go to use them!

  ….the Real Red panel (though hard to photograph) is embossed with the Chevron embossing folder…see how it mimics Rudolph's sweater??

  ….the glimmer paper nose…so cute I had to mention it twice!

  ….Rudolph is stamped on watercolor paper and colored with blender pens and ink pads.

  Thanks for looking!  Did you stamp today?

Stamps: Color Me Christmas

Ink: Stazon  For watercoloring: Baked Brown Sugar, Real Red, Gumball Green

Paper: Gumball Green, Real Red, watercolor paper, Soft Sky, Red Glimmer paper

Accessories: Chevron embossing folder, chalk marker, owl punch (for the nose), blender pens, dimensionals

Tuesday, November 5, 2013

Traditional Winter Pine

  It's election day here in Virginia and I'll be happy when the political call stop!  The boys have off from school and we're trying to figure out what to do….I wasn't organized enough to set up playdates beforehand so we're thinking maybe the movies or science museum.

I had my Christmas stamp-a-stack last week so I have a few new Christmas designs to share.  The ladies all really liked this one and several even purchased the Gorgeous Grunge set so they could make more of these cards.

 
 Isn't that fun??  Using the small splatter stamp to make snow over the pine tree?  I find that I'm liking Gorgeous Grunge more and more.

 The card base is Garden Green, then a layer of Cherry Cobbler.  The pine from Lovely As A Tree is stamped onto Crumb Cake in Garden Green ink.  Then using white craft ink the splatter stamp from Gorgeous Grunge is randomly stamped over the Crumb Cake layer.

  A star punched out of Champagne shimmer paper tops our pretty tree and Cherry Cobbler chevron ribbon backs our Christmas sentiment from the More Merry Messages stamp set.

  Thanks for looking!  Did you stamp today?

Stamps: Lovely As A Tree, Gorgeous Grunge, More Merry Messages

Ink: Garden Green, Whisper White craft

Paper: Garden Green, Cherry Cobbler, Crumb Cake, Very Vanilla, Champagne Glimmer paper

Accessories: Cherry Cobbler chevron ribbon, oval punch, star punch,


Friday, November 1, 2013

Thanksgiving Leaves - Fab Friday 30

  Whew!  Halloween is over!  How did everyone fare last night?  Sugar hangover this morning?  Kids still hopped up on candy?  I really feel bad for the poor teachers the day after Halloween!

  Now that we've checked October off the calendar let's move on to November and Thanksgiving.  I try to send a few cards for Thanksgiving and I thought this week's Fab Friday challenge had great colors to get me started!  To see all the other Design Team projects head on over to the Fab Friday challenge and be inspired and play along!

  Here they are:


   These are good colors for guy cards as well if you have some fall birthdays that you need cards for!

  Here's what I did:


   I thought the little leaf from Betsy's Blossoms would be cute for a fall card with our challenge colors.  After I stamped them out they almost looked like feathers….what do you think?  And then after looking at them some more I kind of saw Indian corn too.  Maybe it's just the colors that made me think of Indian corn.  Anyway, I used the leaves/feathers/corn as accents to highlight my Thanksgiving sentiment, "So Grateful".

  The large Very Vanilla panel is stamped with the Gorgeous Grunge splatter stamp (I know I'm probably over-using this stamp but I love it for just so many things!), then I embossed it with the Woodgrain embossing folder.  Corners were rounded using the envelope punch board.

  A strip of the burlap ribbon (in the Holiday catalog) goes across the middle and I layered my leaves/feathers/corn onto a piece of Early Espresso Core'dinations cut with a Labels Collection framelit.   I sanded the label lightly then pierced the edge using the matching piercing guide.  My chalk marker was used for the faux stitching.

  The sentiment was stamped in Early Espresso and then the strip was pierced using the piercing guide. An adhesive pearl added to the leaves/feathers/corn is the last detail.

 I hope you'll play along with us at Fab Friday.  The entries have been awesome and it's so hard to pick favorites!  Throw your hat in join us!

  Thanks for looking!  Did you stamp today?

Stamps: Betsy's Blossoms, Apothecary Art, Gorgeous Grunge

Ink: Early Espresso, Old Olive, Crushed Curry, Cajun Craze

Paper: Early Espresso, Very Vanilla, Old Olive, Early Espresso Core'dinations

Accessories: burlap ribbon, Woodgrain e.f., adhesive pearls, Label Collection framelits, chalk marker, piercing tool & guides, corner rounder, dimensionals


Saturday, October 26, 2013

Autumn Build a Banner

  I've had this Build a Banner Simply Created kit (page 31 Holiday Catalog) since the Holiday catalog was previewed for us demonstrators way back when in the summer.  I thought back then that it would be fun to create a banner for the fall and another for Christmas to hang in my front entry way.  Well, I finally got around to making my autumn banner last weekend.

  I really like this kit because you get 18 banners in 3 styles as well as the pattern and alphabet stencils so you can make any kind of banner you want.  You can also use the stencils on cardstock when making cards and scrapbook pages and you know how much I love double duty supplies!


  Here it is on the floor of my stamp room after I finished it.  I used Crushed Curry, Tangerine Tango, Soft Sky and Chocolate Chip for my colors.  Instead of using the Spritzer included in the kit for applying the colors I used sponged daubers so I could get a more saturated color.  First I did the background patterns then I did the letters.


  In between each letter I made a mini banner out of Sweater Weather DSP and added an Autumn Accents leaf.  I alternated the leaf color and shape as well as the embossed pattern.  Some are embossed with the Perfect Polka Dot folder and the others are embossed with the Woodgrain folder.  I tied a piece of linen thread around each leaf stem.


  Since my banner was quite long and I didn't want to use up all the jute twine that came with the kit I cut smaller lengths and just knotted the ends to link my banners instead of having the twine threaded through the back.  This also kept the banners from sliding around.  The smaller DSP banners are attached with sticky tape for a secure hold.  I just folded over the top of the DSP around the jute twine and adhered.


  And one final (giant) photo showing the banner hung up in my front entry.  It add some nice fall color to a very bland wall.  I'm looking forward to enjoying this banner through Thanksgiving and for many more fall seasons to come.

  It was really easy to put together and fun to add the extra accents.  What do you think I should make for Christmas?  "Merry"?  "Joy"?  I still  have 12 banners left so I could do both if I wanted to!

  Thanks for looking!  Did you stamp today?

Stamps: none

Ink: Crushed Curry, Tangerine Tango, Soft Sky, Chocolate Chip

Paper: Sweater Weather DSP, Crushed Curry, Tangerine Tango, Soft Sky

Accessories: Autumn Accents die, linen thread, Perfect Polka Dot e.f, Woodgrain e.f., sponge daubers, Build A Banner Simply Created kit

Wednesday, October 23, 2013

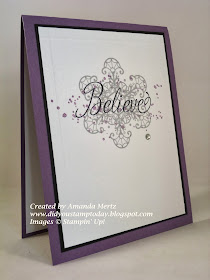
Clean and Simple Snowflake

 I'm trying to get this posted so I can enter this card in the CAS(E) this Sketch challenge for this week before it ends tomorrow morning.  It is such a fun sketch I just had to try it over the weekend and I'm just now getting a chance to edit the photo and get it posted.  It is cold so I think this is fitting right?  Not quite 'snow' cold but cold for Richmond in October!  I've busted out the wool socks and sweaters!

  Here's the sketch.  And remember it's trying to keep the card clean and simple, lots of open space.


How'd I do??


I pulled the color combination right from the Color Coach.  It was kind of winter-y I thought.  I didn't even notice it was the same color scheme as the challenge logo until just now.

I stamped off once before stamping the small splatters in Bermuda Bay, then I stamped the snowflake in Smoky Slate and finally the "Believe" in Stazon right over the top.

I paper pierced around the edge and added a few rhinestones to finish it off.  I think I will be making some more of this design to add to my Christmas card stash.

  Thanks for looking!  Did you stamp today?

Stamps: Gorgeous Grunge, Snowflake Soiree

Ink: Bermuda Bay, Smoky Slate, Black Stazon

Paper: Bermuda Bay, Smoky Slate, Basic Black

Accessories: paper piercer, rhinestones

Summer Field Flowers

  I guess now that it actually feels like fall here in Richmond I'll show a card we did over the summer at stamp club.  So backwards huh?  I'm still cleaning out my projects folders so you'll probably see some more older projects over the next few weeks.  Once I'm caught up I'm actually going to have to stamp for something new to show you!  What a hard life right?

  I don't think you can go wrong with the Field Flowers set….it is just so elegant and timeless, you can color it in or leave it, go vintage or clean and simple, pastels or brights.  So many options!


  The base is Wild Wasabi with a scored border using the Simply Scored tool…so easy!  Next is a layer of the Natural Composition Specialty paper.

  For the flower panel we did the stems in Wild Wasabi and then the blossoms with 2 step stamping.  First was Crisp Cantaloupe then Calypso Coral for the second layer.  This was my sample card and I think the Calypso Coral looks a bit bright so you might want to stamp off once for the CC layer for a more subtle look.

  The little embellishment is a Very Vintage Designer button with a wee bit of linen thread tied through the holes.  To make the cute bit of ruffle around the button cover the back with a few pieces of sticky strip being sure to keep them from hanging off the edge.  Next take a piece of Ruffle Stretch trim (I used Crisp Cantaloupe here) and just press it into the sticky strip all the way around slightly overlapping where you started.  Trim any extra ribbon.  Attach it to the card with more sticky strip, a dimensional or glue dot.

  I'll be back in a day or 2 with a more seasonal project that I finished over the weekend!

  Thanks for looking!  Did you stamp today?

Stamps: Field Flowers

Ink: Wild Wasabi, Crisp Cantaloupe, Calypso Coral

Paper: Wile Wasabi, Very Vanilla, Calypso Coral, Natural Composition Specialty paper

Accessories: sticky strip, Ruffle Stretch trim, Very Vintage Designer button, linen thread

Monday, October 21, 2013

Quick Sweet Treat

  The project I'm sharing today goes to show you how unorganized my summer was.  We made this project at my new catalog open house over the summer to introduce new products.  Yikes!  Summer was a long time ago!

  Anyway I thought it was a good one to share to not only tidy up my project folders but also because we're getting to the seasons of sharing little treats and goodies with Halloween, Thanksgiving and Christmas coming on fast.


  To make this tag we embossed the Chalk Talk stamp in white on black cardstock then cut it out with the matching framelit.  Next, the sentiment was stamped in Island Indigo on Whisper White and then punched out.  It's attached to the tag with a dimensional.

  The tag is tied to a small cello bag filled with Hershey kisses.  We used the new (well now not so new!!) chevron ribbon to tie everything together.

  Now to be more fitting with the season can't you see this in some pretty fall colors (think Sweater Weather DSP colors), with the fall Hershey kisses inside the bag.  Wouldn't that be a perfect table favor at Thanksgiving?

  Thanks for looking!  Did you stamp today?

Stamps: Chalk Talk

Ink: Versamark, Island Indigo

Paper: Basic Black, Whisper White

Accessories: Chalk Talk framelits, white embossing powder, dimensionals, oval punch, chevron ribbon

Friday, October 18, 2013

Simple Tree - Fab Friday 29

  And we're back again for another great challenge at Fab Friday!  Make some time in your weekend schedule and play along with us!  It a sketch this time around.


  So many possibilities!  Since I went for completely obvious on the last challenge with the Halloween colors I changed up some of the shapes this time but I hope you can still see the bones of the sketch in my card.


 I decided to go with a simple punched Christmas tree presented on an oval backdrop.  I've got some rustic/vintage type touches as well as some modern bling-y ones too…Hopefully they don't compete but compliment each other!

  The card base is Sahara Sand, then a layer of Soft Sky embossed with the Chevron embossing folder. I've detailed this panel with some vintage trinket brads with rhinestones added to the centers.

  The ovals are cut with the oval framelits.  The smaller one is cut from one of the Sweater Weather DSP patterns (see not just for fall cards!) and I stamped some Serene Snowflakes on it in Sahara Sand.  I used the chalk marker to do some faux stitching around the outside of the larger oval.

  The tree is punched with the Pennant punch out of Epic Day DSP and popped up with a dimensional.  The base is stamped in Sahara Sand, cut out and sponged with Soft Suede.

  I stamped the "merry" from Pennant Parade right onto the natural trim with Soft Suede ink.  I was surprised that the trim took the ink so well since it's fairly textured.  I will definitely be doing that again in the future!  To finish off that horizontal detail from the sketch I punched out some silver Glimmer paper stars and adhered them across the top of the trim.  Not that I don't love chevrons and all but I liked the stars for a Christmas card!


  I hope you'll head over to Fab Friday to see the rest of the design team's awesome projects!  They are Fab!

  Thanks for looking!  Did you stamp today?

Stamps: Serene Snowflakes, Pennant Parade

Ink: Sahara Sand, Soft Suede

Paper: Sahara Sand, Soft Sky, Sweater Weather DSP, Epic Day DSP, Whisper White

Accessories: vintage trinkets, rhinestones, chevron e.f., oval framelits, pennant punch, star punch, natural trim, dimensionals

Tuesday, October 15, 2013

Autumn Give Thanks

  I hope everyone had a nice weekend!  The boys and Matt had the day off yesterday so we enjoyed our 3 day weekend.  I kept thinking that it was still the weekend so I missed the deadline to enter this card into the challenge at Freshly Made Sketches but it's still a cute card; simple and square.

  The lesson at church and Sunday school this week was the story of the 10 men healed and only one man returned to thank Jesus for healing him.  Our pastors sermon was based on giving thanks so I wanted to make a thank you to send to him to say thanks for all he does for our congregation.


  I used that fun Sweater Weather DSP again!  And the Gorgeous Grunge stamp set again….see it stamped right on the DSP?

  The acorn is cut from Champagne Glimmer paper and tied with some linen thread.  It's adhered to a small Very Vanilla scallop circle with a dimensional.  The scallops are pierced and then lightly sponged.  I used the stamp-a-ma-jig to line up my sentiment from Lots of Thanks.  I inked the "give" and "thanks" separately with my Chocolate Chip marker and then stamped onto Soft Sky.  Instead of the typical banner that I'm obsessed with and probably overuse I make a little scroll by rolling the end of the strip around my paper piercer.  I sponged the sentiment scroll as well.


  So who do you need to give thanks to?  Put a card in the mail today!

  Thanks for looking!  Did you stamp today?

Stamps: Lots of Thanks, Gorgeous Grunge

Ink: Chocolate Chip

Paper: Chocolate Chip, Very Vanilla, Sweater Weather DSP, Soft Sky, Champagne Glimmer

Accessories: Autumn Accents die, small scallop circle punch, paper piercer, line thread, dimensionals

Sunday, October 13, 2013

Cantaloupe Christmas

  So much for my "every other day" posting goal!  We've had a busy last few days but I did get some stamping time on Friday and after some photography woes I think I have a decent enough photo to share.

  When I sat down to stamp I had a few challenges that I was looking to join and the one at CAS(E) this Sketch caught my eye.   I thought the 3 shapes could be fun to work with so I pulled out a color combination that I had seen a while ago on Pinterest and decided a non-traditional color Christmas card would be cool.  Here's the sketch:


  I had some fun with my Ornament Framelits and first cut out the larger ornament from the middle of a piece of Whisper White.  Then I backed the opening with a piece of Crisp Cantaloupe embossed with the Chevron embossing folder.


 I stamped the small ornament in Crisp Cantaloupe ink.  I cut it and another small ornament out of the Winter Frost DSP.  Doesn't that Smoky Slate look great with the Crisp Cantaloupe and Black?

  I popped the small ornaments up with dimensionals; the Smoky Slate using one dimensionals and the CC one with 2 stacked up so it would sit a bit higher thank the other one.

  I embellished the large ornament with a black taffeta knot, the CC one with a black Glimmer brad and the SS ornament with a silver punched star and a black candy Dot.

  The sentiment is stamped in black and then I added a few rhinestones to sides.

  Thanks for looking!  Did you stamp today?

Stamps: Keepsake Ornaments, Sweet Essentials

Ink: Black, Crisp Cantaloupe

Paper: Basic Black, Whisper White, Crisp Cantaloupe, Winter Frost Specialty DSP, Silver Glimmer

Accessories: Ornament framelits, black taffeta ribbon (retired), glimmer brad, candy dot, star punch, rhinestones, dimensionals

Tuesday, October 8, 2013

Sweater Weather Thank You

  I'm just in under the wire here to try to keep up with my every other day blogging plan!  I better type fast right?  =)

  Here is another card that we did last month at Stamp Club.  I wanted to show off more of the Sweater Weather DSP and since I couldn't decide on just one pattern for the card I used 3!


  The base is Sahara Sand with another Sahara Sand layer embossed with the the Woodgrain folder.  Then the 3 panels of Sweater Weather DSP. 

  The leaves were cut with the Autumn Accents die.  The orange leaf is another Sweater Weather DSP pattern!  The oak leaf is from the Wonderfall set and inked up in Sahara Sand.  Quick tip for stamping on the Autumn Accents die cuts…ink up your stamp and turn it so the rubber is facing up.  Line up the leaf shape with the stamp and lay your cardstock onto the stamp and press lightly to transfer the ink.  This way is so much easier thank trying to line it up the other way.  Both leaves are sponged with a bit of Chocolate Chip ink.

  The sentiment is from Lots of Thanks inked with Chocolate Chip and punched out with the scalloped circle punch.  It is layered on a Crushed Curry punched circle and both are sponged as well.  A linen thread bow is adhered with a glue dot.

  Don't forget to check out my Stampin' Up! online store for the fun new Weekly Deals every week.  Great products at great prices for just a week at a time.  Every Tuesday there will be a new batch of items.  If I didn't already have most of those items I would be putting in an order myself!

  Also, for the month of October Stampin' Up! will have a Thank You Thursday discounted item announced on the Stampin' Up! blog.  The item will only be available for one day and while supplies last.  Check it out on Thursday!  

  And last but not least... Have you ever wanted to get some of the great perks of being a Stampin' Up! demonstrator?  Do you like the idea of a 20% discount on your favorite products? How about a chance to earn extra cash, along with tons of exclusive creative ideas at your fingertips? For two weeks only, you can join the Stampin' Up! family for just $25 and experience all this and more.  To celebrate Stampin' Up!'s 25th anniversary a special Starter Kit is available until Oct. 21.  For just $25 get $26.95 worth of product of your choice and all the business supplies you need to get started.  And you get to use your demonstrator discount to order more of your wish list!  Contact me if you want all the details!

  Thanks for looking!  Did you stamp today?

Stamps: Wonderfall, Lots of Thanks

Ink: Sahara Sand, Chocolate Chip

Paper: Sweater Weather DSP, Sahara Sand, Very Vanilla, Crushed Curry

Accessories: Woodgrain e.f., Autumn Accents die, linen thread, scalloped circle punch, circle punch

Sunday, October 6, 2013

Color Block Birds

  I hope everyone has had a great weekend so far!  We've been busy but without a lot to show for it.  Our backyard camping didn't happen on Friday night much to the boys' dismay.  We live in a subdivision and some of our neighbors backyard spotlights were never turned off and then another neighbor sat on his deck smoking cigars well into the night…yuck!  So with the brightness of daylight and the stink of cigars in the tent it just wasn't going to work out.  I guess I'm just picky or something with my sleeping conditions!  =)  Luckily we have a camping trip planned with Cub Scouts soon.

  Today I'm sharing a card that my club ladies made last month.  This is a quick card that looks like it takes more time than it does.  And it's a good way to use up some paper scraps that you have laying around and that's always a bonus!


 First, we layered some of our colored cardstock strips across a panel of Whisper White.  The overhanging edges were trimmed off to match the Whisper White panel.  Next, using one of the Chalk Talk framelits we cut out where we were going to stamp.  Without adhering the color block layer we lined it up on the Whisper White base and then stamped right through the opening.  That way if you mess up the image or the coloring you don't have to start fresh by making a new color block panel or try to rip it off to re-use it.

  The image was stamped in Stazon (aren't those birds sweet?).  We used ink pads and blender pens to color in the birds and heart.  Isn't this a great combination of 4 of the 5 newest set of In Colors?

  Once we were finished coloring we added dimensionals to the back of the color block panel and adhered it to the base lining up the birds in the center of the cut out.  A Whisper White stitched bow is the final touch for this card.

 Thanks for looking!  Did you stamp today?

Stamps: For the Birds

Ink: Stazon, Pistachio Pudding, Coastal Cabana, Baked Brown Sugar, Strawberry Slush

Paper: Whisper White, Pistachio Pudding, Coastal Cabana, Baked Brown Sugar

Accessories: Chalk Talk framelits, stitched grosgrain ribbon, dimensionals, blender pen

Friday, October 4, 2013

Spooky Spider

  This is going to be a quick one for today.  I have a busy Friday ahead of me…first a private stamping lesson, then some volunteering at the boys school, then getting geared up for some weekend fun.  Matt and the boys want to "camp" in the backyard tomorrow night…and as I was told by Alex, "Mommy you can sleep in the tent with us now since we got you a sleeping bag last Christmas!".  Oh joy!  =)  At least I think I can sneak inside to my own bed once they are all asleep since they are all quite heavy sleepers!

  To start the day off right we have another great challenge at Fab Friday!  Check out these colors!  Are they Halloween or what?  I'm actually curious to see what kind of non-Halloween cards you all come up with.  Halloween was all I could see when I pulled the colors out to start my card and I just couldn't get away from that idea!


  I didn't get a new Halloween stamp set this year since I've finally come to terms with the fact that besides maybe one project for stamp club I don't really make Halloween projects.  So when lacking in the themed stamp set department I turn to punch art.  Check out this creepy crawly!


  I played around with the color combos a lot for this one and I'm still not perfectly happy but it is what it is.  I do like how the spider came out though.  Do you recognize his legs?  Hello hexagon punch!  Isn't that just another fun use for that punch?

 I did cheat a little and there is some Basic Gray in the DSP but it was the only DSP that I had that would work for a spider body and I didn't want to make him too life-like with a black body!  Ew!

  I hope you will go check out the all star design team creations at Fab Friday and then play along!  Will you go Halloween or not with these colors?

  Thanks for looking!  Did you stamp today?

Stamps: Designer Typeset (photopolymer)

Ink: Versamark

Paper: Basic Black, Rich Razzleberry, Old Olive, Howlstooth & Scarringbone DSP (retired), Whisper White

Accessories: 1 3/8" circle punch (body), 1" circle punch (head), Owl punch (eyes), Hexagon punch (legs), candy dots, white embossing powder, edgelit, Pefect Polka Dot e.f., stitched ribbon, baker's twine, dimensionals

Wednesday, October 2, 2013

Retro Birthday Cake

  Here is a card that came together quickly using the Color Coach and a sketch challenge for inspiration.


  I thought the current challenge at Hand Stamped Sentiments was a fun layout and that circle panel was just right for a cake.  Once I decided on my stamp set I wanted to find a color combination that worked for this sweet treat.  Hello Color Coach!  Always a great combination to be found in it!

  I stamped the cake and then cut out and popped up the layers on the circles.  I added the fun ruffled stretch ribbon on the backside and then layered 2 pieces of ribbon underneath.  I adhered the whole thing on 2 panels of Winter Frost Specialty DSP.  Calypso Coral candy dots finish off the corners.

  Thanks for looking!  Did you stamp today?

Stamps: Make a Wish

Ink: Coastal Cabana, Calypso Coral, Crushed Curry (marker for the candle flames)

Paper: Coastal Cabana, Whisper White, Winter Frost Specialty DSP

Accessories: circles framelits, chevron ribbon, ruffled stretch ribbon, ruffled ribbon (retired), candy dots, dimensionals

Monday, September 30, 2013

Glittery Birthday Gift

  It seems that even though the boys have been in school for almost a full month now I'm still having trouble getting organized enough to post projects regularly.  My house is clean, we have groceries, I've even done some organizing of drawers, closets and cabinets but the blogging just isn't happening as much as I'd like it too.  But I do have a card to share today so that's something right?   Maybe I'll keep my blogging clean and simple like the card??


  I made this card using the just ended Freshly Made Sketches challenge.  I am a few hours late getting it posted but it's a fun sketch nonetheless.

  The 4 background panels are embossed with the Stripes embossing folder.  I just turned the squares on an angle when I sent them through the Big Shot.  I thought it gave kind of cool look that echoes the stripes on the gift.


  Do you recognize this image?  It's from the Color Me Christmas set!  Not just for Christmas apparently.  I stamped it with Stazon on watercolor paper.  I colored it with markers and then used an Aquapainter and Sahara Sand ink pad to make a very light shadow around the gift.  I covered the bow/ribbon with Dazzling Details and then popped it up with dimensionals.  Rhinestones in the four corners finish off this birthday card.

  Thanks for looking!  Did you stamp today?

Stamps: Color Me Christmas

Ink: Stazon, Sahara Sand, Wisteria Wonder & Soft Sky (markers)

Paper: Sahara Sand, Wisteria Wonder, Soft Sky, watercolor paper

Accessories: Stripes e.f., rhinestones, Dazzling Details, dimensionals

Wednesday, September 25, 2013

Washi Grunge

Happy Wednesday!  I had a great day yesterday stamping with my stamping ladies.  I hope they had a good time too.  It's always fun to catch up and visit with everyone.  If you're in the Richmond, VA area and would like to join us sometime just give me a shout!

Here is one of the cards we made yesterday.  It's a really fun one and is perfect for those preteen/teen birthdays.  Several ladies commented last night that they needed a card for that age group!  The Gorgeous Grunge set makes quick cards with all the fun splatters and streaks. And if you get some ink smudges on it by accident it's totally OK….it blends right in!


The card base is Calypso Coral and then a layer of Basic Gray.  A piece of Whisper White is stamped with Basic Gray splatters and a Calypso Coral streak.  The Epic Day washi tape is just adhered to the cardstock.  Super easy to reposition too!

The "Happy Birthday" from the Blue Ribbon set is stamped in Basic Gray onto Calypso Coral and then punched out with the large oval punch.  To jazz it up we made chevrons using the hexagon punch!  A very cool different use for that punch!  I love it when you can use a tool for more than one purpose.  The chevrons are adhered to the oval and then a few rhinestones to bring the eye in.  All that is popped with dimensionals.

See…..Easy right?

  Thanks for looking!  Did you stamp today?

Stamps: Gorgeous Grunge, Blue Ribbon

Ink: Basic Gray, Calypso Coral

Paper: Whisper White, Basic Gray, Calypso Coral

Accessories: oval punch, hexagon punch (chevrons), rhinestones, Epic Day washi tape, dimensionals, rhinestones


Saturday, September 21, 2013

Sweet Christmas Stocking

  I used the great sketch from Freshly Made Sketches this week to do up a quick Christmas card to continue to build my stash.  I used the colors from Hand Stamped Sentiments since they seemed perfect for Christmas!


  The base is Baked Brown Sugar and then a layer of Gumball Green Core'dinations embossed with the Snow Flurry embossing folder and lightly sanded.  The DSP is the retired Orchard Harvest pack from last fall.  Luckily I have just enough left to make a few more cards for my stash.  I embossed the "merry" in Early Espresso embossing powder.   


  I had some strips of watercolor paper leftover from a club project that are just the right size for the banner element of the sketch.  I stamped the stocking in Stazon and then used an Aquapainter and ink pads to watercolor.  I added Gumball Green ribbon and 2 retired metallic brads and then popped the banner up with dimensionals.


  The final touch for this card is the Dazzling Details on the white parts of the stocking design.  

  Thanks to both challenges for helping me get going on my Christmas cards!

  Thanks for looking!  Did you stamp today?

Stamps: Color Me Christmas, Pennant Parade (merry)

Ink: Stazon, Gumball Green, Raspberry Ripple, Baked Brown Sugar, Versamark

Paper: Baked Brown Sugar, Gumball Green Core'dinations, Orchard Harvest DSP (retired), watercolor paper

Accessories: Snow Flurry e.f., Dazzling Details, brads, stitched ribbon, Early Espresso e.p., aquapainter

Friday, September 20, 2013

Mini Polaroid Frames - Fab Friday 27

Oh my goodness do we have a fun sketch for you today at Fab Friday!  There are sooooo many possibilities with those 4 squares….keep the squares, use a different shape instead of the squares, flip it, lots of layers, CAS….It might be hard to narrow it down!


  I stuck with the squares and made some cute little mini polaroid type frames for the adorable animals of the Zoo Babies set.  I kind of took my inspiration from this large scale polaroid frame card that I made over the summer.  I thought it would be cute to use some of the smaller animal stamps from this set and put them in mini frames.


 I used the awesome square framelits to cut out the centers and then stamped the animals on another smaller piece of Whisper White and then popped the frame on top with dimensionals.  I defined the edges of the frames by lightly sponging some Baked Brown Sugar ink on the outside and also using the matching marker to lightly run along the inside of the frame edge.

  Using a marker I inked up just the "smile" portion of the "so many smiles" stamp from Petite Pairs and stamped it directly onto the Sweater Weather DSP and added an Old Olive candy dot.  Don't you love this Sweater Weather DSP pattern??  When Crushed Curry came out as an In Color years ago I wasn't a big fan but I think this paper is turning that around.  And when was the last time I used Old Olive??  Like 2 years ago before Lucky Limeaid?  OO is still a great color and totally rocks with these other 2 colors.

  I hope you'll head over to Fab Friday and check out the other Design Team samples and then play along with us.

  Thanks for looking!  Did you stamp today?

Stamps: Zoo Babies, Petite Pairs

Ink: Old Olive, Crushed Curry, Baked Brown Sugar

Paper: Baked Brown Sugar, Old Olive, Sweater Weather DSP, Whisper White

Accessories: markers, Square Framelits, candy dot, dimensionals

Wednesday, September 18, 2013

Hexagon Congratulations

Here's a quick card that with just a change of sentiment can be used for just about any occasion!  The hexagon punch and Six Sided Sampler stamp set make this one really easy!


 My stamping ladies made this one last month at my stamp-a-stack.  Don't you love these colors together?  If you can't get enough of this combo check out the Eastern Elegance DSP on page 154 of the catalog.  Great patterns huh?

  Anyway, back to the card.  The base is Coastal Cabana with the hexagon outline stamp stamped in the same color ink.  This is an easy stamp to line up in a pattern using the clear mount version.  A word of wisdom (cause I learned the hard way!), if you keep getting extra ink inside this outline stamp no matter how gently you ink up (remember with the new firm foam pads it's tap tap tap, not mash mash mash!) just trim out the extra rubber inside the design.  I used a craft knife to just trim it out….now no more ink shadows in my hexagons!  Don't be afraid to trim sentiments from images, cut the edges of the rubber off or alter your stamps to make them work for you!  You're not going to reach for a cool image if you always get an ink shadow or you hate masking off the sentiment.  Just remember to trim your clear mount stamps looking at the rubber side and not the label side…sometimes they aren't lined up exactly and you might trim your image by mistake!

  We used Crushed Curry, Smoky Slate for the other hexagons and then punched them out.  To get the circle in the center of just stamp your image then line up a small circle punch inside the hexagon…pretty easy to eyeball, and then punch out the hexagon.

  A little baker's twine knot tied right around the hole and a candy dot brad with rhinestone (and popped up) finish this one off.

  Thanks for looking!  Did you stamp today?

Stamps:  Six Sided Sampler, Sweet Essentials

Ink: Coastal Cabana, Smoky Slate, Crushed Curry

Paper: Coastal Cabana, Whisper White, Smoky Slate

Accessories: Hexagon punch, circle punch, brad base, rhinestone, baker's twine, dimensionals

Friday, September 13, 2013

Butterfly Sympathy

Last month I held a stamp-a-stack for my customers and it was requested that one of the card designs be a sympathy card.  No one ever wants to sit down and make one of those.  It's always easier just to have one ready to go.  I know I never have much creativity in me when I have to sit down and make one.  I'd much rather have it designed and stamped before I need it.


 Each person made 4 of these and I also has some get well and generic thinking of you sentiments out that they could use instead of sympathy.

  The base is Naturals White and then a layer of Pear Pizzazz.  Another layer of Naturals White with a an embossed strip of Early Espresso Core'dinations tied with a Whisper White taffeta ribbon.  We used the Modern Mosaic embossing folder and then lightly sanded the raised pattern.

  Before adhering the top layer of Naturals White we used the small butterfly punch and punched through the edge of the Early Espresso layer so the Pear Pizzazz shows through the negative space.  We added some pearls for the body and then a few more punch Pear Pizzazz butterflies.  To make the butterflies have some dimension just adhere the centers and bend up the wings a bit.  For the flight paths of the butterflies just use a paper piercer and free hand the the pattern.  Trust me it's easy!

  I hope you have fun things planned for the weekend.  Don't forget to have some stamping time too!  =)

  Thanks for looking!  Did you stamp today?

Stamps: Thoughts and Prayers

Ink: Early Espresso

Paper: Naturals White, Early Espresso Core'dinations, Pear Pizzazz

Accessories: small butterfly punch, Modern Mosaic e.f., pearls, paper piercer, taffeta ribbon


Wednesday, September 11, 2013

Clean and Simple Christmas

  I know you're thinking,  "really Amanda?? Christmas?  It's barely September and the temps are still 90 here in Virginia this week…."  I know I know!  I should be working on fall cards and getting birthday cards ready but this Christmas card idea just came about and I had to go with it.  I even have all the stuff cut and stamped to put together 10 more of this design so I can start whittling away at the 100+ cards I need for Christmas this year.

  I used 2 challenges for this card. The layout is from CAS(e) this Sketch and the colors are from The Paper Players.


  I went very CAS but with a few little details…I used black embossing powder for the sentiment.  Heat embossing always adds a wow factor and it give a little bit of shine that looks great against the Whisper White background.


I stamped the ornament in Rich Razzleberry, cut it out with the framelits and then added Dazzling Details to the little dots in the pattern.  I popped it up with dimensionals and then dressed it up with a Pool Party bakers twine bow and "hung" it with a rhinestone.


 I rounded the corners of my Whisper White panel to soften the lines a bit.

  I want to apologize for the poor photos lately.  There is something inside of the lens of my camera that is making a dark smug along the left side.  You can't see it on the camera lens but it shows in all the photos when I use the macro lens.  It's like a little fuzz or something and the focus is off because of it.  Added to the camera problem one of the boys knocked one of my lightbox lights on the floor.  It seemed to be OK at first and then it stopped working yesterday.  I tried changing the lightbulb but still nothing.  So now I've got a camera issue and an uneven lighting issue.  If anyone has a good cheap camera suggestion I'm all ears!  I just need something that will take good up close photos of cards.

  Thanks for bearing with me during these technical difficulties!  Who knew it would be so hard to share some papercrafting huh?

  Thanks for looking!  Did you stamp today?

Stamps: Delightful Dozen, Gorgeous Grunge, Ornament Keepsakes

Ink: Versamark, Pool Party, Rich Razzleberry

Paper: Pool Party, Basic Black, Whisper White

Accessories: corner rounder punch, Ornament framelits, Dazzling Details, black embossing powder, dimensionals, baker's twine, rhinestone