My sons preschool does a Halloween carnival every year for the kids. They have food, and games where they can win small prizes or candy and the kids get to come in their costumes. The school asks that the parents donate the prizes for the games and of course I have to make something! Last year I made these
magnets from dominoes and from what I heard they were a sought after prize. So this year I again wanted to do something stampy/crafty because you know I'm not going to just go out and buy some candy....it needs to be something cute!
I found some Halloween pencils in the Target Dollar Spot and they all had cute little Halloween pictures on them. I decided I would make toppers for the pencils using the pictures as my inspiration. I think I made 28 pencils-- there were 2 skull & crossbones pencils that I just didn't think were for the 3-5 year old crowd. I made witches, cats, bats, jack-o-lanterns, and candy corn toppers.
Here is a photo of all of them...
They are all punch art except for the candy corn. I basically made them all, added an extra panel on the back for support and stuck them to the top of the pencils with sticky strip. All of the pieces are adhered with my 2 way glue pen (great way to get all these little pieces stuck where they needed to be).
Here is the little bat. I used the instructions found
here for the body and wings. For the eyes I used the owl punch and for the fangs I used the tips from the small star punch. I sponged the edges with white craft ink.
Supplies used: Black & Whisper White cardstock, owl punch, large oval punch, 3/4" circle punch, small star punch, white craft ink
I know a lot of people don't like candy corn but I do....I mean I'm not going to eat an entire bag but I like the colored sugar enough for a handful or 2!
For this one I adhered Daffodil Delight & Pumpkin Pie cardstock to a strip of Whisper White and then used my paper trimmer to cut the triangle shape. I used the corner rounder twice on each corner to round them off...no one likes sharp edged candy right?
Supplies used: Daffodil Delight, Pumpkin Pie, Whisper White cardstock, paper trimmer, corner rounder
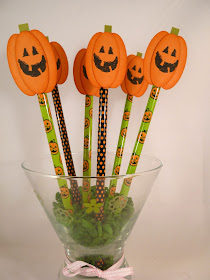
The pumpkin is the same as the one I made
here on my 2 Tags Treat basket and I just added the Jack-o-Lantern face from the Autumn Harvest stamp set.
Supplies used: Pumpkin Pie & Old Olive cardstock, black ink, large oval punch
For the kitty I followed the instructions
here but changed him to black and used the photo corner punch for the ears. I also used the heart from the owl punch and trimmed it down for the nose. This little guy is so cute and chubby...not really a Halloween cat but I didn't want to scare the kids!
Supplies used: 1 3/4", 1 1/4" & 3/4" circle punches, owl punch (circle for nose & heart for mouth), photo corner punch (ears), large oval punch (tail), googlie eyes, black ink (sponging)
For the witch I got inspiration from all over and kind of combined different ideas using the punches I had on hand.
The top of the hat is the large heart punch with the edges cut off and the word window punch for the brim. The head is the ornament punch (so cool! this punch can be used all year round, not just at Christmas!). For the face I again used the circle from the owl punch and trimmed a little off the bottoms for the eyes and used the smallest circle for the pupils. The nose is the same 2 circles--a witch has to have a wart right? The mouth is hand drawn with my black marker. The hair is the scallop oval punch cut in half.
Supplies used: Black, Basic Gray, Whisper White & Certainly Celery cardstock, Large heart punch, word window punch, ornament punch, owl punch, scallop oval punch
And here is how all the pumpkins look attached to the pencils. Hopefully the kids like them but even if they don't I had a lot of fun making them. It's funny how each separate punch art piece has it's own little personality even though they are made out from the same materials!
I hope everyone has a great weekend! Happy Stamping & Thanks for looking!


